Adding and Editing Subscription Plans
- 4 Minutes to read
- Print
- DarkLight
- PDF
Adding and Editing Subscription Plans
- 4 Minutes to read
- Print
- DarkLight
- PDF
Article Summary
Share feedback
Thanks for sharing your feedback!
Note
Editing a plan that has been assigned to users can change what the users can do. For example, if you change a plan by changing the cloud drive license from Full to None, all users with the plan will not be able to access their cloud drive. The cloud drive content is not deleted from the portal, so assigning users with a plan that includes the Full cloud drive license will re-enable users to access their files.
To add or edit a subscription plan:
Select Provisioning > Plans in the navigation pane.
The PLANS page is displayed.
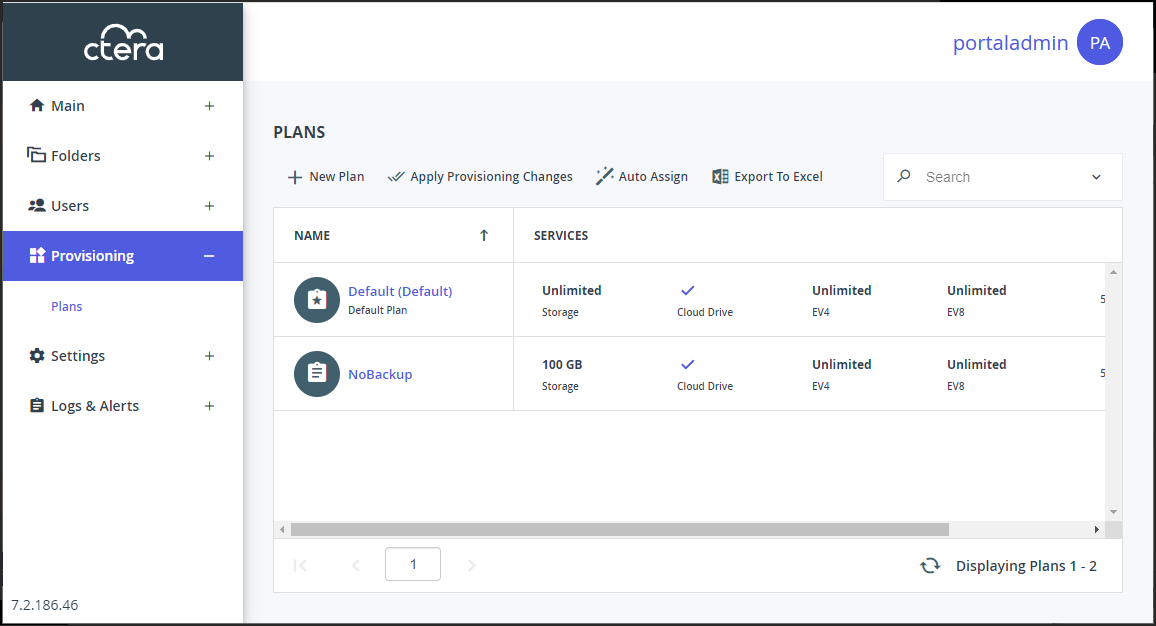
To add a new plan, click New Plan.
Or,
To edit an existing plan, click the plan's name.
The plan wizard opens, displaying the Services window.
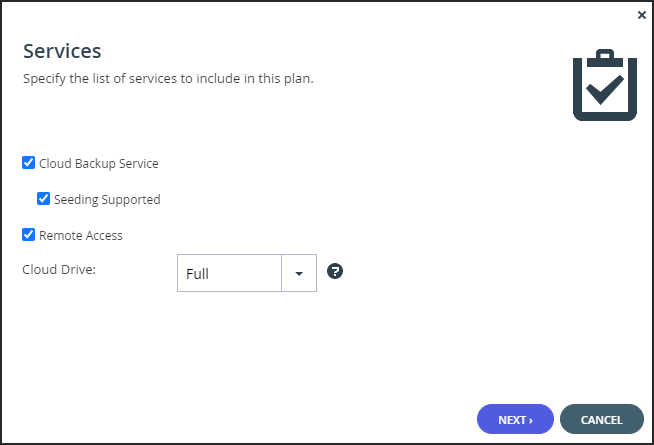
Choose which services to include in the plan:
Cloud Backup Service – The Cloud Backup Service is included in the subscription plan.- Seeding Supported – Include backup seeding in the subscription plan.
Remote Access – Include remote access in the subscription plan. Remote access includes both access to the device's management interface via the CTERA Portal and a dedicated URL, access to the user's files via the CTERA Portal and a dedicated URL.
NoteDevice owners can disable remote access via the device's management interface.
Cloud Drive – Select the license type you want.
- Full – The CTERA Portal can be accessed by users.
- Connect – Users can access their folders and files and add to them. Users cannot sync their files nor share them with other users.
- None – Cloud drive services are not included in the plan.
Antivirus Service – Include the Cloud Drive antivirus service in the plan. When antivirus is activated, files are scanned for malware automatically and transparently, before they are downloaded for the first time. The Cloud Drive antivirus service requires an additional license.
Data Loss Prevention (DLP) – Include the Cloud Drive DLP service in the plan. When DLP is activated, files are scanned for sensitive data automatically and transparently, based on the DLP policies set in Symantec Data Loss Prevention. Content that is defined as sensitive is identified and the file cannot be downloaded, viewed or copied by external users.Click NEXT.
The Plan Details window is displayed.
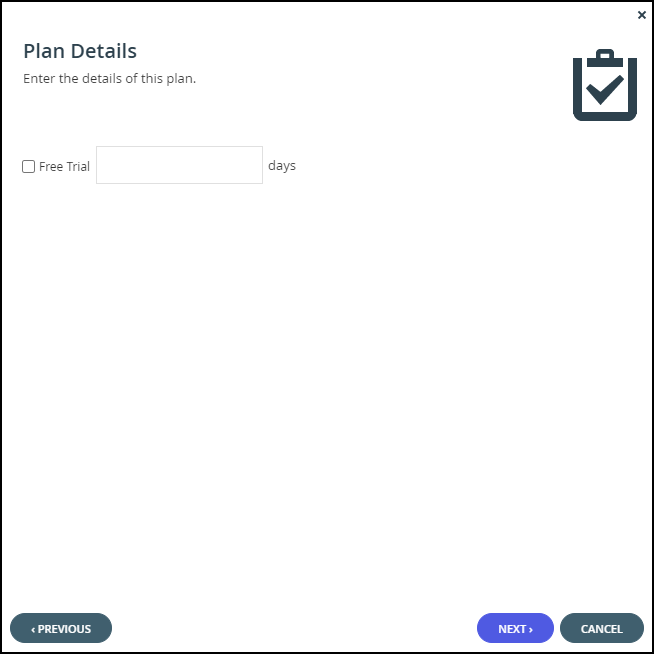
Set the plan details.
Allow users to join this plan – Allow users to subscribe to this plan. If this option is not selected, the subscription plan is invisible to end users, and only administrators can assign users to this plan.
Free Trial – Include a free trial period in the plan. Enter the number of days that subscribers can receive the plan for free.Click NEXT.
The Snapshot Retention Policy window is displayed. This policy applies to both Cloud Drive snapshots and backups from CTERA Edge Filers and CTERA Agents.
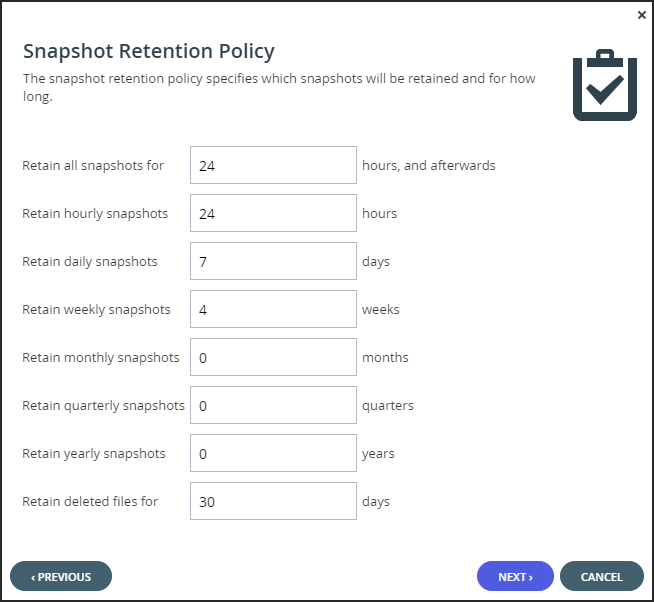
Set the snapshot retention policy.
Retain all snapshots for – The number of hours after creation that all snapshots are retained.
Retain hourly snapshots – The number of hourly snapshots that are retained.
Retain daily snapshots – The number of daily snapshots that are retained.
Retain weekly snapshots – The number of weekly snapshots that are retained.
Retain monthly snapshots – The number of monthly snapshots that are retained.
Retain quarterly snapshots – The number of quarterly snapshots that are retained.
Retain yearly snapshots – The number of yearly snapshots that are retained.
Retain deleted files for – The number of days to retain deleted files. The minimum is 1 day.NoteFor an explanation of each policy, see Managing Snapshots (Backups.
Click NEXT.
The Plan Name and Description window is displayed.
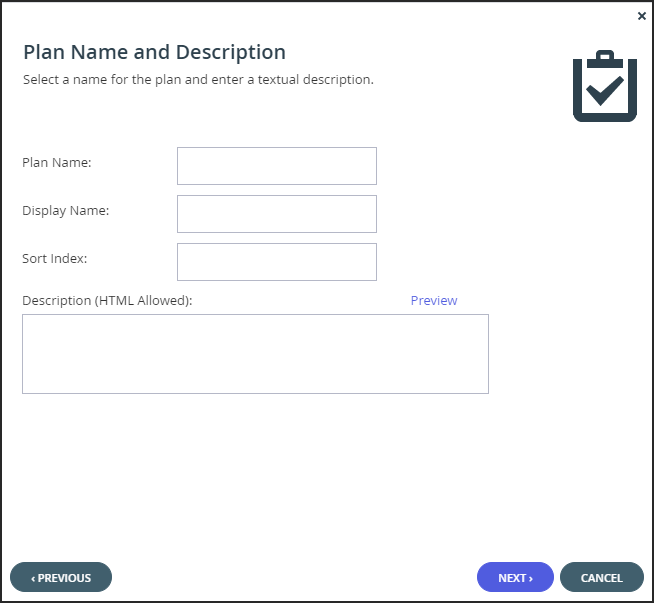
Specify the plan name and provide a description.
Plan Name – A name for the plan. Only letters and numbers can be used for the name.
Display Name – The name to use when displaying this plan in the end user portal and notifications.
Sort Index – Optionally, an index number to assign the plan, to enable custom sorting of the plans displayed to end users in the Subscribe to Plan wizard.
Description – A description of the plan. HTML tags can be used in the description. Click Preview to open a new page in the browser displaying the plan description.Click NEXT.
The Quotas window is displayed.
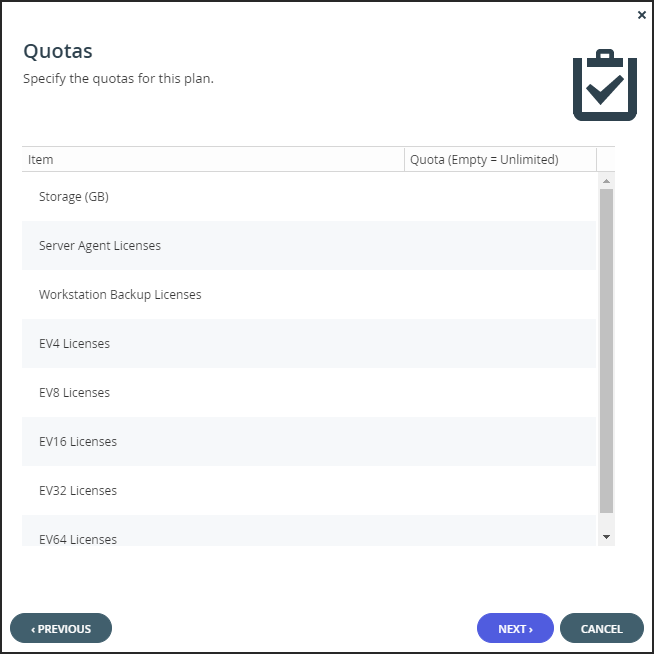
For each item, click in the quota field and enter the number to include in the plan.
For example, to include 100GB of storage space, click in the Storage (GB) item's quota field and enter 100.NoteThe quotas must not exceed the number specified in the license. An error message is displayed when you attempt to assign a user to a plan with a quota that exceeds the number specified in the license. The items shown are the items that are licensed.
Click NEXT.
The Wizard Completed screen is displayed.Click FINISH.


If you edited an existing plan, the changed plans are applied to all users every day at midnight. You can use apply the plan changes immediately by clicking Apply Provisioning Changes. The Apply Provisioning Changes window is displayed and the changes are applied. Either click CONTINUE IN BACKGROUND or wait for the update to complete and click CLOSE.
Was this article helpful?