Agent Logs and Troubleshooting
- 5 Minutes to read
- Print
- DarkLight
- PDF
Agent Logs and Troubleshooting
- 5 Minutes to read
- Print
- DarkLight
- PDF
Article Summary
Share feedback
Thanks for sharing your feedback!
CTERA Agent provides logs for the different activities related to the CTERA Agent.
| Log | Content |
|---|---|
| System | General CTERA Agent events, including connecting to the CTERA Portal and disconnecting from the CTERA Portal. |
| Cloud Backup (only available when CTERA Drive Protect is licensed) | Cloud backup and restore events. |
| Cloud Sync | Cloud Drive synchronization operation events. |
| Access | Currently not supported. |
| Audit | Changes to the CTERA Agent configuration. |
Viewing Logs
To access the CTERA Agent event logs:
- Right-click the CTERA Agent Menu Bar icon,
 , and select Settings.
Or,
Click the settings icon, , in the bottom right corner of the CTERA Agent window.
The CTERA Agent Settings window is displayed. - Click Advanced > Log Viewer in the navigation pane.
The Event Log page is displayed.
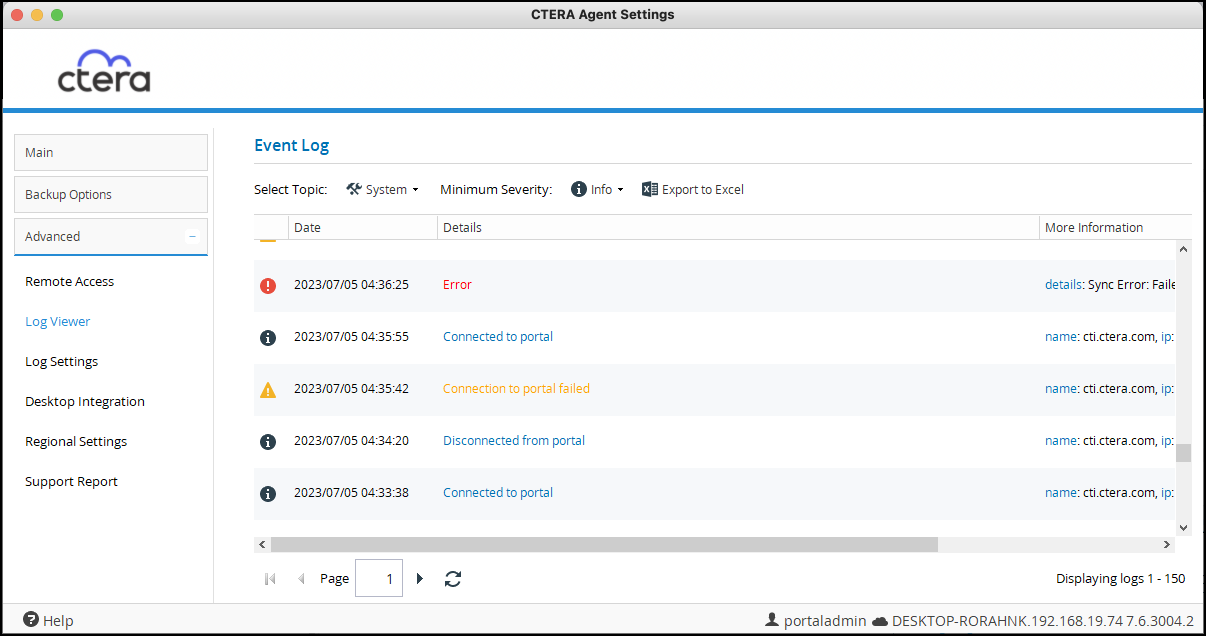
- Click the Select Topic value and select the type of log to display.
- Optionally, filter the log for a specific minimum severity level at which to view events: Click the Minimum Severity value and select a different security level from the list.
 – Error
 – Warning
 – Info
For example, if you select Warning, then only Warning and Error events are displayed. - Optionally, change the order in which the events are listed in the Log Viewer.
- Mouse-over a heading in the log entries table.
If the order can be changed, an arrow are displayed in the heading. - Click the arrow next to the heading and click Sort Ascending or Sort Descending.
- Mouse-over a heading in the log entries table.
 , and select Settings.
 , in the bottom right corner of the CTERA Agent window.
 – Error
 – Warning
 – Info
System Log
The System log displays the following details:
Date – The date and time at which the event occurred.
Details – A description of the event.
More Information – Additional information about the event.
Cloud Backup Log
Note
The backup overlay icons are only available when CTERA Drive Protect is licensed.
The Cloud Backup log displays the following details:
Start Time – The date and time at which the backup or restore operation started.
Mode – The operation mode: Backup or Restore.
Type – The type of backup: Manual or Scheduled.
Duration – The amount of time the backup or restore operation took.
Result – The result of the backup or restore operation.
(blank) – A link to additional details. To view additional logging information for a backup or restore operation, click Details for the selected operation. A new window is displayed that shows the following information for all files for which an error occurred during backup.
Files – The number and total size of files backed up or restored.
Transferred – The number and total size of the files transferred to the cloud storage or restored from the cloud storage during the operation.
Changed – The number and total size of the files that changed since the last backup or restore operation.
More Information – Additional information about the event.
Cloud Sync Log
The Cloud Sync log displays the following details:
Operation – The synchronization operation performed.
Direction – The direction of the synchronization operation.
File Name – The name of the file transferred during the synchronization operation.
Folder Name – The name of the folder that contains the file.
Path – The path to the file transferred during the synchronization operation.
Start Time – The date and time at which the synchronization operation started.
Duration – The amount of time the synchronization operation took.
Size – The size of the synchronized file.
Transferred Size – The actual amount of data transferred.
Dedup – The deduplication ratio for the file transferred during the synchronization operation.
Result – The result of the synchronization operation.
More Information – Additional information about the event.
Audit Log
The Audit log displays the following details:
Action – The action type:
- Added – An object was added.
- Deleted – An object was deleted.
- Modified – An object was modified.
- Disabled – A setting was disabled.
- Enabled – A setting was enabled.
Date – The date and time at which the event occurred.
User – The user who performed the action.
Type – The type of setting that was affected by the action. For example, if user JohnS was deleted, this column displays Users.
Target – The object that was affected by the action. For example, if user JohnS was deleted, this column displays JohnS.
More Information – Additional information about the event.
Exporting Logs
You can export a log to a comma separated values (*.csv) Microsoft Excel file on your computer.
To export a log to Microsoft Excel:
- Right-click the CTERA Agent Manu Bar icon, , and select Settings.
Or,
Click the settings icon,, in the bottom right corner of the CTERA Agent window.
The CTERA Agent Settings window is displayed. - Click Advanced > Log Viewer in the navigation pane.
The Event Log page is displayed.
- Select the log to export to Excel and click Export to Excel.
The log is exported to an Excel file and downloaded to your computer.
Configuring Log Settings
The logs are saved to /var/log/.
- Right-click the CTERA Agent Menu Bar icon, , and select Settings.
Or,
Click the settings icon,, in the bottom right corner of the CTERA Agent window.
The CTERA Agent Settings window is displayed. - Click Advanced > Log Settings in the navigation pane.
The Log Settings page is displayed.

- To change the minimum log level to display, click Log Level and select a different level from the list. The default is Info.
For example, if you select Critical, then only Alert, Critical, and Emergency logs are displayed. - For cloud backup, when CTERA Drive Protect is licensed, to specify whether CTERA Agent displays additional information, such as file name and deduplication ration, about files that are backed up and restored, click Cloud Backup Log Level and select one of the following:
Log Every File – Provides additional information about all backed up and restored files.
Log Errors Only – Only provides additional information about files for which errors occurred during backup and restore operations.
No Logging – Does not provide additional information about backed up and restored files. - Click Save.

Troubleshooting
Under Settings when the CTERA Agent is connected to a CTERA Portal, you can generate a report that CTERA Support support can use to troubleshoot problems.
To generate a report for CTERA Support support:
- Right-click the CTERA Agent Menu Bar icon, , and select Settings.
Or,
Click the settings icon,, in the bottom right corner of the CTERA Agent window.
The CTERA Agent Settings window is displayed. - Select Advanced > Support Report.

- Click Download Support Report and specify where to save the report.
The report is saved. The report name is the current date followed by the device name on which the CTERA Agent is running.
The report is generated in ZIP file compression format. - Send the report to CTERA Support.

Was this article helpful?