Setting Up Privileges to Allow Back Ups
You must have Back up files and directories privilege in the Windows operating system. Users in the groups Administrators, Backup Operators, and Domain Administrators have this privilege by default. If you do not have the Back up files and directories privilege, an administrator can assign you these privileges.
To assign the Back up files and directories privilege to a user:
- In Administrative Tools access Local Security Policy > Local Policies > User Rights Assignment > Back up files and directories.
- Add the user and click OK.
Selecting Files to Back Up
Files on removable media, such as a USB drive, cannot be backed up using the CTERA Agent.
To select backup files from Windows File Explorer:
- Browse to the files or folders to add to the backup.
- Right-click each file or folder and select CTERA Agent > Add to backup to add the file to the backup list.
Or,
CTERA Agent > Remove from backup to remove the file from the backup list.
The  icon on a folder indicates that all the files and nested folders in this folder are selected for backup. New files and folders added to this folder will also be backed up.
To select backup files in the CTERA Agent Settings window:
- Right-click the CTERA Agent tray icon,
 , and select Settings.
Or,
Click the settings icon, , in the bottom right corner of the CTERA Agent window.
The CTERA Agent Settings window is displayed.
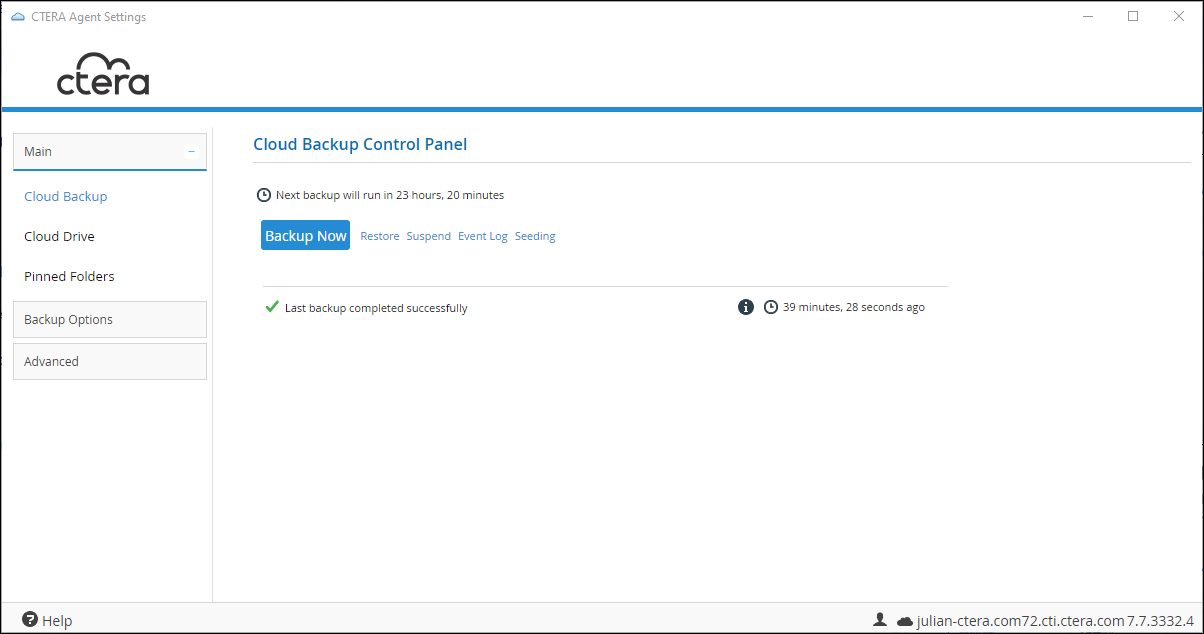
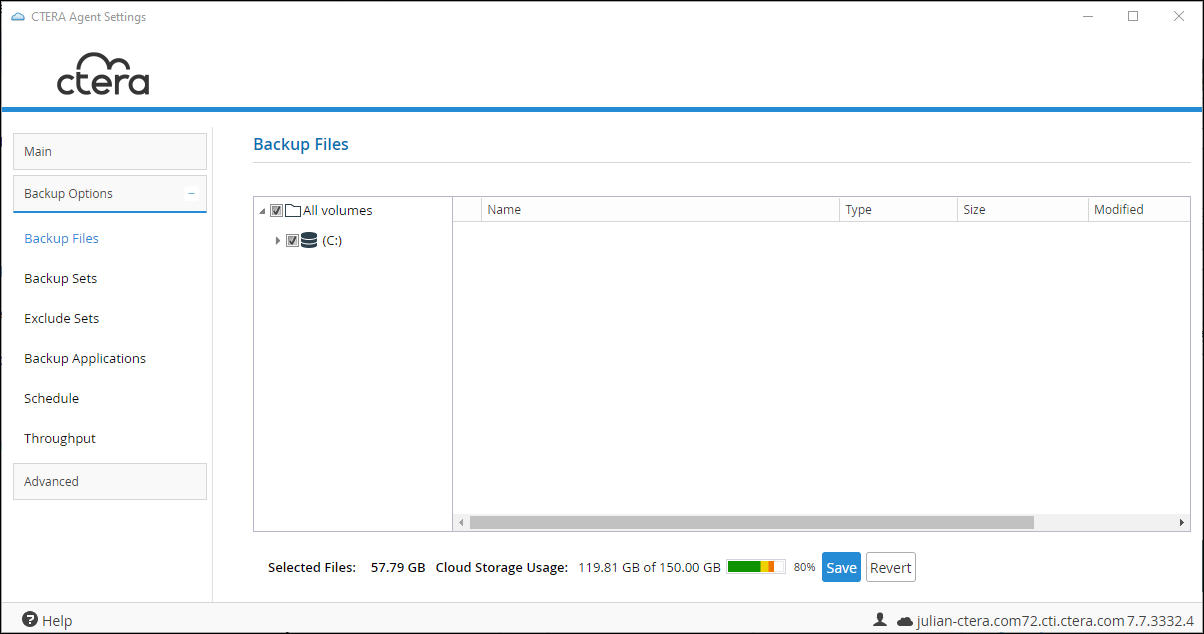
- Click Backup Options > Backup Files in the navigation pane and expand the tree under All Volumes.
 Note
NoteWith Windows Server, under Backup Options the navigation menu also includes a SQL Server Backup option.
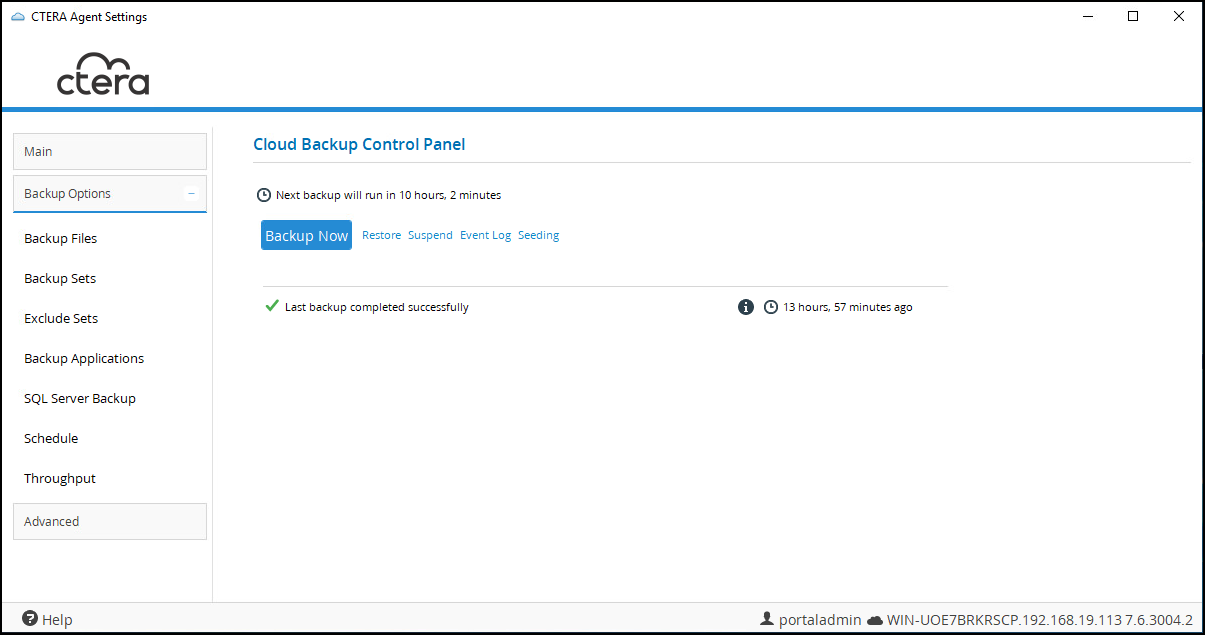
This option, SQL Server Backup, is currently not supported. - Check any folder to add to your backup.
Files in each folder are displayed in the right pane when you select the folder, all the files are selected for backup. If you do not check the folder, all the files are displayed without being selected for backup
The Selected Files field, at the bottom of the window, indicates the size of the files selected for backup.
The Cloud Storage Usage field, at the bottom of the window, indicates the amount of used space in your account after the next cloud backup operation, including backups from any other CTERA devices included in your account.
For example, let's say your account includes two devices, and each device will back up 100MB worth of files in the next cloud backup operation, for a total of 200MB. Your account already has 350MB worth of files stored online. In this case, the Cloud Storage Usage field will display550MB. - Click Save.
Backup and Exclude Sets
A Backup Set is a filter which includes files in a backup based on criteria of your choice. An Exclude Set is a filter which excludes files from a backup based on criteria of your choice. Each backup set or exclude set represents a group of files that will be included or excluded in a cloud backup, provided the backup set or exclude set is enabled. When you create a backup set or exclude set, you can specify files by extension type, name, location, size, and/or modification date. For example, you can create a backup set called My Music and include all files with the extensions *.wav and *.mp3 that are located in the folder My Documents > Music.
If a file is included in a backup set and the backup set is enabled, it is included in the backup even if it is not individually selected as a Backup File.
If a file is included in an enabled backup set but is also included in an exclude set, the file is excluded from the backup.
Backup sets and exclude sets can be enabled or disabled. When you create a new backup set or exclude set, it is enabled by default.
Managing Backup Sets
To create or edit backup sets:
-
Right-click the CTERA Agent tray icon,
 , and select Settings.
Or,
Click the settings icon, , in the bottom right corner of the CTERA Agent window.
The CTERA Agent Settings window is displayed. -
Click Backup Options > Backup Sets in the navigation pane.
The Backup Sets page is displayed.
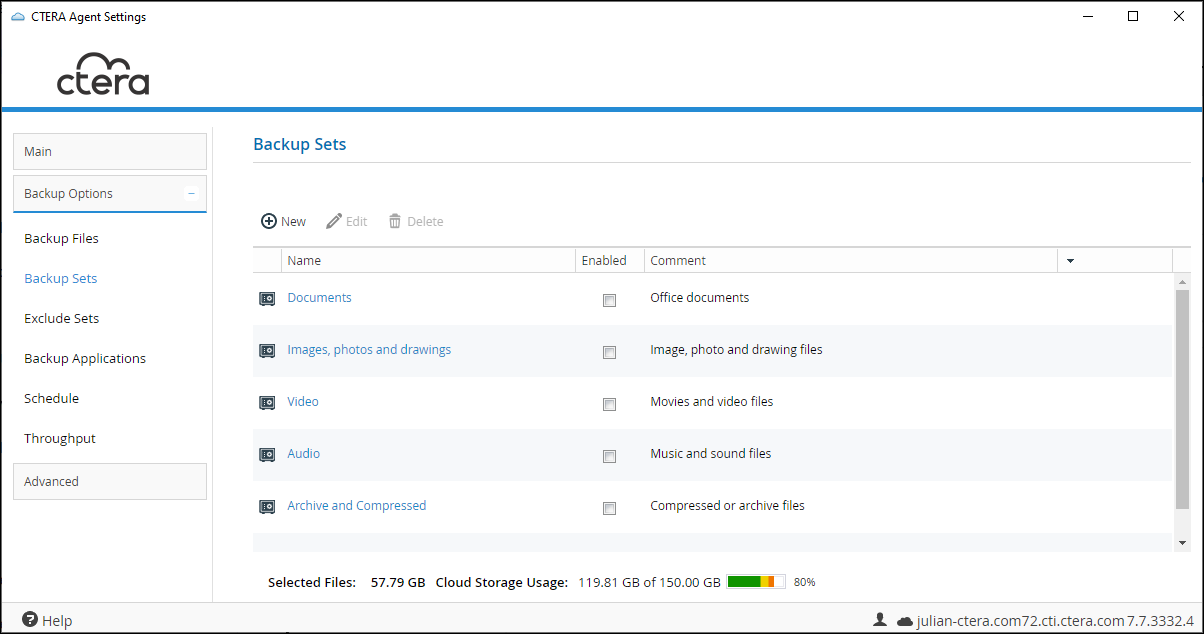
Where:
Name – The name of each backup set.
Enabled – If checked, the backup set is enabled.
Comment – A description of the backup set.The Selected Files field indicates the size of the files currently selected.
The Cloud Storage Usage field indicates the amount of used space in your account after the next cloud backup operation, including backups from any other devices included in your account.
-
To create a backup set, click New.
Or,
To edit an existing set, select the set row and click Edit.NoteIf backup sets were defined as part of a configuration template in the portal and the template is assigned to this agent, these sets cannot be edited.
The Backup Set Details window is displayed.
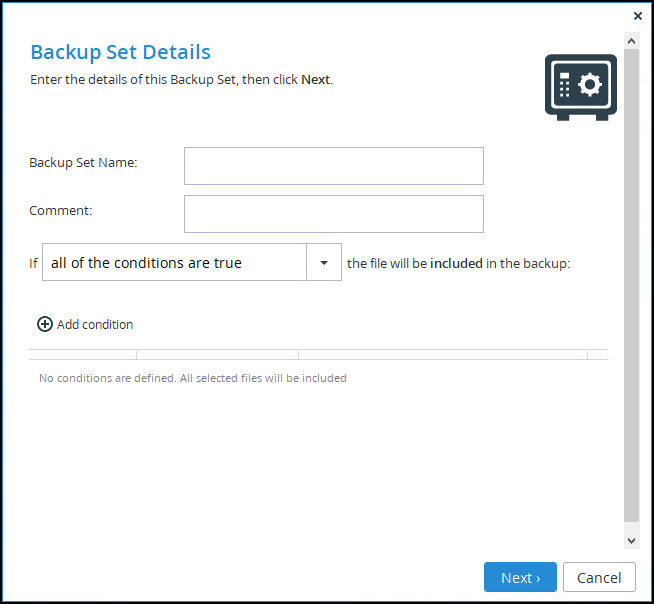
If the set is being edited, the Backup Set Details window has values. -
Set the details and conditions for the set.
Backup Set Name – A name for the backup set.
Comment – A description of the backup set.
If – How you want files to match your conditions:
all of the conditions are true – All of the conditions defined in steps 5 to 8 must be met in order for a file to be included in the set.
at least one of the conditions is true – One or more of the conditions defined in steps 5 to 8 must be met in order for a file to be included in the set. -
Click Add condition.
-
Click Select and select the condition parameter from the drop-down list.
- File Name
- File Path
- File Type
- File Size
- File Modified
-
Click Select in the second column and select the condition operator from the drop-down list, which is dependent on the parameter selected in the first column.
Parameter Operator File Name, File Path, File Type equals, begins with, ends with, contains, is one of File Size less than, more than File Modified before, after -
Click in the third column, and complete the condition, which is dependent on the parameter selected in the first column.
Parameter Values File Name, File Path, File Type Free text. File Size Free text. Add a numerical value and the unit, such as KB, MB or GB. File Modified Choose a date from the pop-up calendar. For example, if you select File Name as the condition parameter in the first column, select begins with as the condition operator in the second column, and enter
Work-123-in the third column, then the set will include all files whose names begin withWork-123-.
Likewise, if you select File Type as the condition parameter in the first column, select is one of as the condition operator in the second column, and enteravi, mov, mpgin the third column, then the set will include all files matching*.avi, *.mov, and *.mpg. -
Repeat steps 5 to 8 to define additional conditions for the set.
If no conditions are defined, then all selected files in that backup set are included in the backup. -
Click Next.
-
Drill-down and select the folders to which you want to apply the conditions.
-
Click Next and then Finish.
The backup set is created and automatically enabled.
To delete backup sets:
- Right-click the CTERA Agent tray icon, , and select Settings.
Or,
Click the gear icon in the bottom right corner of the CTERA Agent window.
The CTERA Agent Settings window is displayed. - Click Backup Options > Backup Sets in the navigation pane.
The Backup Sets page is displayed. - Select the backup set row and click
 .
.
A confirmation window is displayed. - Click Yes.
The backup set is deleted.
Managing Exclude Sets
To create or edit exclude sets:
-
Right-click the CTERA Agent tray icon,
 , and select Settings.
Or,
Click the settings icon, , in the bottom right corner of the CTERA Agent window.
The CTERA Agent Settings window is displayed. -
Click Backup Options > Exclude Sets in the navigation pane.
The Exclude Sets page is displayed.
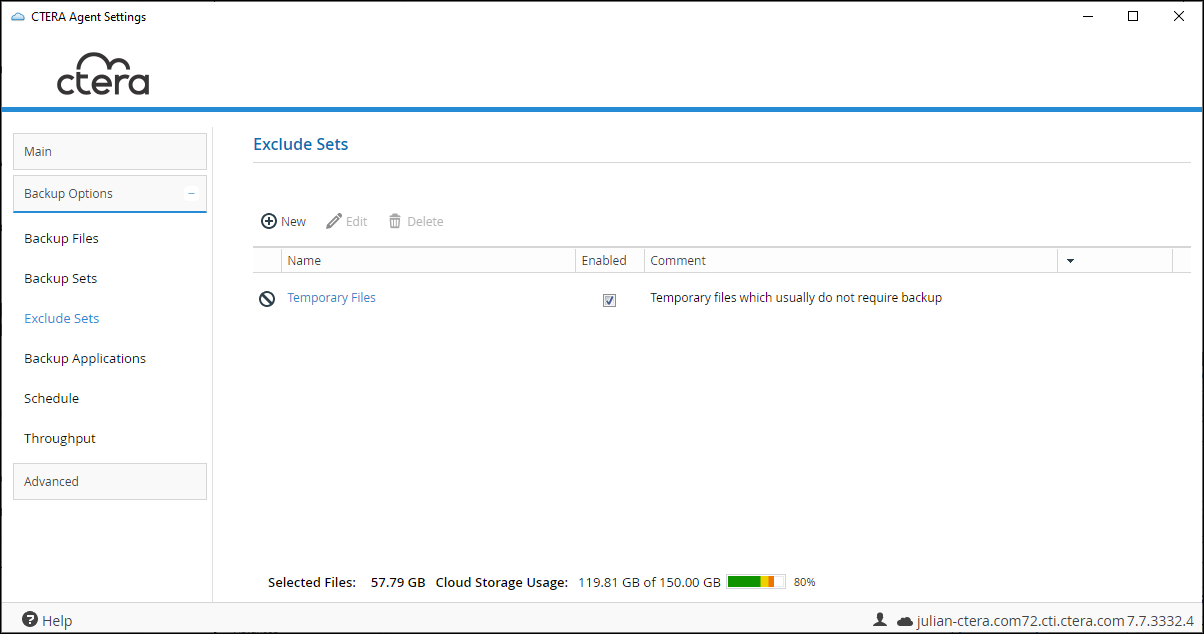
Where:
Name – The name of each exclude set.
Enabled – If checked, the exclude set is enabled.
Comment – A description of the exclude set.The Selected Files field indicates the size of the files currently selected.
The Cloud Storage Usage field indicates the amount of used space in your account after the next cloud backup operation, including backups from any other devices included in your account.
-
To create an exclude set, click New.
Or,
To edit an existing set, select the set row and click Edit.NoteIf exclude sets were defined as part of a configuration template in the portal and the template is assigned to this agent, these sets cannot be edited.
The Exclude Set Details window is displayed.
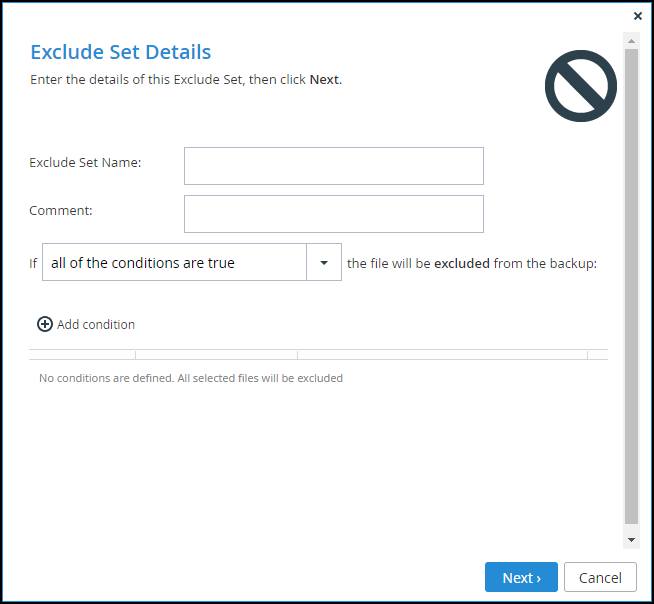
If the set is being edited, the Exclude Set Details window has values. -
Set the details and conditions for the set.
Exclude Set Name – A name for the backup set.
Comment – A description of the exclude set.
If – How you want files to match your conditions:
all of the conditions are true – All of the conditions defined in steps 5 to 8 must be met in order for a file to be included in the set.
at least one of the conditions is true – One or more of the conditions defined in steps 5 to 8 must be met in order for a file to be included in the set. -
Click Add condition.
-
Click Select and select the condition parameter from the drop-down list.
- File Name
- File Path
- File Type
- File Size
- File Modified
-
Click Select in the second column and select the condition operator from the drop-down list, which is dependent on the parameter selected in the first column.
Parameter Operator File Name, File Path, File Type equals, begins with, ends with, contains, is one of File Size less than, more than File Modified before, after -
Click in the third column, and complete the condition, which is dependent on the parameter selected in the first column.
Parameter Values File Name, File Path, File Type Free text. File Size Free text. Add a numerical value and the unit, such as KB, MB or GB. File Modified Choose a date from the pop-up calendar. For example, if you select File Name as the condition parameter in the first column, select begins with as the condition operator in the second column, and enter
Work-123-in the third column, then the set will include all files whose names begin withWork-123-.
Likewise, if you select File Type as the condition parameter in the first column, select is one of as the condition operator in the second column, and enteravi, mov, mpgin the third column, then the set will include all files matching*.avi, *.mov, and *.mpg. -
Repeat steps 5 to 8 to define additional conditions for the set.
If no conditions are defined, then all selected files in that exclude set are excluded from the backup. -
Click Next.
-
Drill-down and select the folders to which you want to apply the conditions.
-
Click Next and then Finish.
The exclude set is created and automatically enabled.
To delete exclude sets:
- Right-click the CTERA Agent tray icon,
 , and select Settings.
Or,
Click the settings icon, , in the bottom right corner of the CTERA Agent window.
The CTERA Agent Settings window is displayed. - Click Backup Options > Exclude Sets in the navigation pane.
The Exclude Sets page is displayed. - Select the exclude set row and click
 .
.
A confirmation window is displayed. - Click Yes.
The exclude set is deleted.
Scheduling Backups
To schedule backups:
- Right-click the CTERA Agent tray icon,
 , and select Settings.
Or,
Click the settings icon, , in the bottom right corner of the CTERA Agent window.
The CTERA Agent Settings window is displayed. - Click Backup Options > Schedule in the navigation pane.
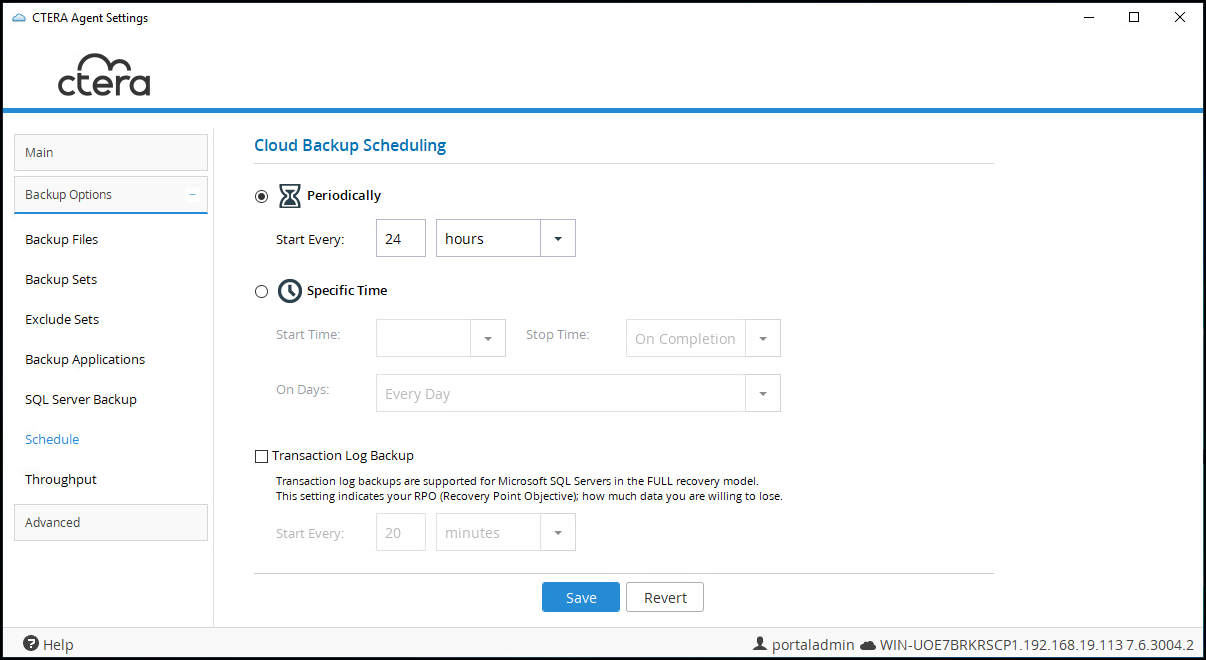
The Cloud Backup Scheduling page is displayed.
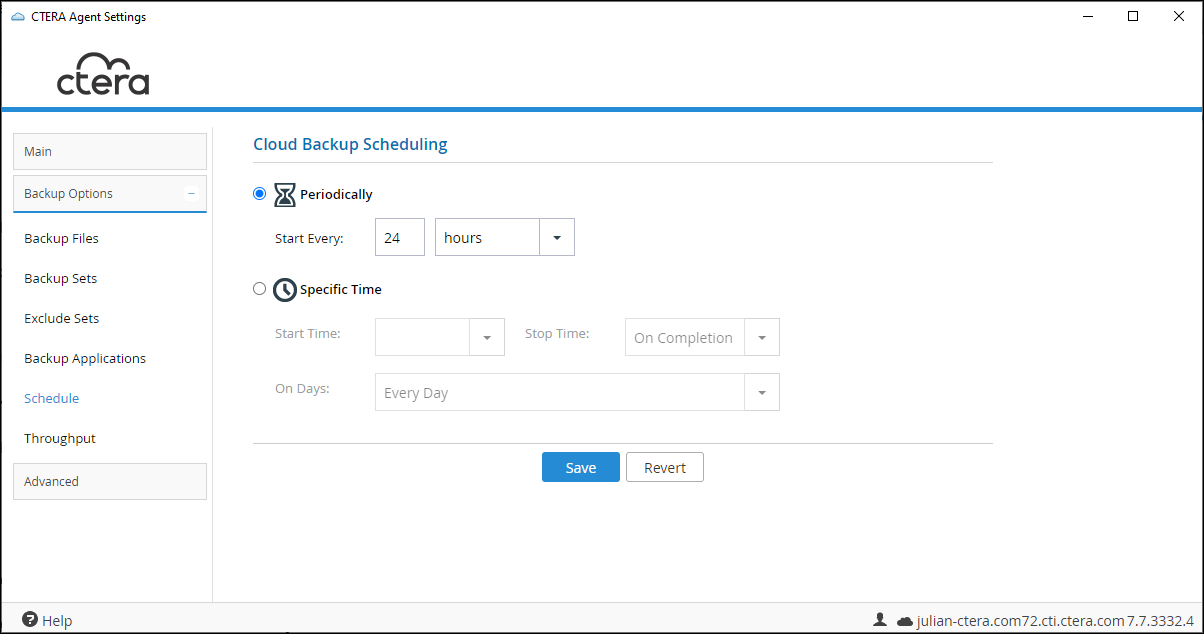
When running the agent on a Windows Server, the following Cloud Backup Scheduling page is displayed.
 Notes
NotesThe Transaction Log Backup option for backing up Microsoft SQL Server on a Windows Server is currently not supported.
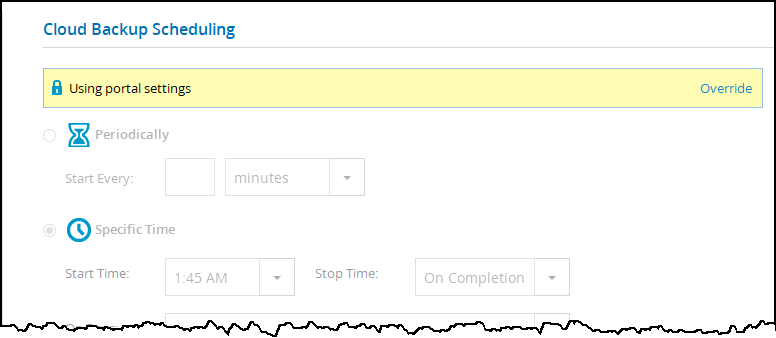
If a configuration template was defined in the CTERA Portal with throttling, click Override to override the CTERA Portal configuration.
- Schedule backups:
Periodically – Automatic backups are performed every specified number of hours or minutes.
Start Every – The interval between backups.If a given backup extends past the scheduled time for the next automatic backup, the next automatic backup will commence immediately upon completion of the prior backup.
Start Time – The time at which a backup starts.
Stop Time – Either on completion of the backup or at a specific time, after which the backup is stopped even if it hasn’t completed.
On Days – The days backups occur. Click Every Day to backup every day. - Click Save.
Restricting Throughput
You can restrict the amount of bandwidth used for backing up files by restricting the available bandwidth used for syncing always or at specified times.
To throttle throughput:
- Right-click the CTERA Agent tray icon,
 , and select Settings.
Or,
Click the settings icon, , in the bottom right corner of the CTERA Agent window.
The CTERA Agent Settings window is displayed. - Click Backup Options > Throughput in the navigation pane.
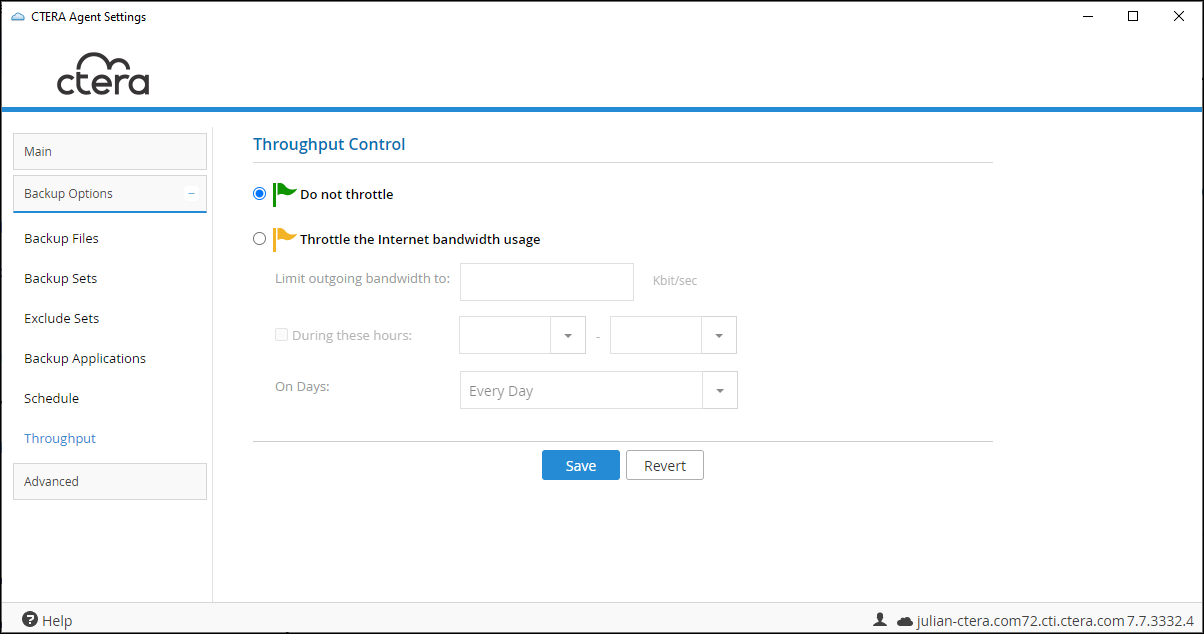
The Throughput Control page is displayed.
 Note
NoteIf a configuration template was defined in the CTERA Portal with throttling, click Override to override the CTERA Portal configuration.
- Select either not to restrict the throughput, Do not throttle, or to restrict the bandwidth used, Throttle the Internet bandwidth usage.
- If you selected Throttle the Internet bandwidth usage, complete the fields:
Limit outgoing bandwidth to – The maximum bandwidth to use for cloud backups in kilobits per second.
During these hours – The bandwidth used for cloud backups is restricted only at specific times of the day and then use the drop-down lists to specify the time range during which the bandwidth should be restricted.
On Days – The days for which the bandwidth is restricted during the specified hours:- One or more specific days
- Every Day. Bandwidth used for cloud backup will be restricted every day.
- Click Save.