ESXi
- 8 Minutes to read
- Print
- DarkLight
- PDF
ESXi
- 8 Minutes to read
- Print
- DarkLight
- PDF
Article Summary
Share feedback
Thanks for sharing your feedback!
CTERA recommends making a backup of the 6.x edge filer before starting the migration.
After upgrading to a 7.x edge filer, you cannot downgrade it to a 6.x edge filer. CTERA recommends keeping the 6.x edge filer in reserve, in case the migration fails for any reason.
Note
Before migrating an edge filer to a 7.x CTERA Edge Filer, connect the 7.x edge filer to the same CTERA Portal as the 6.x edge filer.
Make sure both the CPU and memory settings for the 7.x edge filer are the same as for the 6.x edge filer.
Upgrade Prerequisite Check
At the end of the procedure, you should be able to connect to the 7.x edge filer using the same IP that was used to connect to the 6.x edge filer. Assigning this IP should be automatic as part of the procedure. In some cases, due to factors external to CTERA this is not he case. CTERA recommends making sure that the 7.x edge filer can be accessed with the IP as follows:
- Shutdown the 6.x edge filer and start up the 7.x edge filer and set it up to use the IP Address, Subnet Mask, Default Gateway and DNS of the 6.x edge filer.
- Make sure that the 7.x edge filer login page is accessible.
- Shutdown the 7.x edge filer and power on the 6.x edge filer.
If the 7.x edge filer is not accessible, you need to check why not. Possible issues include the switch could only be given one MAC address, so the 7.x edge filer could not use the IP that had been assigned to the 6.x edge filer. For help, contact CTERA support.
Upgrade Procedure
To replace a 6.x edge filer with a 7.x edge filer:
- In the vSphere client delete any vSphere snapshots.
- Login to the VMware vSphere Client and right-click the 6.0.x gateway.
- Select Snapshots > Delete All Snapshots.
- Click OK to confirm the snapshot deletion.
- Make a copy of the 6.x edge filer cloudsync.db and save it to a public share, so it is accessible.
- Login to the 6.x edge filer.
- In the CONFIGURATION tab, select Cloud Services > Status in the navigation pane, and then sign in to the portal.
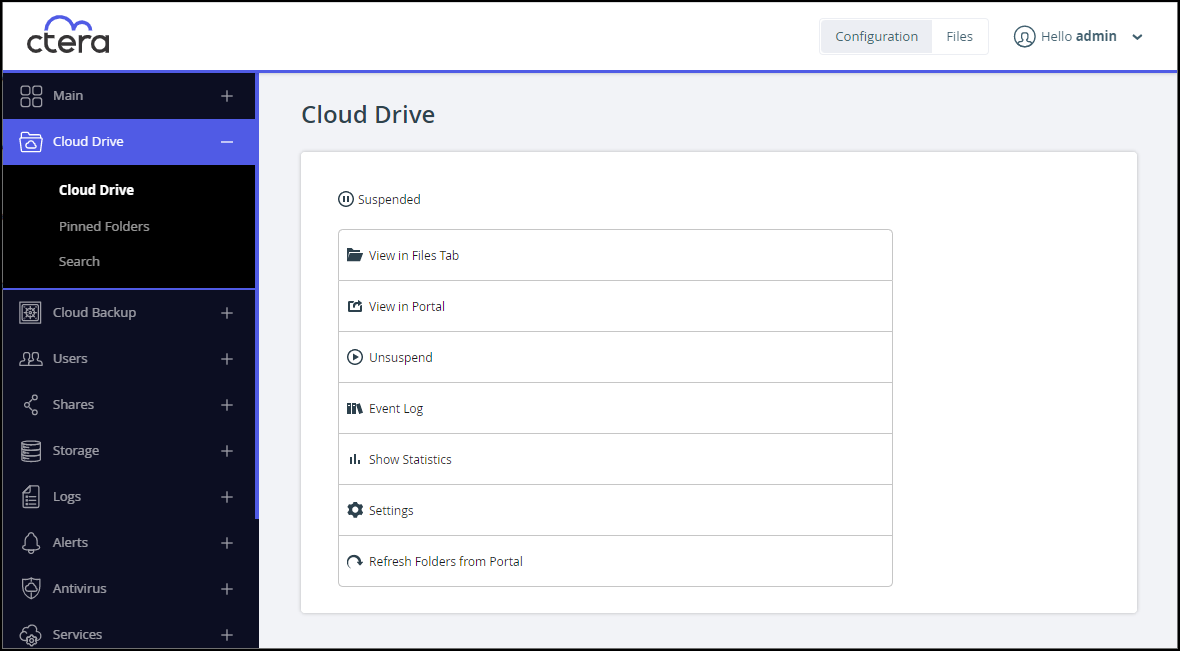
- In the CONFIGURATION tab, select Cloud Drive > Cloud Drive in the navigation pane, and then click Suspend.
- If the edge filer is configured as a Sync Gateway (and not a Caching Gateway):
- Click Settings.
The Cloud Drive Settings window is displayed.
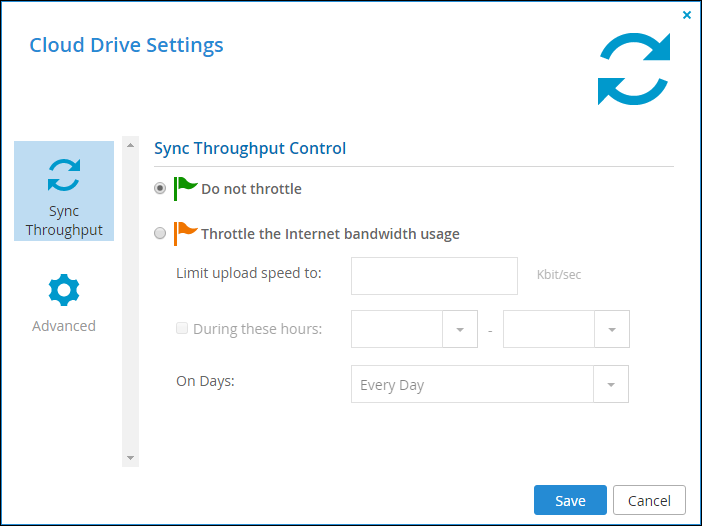
- Select the Advanced option and change the Operation Mode to Caching Gateway.
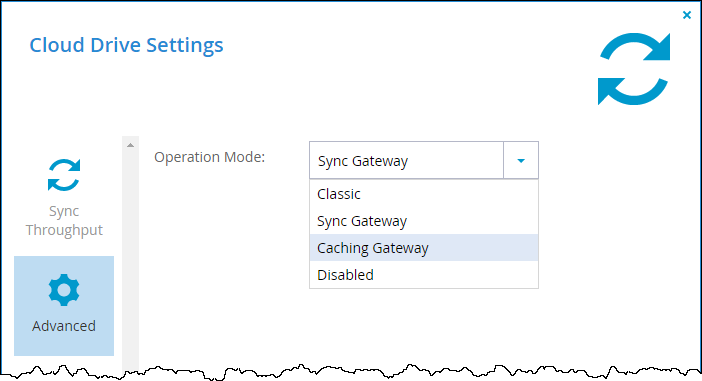
- Click Save.
- Click Settings.
- The procedure continues with one of the following options:
- When the cache size on the 6.x edge filer is small or a new edge filer can be populated in a few hours. See When the cache size on the 6.0.x edge filer is small or a new edge filer can be populated in a few hours.
- When it will take a long time to populate the 7.x edge filer. See When it will take a long time to populate the 7.x edge filer.


When the cache size on the 6.x edge filer is small or a new edge filer can be populated in a few hours:
- Before powering on the 7.x edge filer, change the IP, so it is not the same as the 6.x edge filer IP.
- Power on the 7.x edge filer.
- Make sure both the 6.x and 7.x edge filers are connected to the same portal.
- Check that the edge filer is connected to the portal in the both the 6.x and 7.x edge filers, under Cloud Services > Status.
- Wait for the 7.x edge filer to be fully synced with the portal. View the sync status in the Cloud Drive > Cloud Drive in the edge filer to determine when the syncing has completed.Note
The time for the 7.x edge filer to be fully synced with the portal is dependent on how much data needs syncing.
- Validate that the 7.x edge filer has been synced correctly, by looking at the number of folders and files on both the 6.x and 7.x edge filers.
- Prevent user access to the 6.x edge filer.
- In the 6.x edge filer, in the CONFIGURATION tab, select Cloud Drive > Cloud Drive in the navigation pane, and then click Suspend.
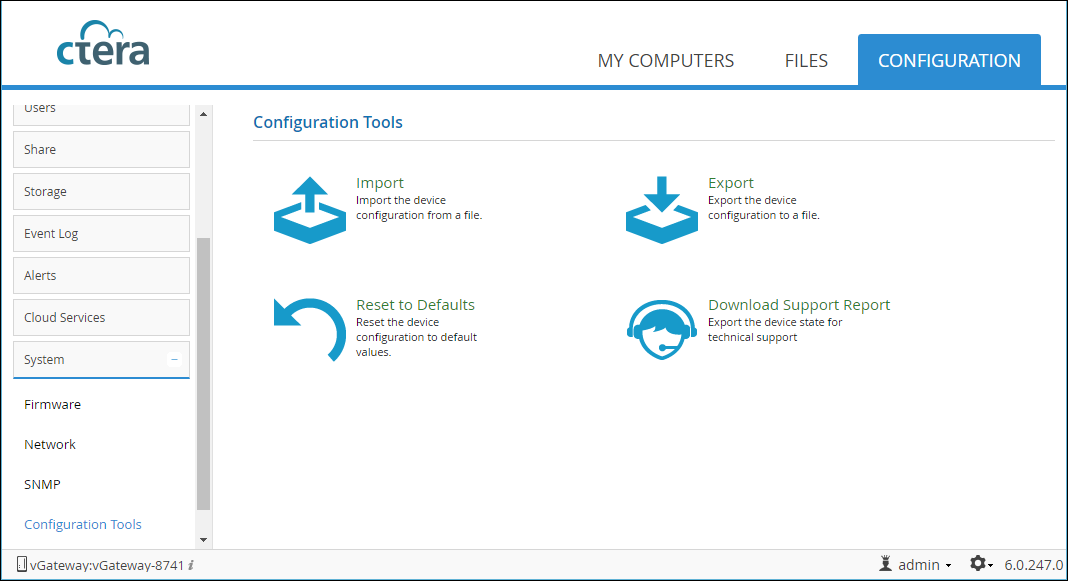
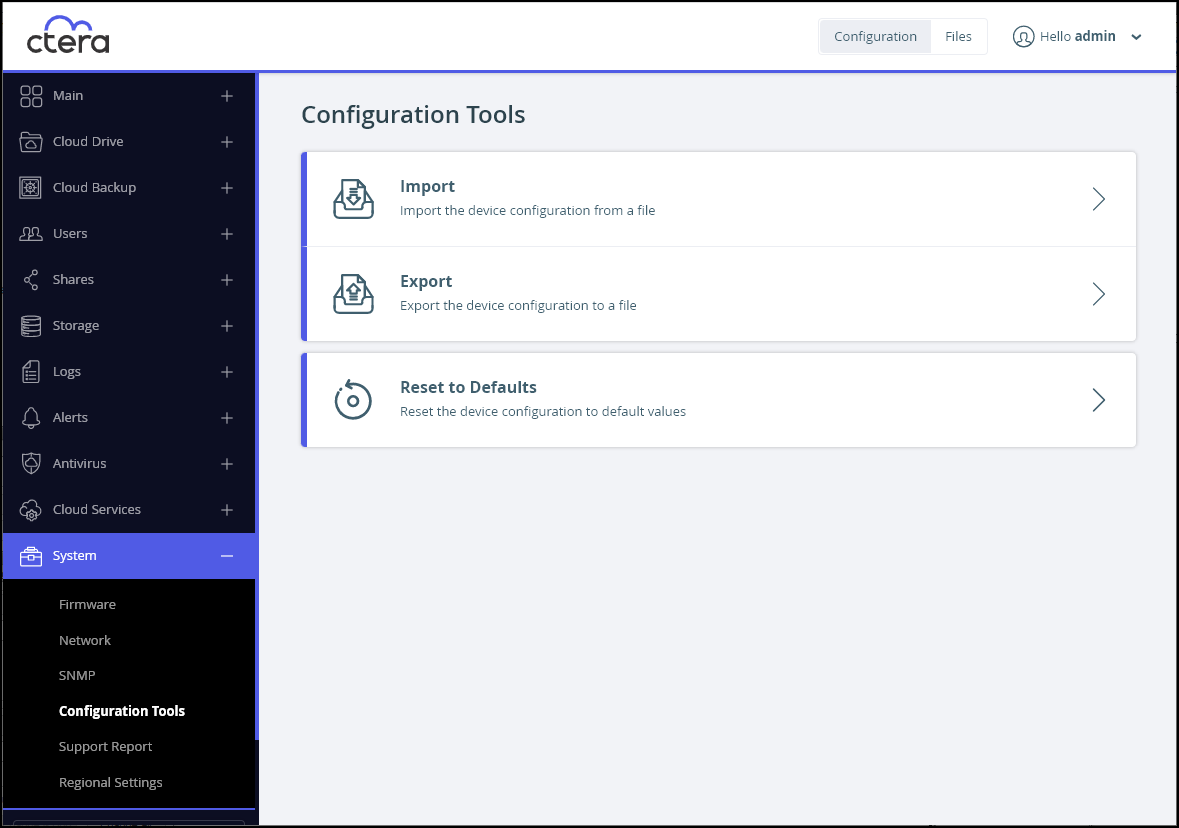
- In the CONFIGURATION tab, select System > Configuration Tools in the navigation pane, and then click Export to save the edge filer configuration to an XML file.
- In the CONFIGURATION tab, select Cloud Services > Status in the navigation pane, and then sign out from the portal.
- Disconnect the 6.x edge filer.
Note
Do not delete the content of the 6.0.x edge filer but keep it for around 30 days so that it can be brought back on line as a failback or temporary backup.
When it will take a long time to populate the 7.x edge filer:
- In the CONFIGURATION tab, select System > Configuration Tools in the navigation pane, and then click Export to save the edge filer configuration to an XML file.
- In the CONFIGURATION tab, select Cloud Services > Status in the navigation pane, and then sign out from the portal.
- Access the edge filer CLI interface.
- Select any option under System In the navigation menu (for example System > Network).
- In the address bar of your browser, delete the string that appears after the final ":" (for example, network if you clicked Network in the previous step) and type cli in its place.
- Press Enter.
The CLI Execution page is displayed. - Enter the following command:
show /config/cloudsync/portalSettings - Note the result of the command, and especially the number at the beginning.
The result is similar to the following:"200.8.9d5c2940-7c6b-4a8a-bc1b-ef511fe97481"
- Shutdown the 6.x edge filer.
- In the status bar, click
 and then click Shutdown.
A confirmation message is displayed. - Click Yes.
The CTERA Edge Filer shuts down.
- In the status bar, click
- Login to the VMware Host Client that manages both the 6.x edge filer and the 7.x edge filer.
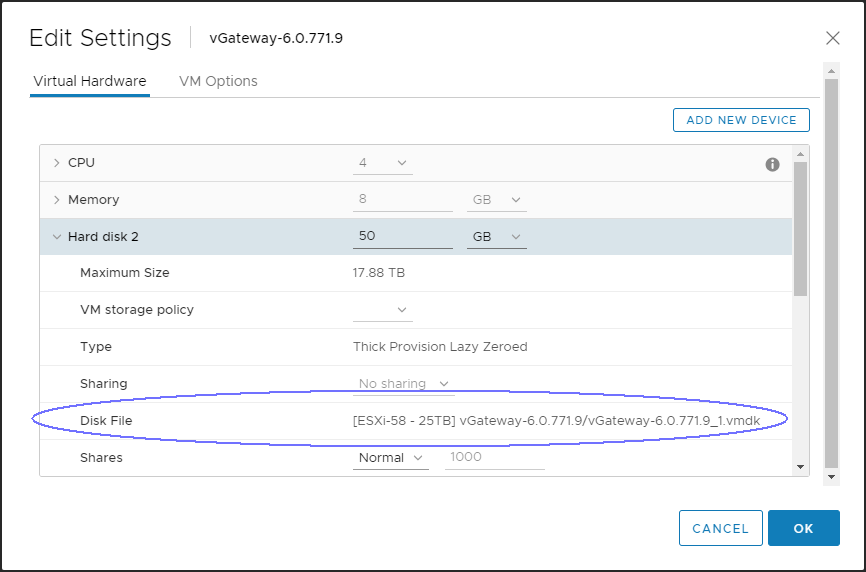
- Right-click the 6.x edge filer VM and select Edit Settings.
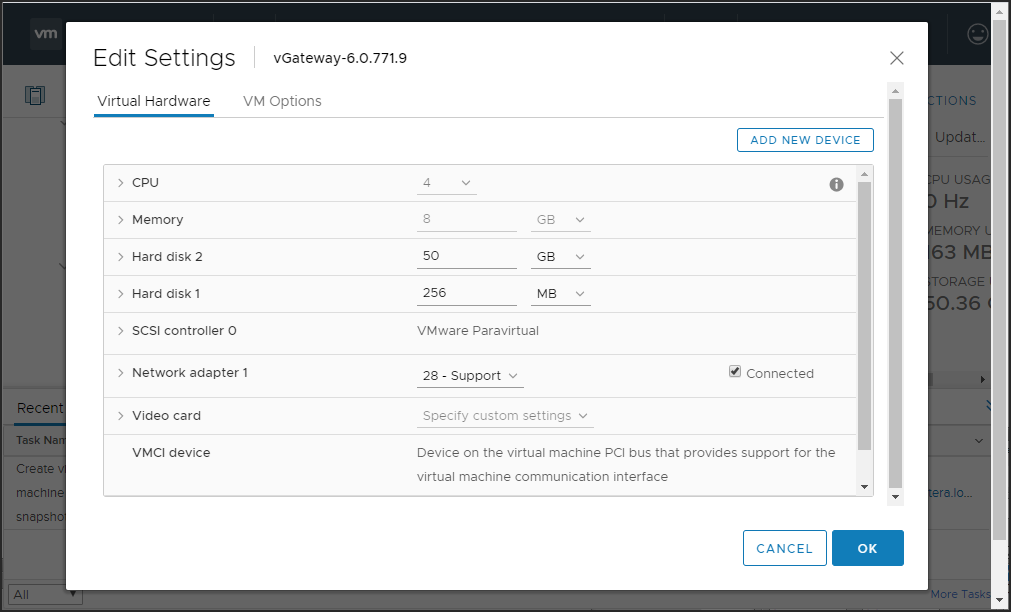
- Expand Hard disk 2 to display the location of the datastore and the vmdk file name for the disk.
- Hover the mouse over the right side of Hard disk 2 and click the X that is displayed.
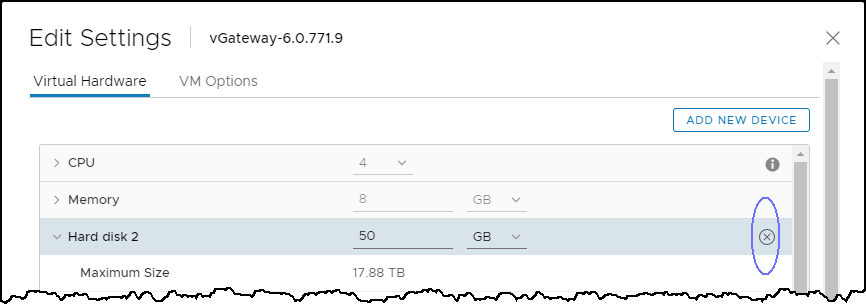
- Make sure Delete files from datastore is not selected and click OK.
The Recent Tasks pane shows the progress for the task Reconfigure virtual machine. - Wait for the task to complete.
- If the datastore defined for the 7.x edge filer is not the same as the datastore for the 6.x edge filer:
- Click Storage in the Navigator pane.
- Select the datastore identified previously and click the Files tab.
- Select the edge filer virtual machine to display the virtual machine files.
- Select the vmdk file identified previously and click Move to.
- The Select Destination window is displayed.
- In the left pane select the datastore used for the 7.x edge filer.
- In the right pane select the 7.x edge filer.
- Click OK.
- Right-click the 7.x edge filer VM and select Edit Settings.
- Click ADD NEW DEVICE and select Existing Hard Disk.
The Select File window is displayed.
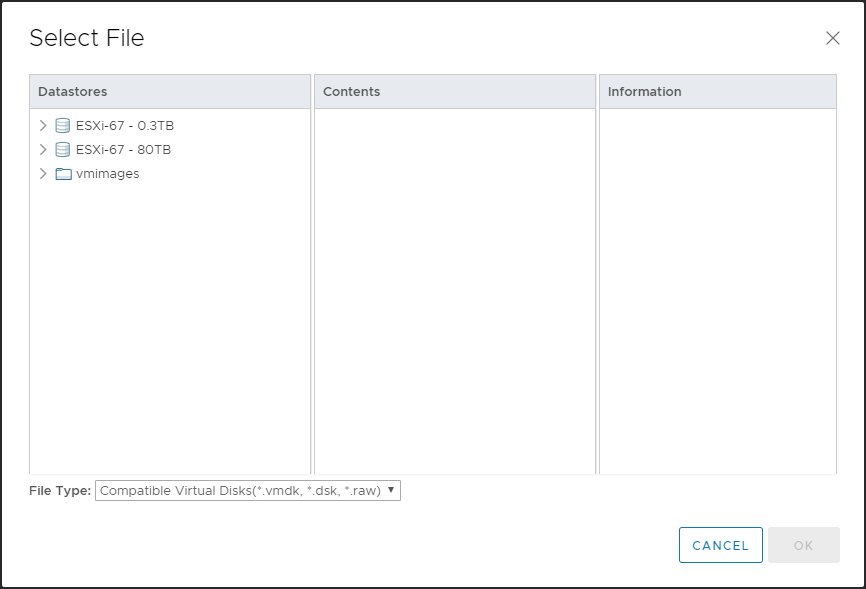
- If the datastore defined for the 7.x edge filer is the same as the datastore for the 6.x edge filer:
- Drill-down the datastore in the Datastores column and select the 6.x edge filer.
- Select the vmdk file identified previously and click OK.
If the disk was moved to this datastore, in step 11, select the datastore for the 7.x edge filer and, in the list displayed in the Contents column, select the vmdk file identified previously and click OK.
The Recent Tasks pane shows the progress for the task Reconfigure virtual machine.
- Power on the 7.x edge filer virtual machine.
- Login to the 7.x edge filer and click Cancel when the Setup Wizard starts, with the Name this Edge Filer window.
- In the 7.x edge filer, in the Configuration view, select System > Configuration Tools in the navigation pane, and then click Import, to import the XML file you exported.
 Note
NoteFields that are no longer valid in the XML are removed and the import procedure reports warnings for these fields, which can be ignored.
- If you moved the vhd file, as described in When it will take a long time to populate the 7.x edge filer, access the edge filer CLI interface.
- Select any option under System In the navigation menu (for example System > Network).
- In the address bar of your browser, delete the string that appears after the final ":" (for example, network if you clicked Network in the previous step) and type cli in its place.
- Press Enter.
The CLI Execution page is displayed. - Enter the following command:
show /config/cloudsync/portalSettings - Make sure that the number at the beginning of the result is the same as the number returned when you previously executed the CLI
show /config/cloudsync/portalSettings("200..."). If the output does not show the same number, do not continue and contact CTERA Support. - Refresh the user interface.
- In the Configuration view, select Cloud Drive > Cloud Drive in the navigation pane.
- Click Unsuspend.
- Login to the VMware Host Client and disable autostart for the 6.x edge filer and enable autostart for the 7.x edge filer. For full details, refer to VMware documentation.
- Select the host for the 6.x edge filer.
- Select the Configure tab and then VM Startup/Shutdown under Virtual Machines.
- Select the 6.x edge filer and click EDIT.
- Move the 6.x edge filer down so startup is disabled.
- Click OK.
- Select the host for the 7.x edge filer.
- Select the Configure tab and then VM Startup/Shutdown under Virtual Machines.
- Select the 7.x edge filer and click EDIT.
- Move the 7.x edge filer up so startup is enabled.
- Click Edit and set Startup delay to
30. - Click OK.
- Click OK.

 and then click Shutdown.


The database on the 7.x edge filer is built and files are synced from the portal.
Direct all the users to the 7.x edge filer. Users can now access and work on the 7.x edge filer.
If, for whatever reason, the migration did not complete successfully, you can try using the copy of cloudsync.db saved to a public share. If this does not work, revert back to the 6.x edge filer and contact CTERA support.
Was this article helpful?