Integrating CTERA Portal with a Directory Service
- 7 Minutes to read
- Print
- DarkLight
- PDF
Integrating CTERA Portal with a Directory Service
- 7 Minutes to read
- Print
- DarkLight
- PDF
Article Summary
Share feedback
Thanks for sharing your feedback!
Before integrating the portal to an active directory, to set up integration with SSL:
- LDAPS (TCP port 636) and Global Catalog SSL (TCP port 3269) ports must be opened.
- Domain controllers must have a domain controller certificate with the EKU (Enhanced Key Usage) Client Authentication/ServerAuthentication.
- On the domain controller, open the Certificates MMC and export the domain controller certificate into .cer format.
- Import the certificate on each CTERA Portal application server:
- Log in to each CTERA Portal application server using SSH.
- Run the command:
portal-cert.sh import -f <certificate>.cer <Alias_Name>where certificate is a name for the certificate and Alias_Name is a name you can use to identify the certificate.NoteYou only need to import the certificate and not the whole certificate chain.
- After importing the certificate to each CTERA Portal application server, run the command to start the portal:
portal-manage.sh restart - Follow the instructions for Active Directory in the To integrate a virtual portal with a directory service procedure, below, checking Use SSL.
- Remove access to ports TCP 389 and TCP 3268.
To integrate a virtual portal with a directory service:
Select Settings in the navigation pane.
The Control Panel page is displayed.
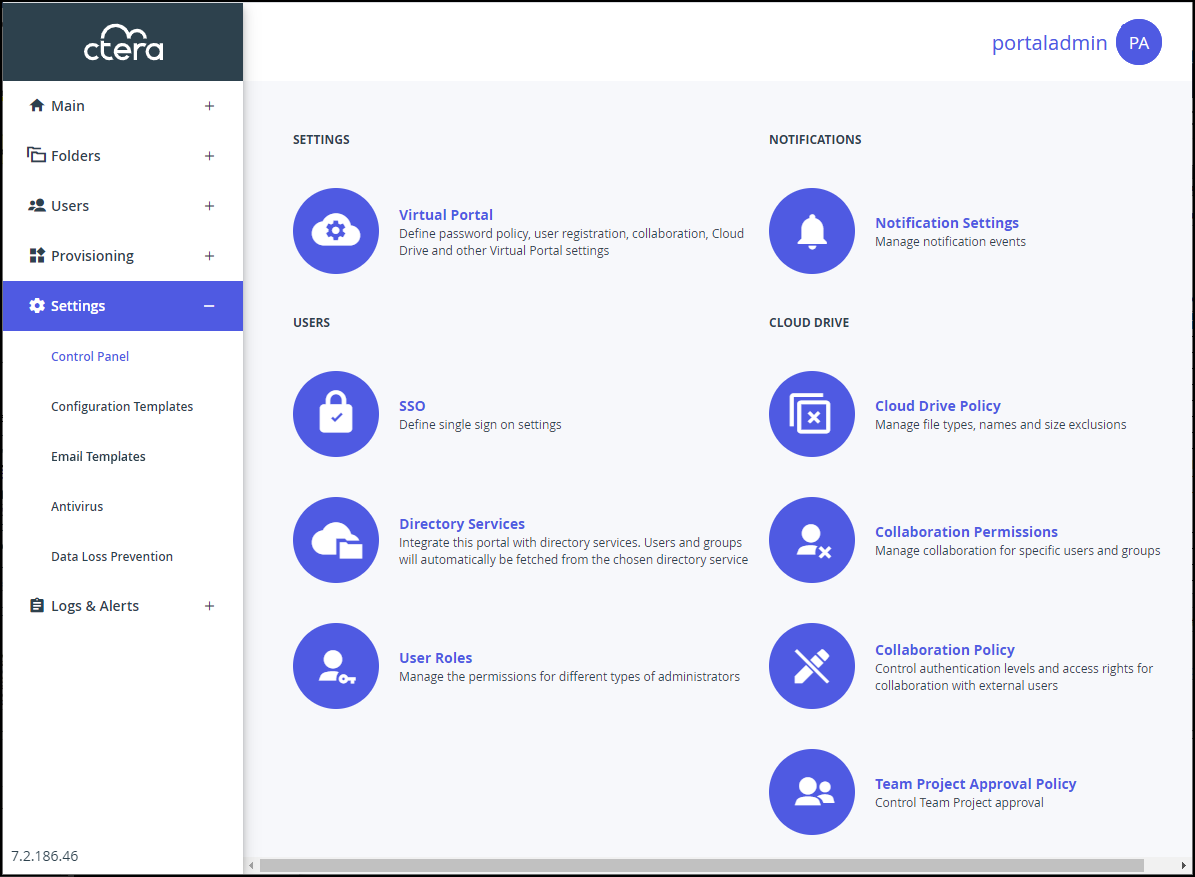
Select Directory Services under USERS in the Control Panel page.
The Directory Services window is displayed.
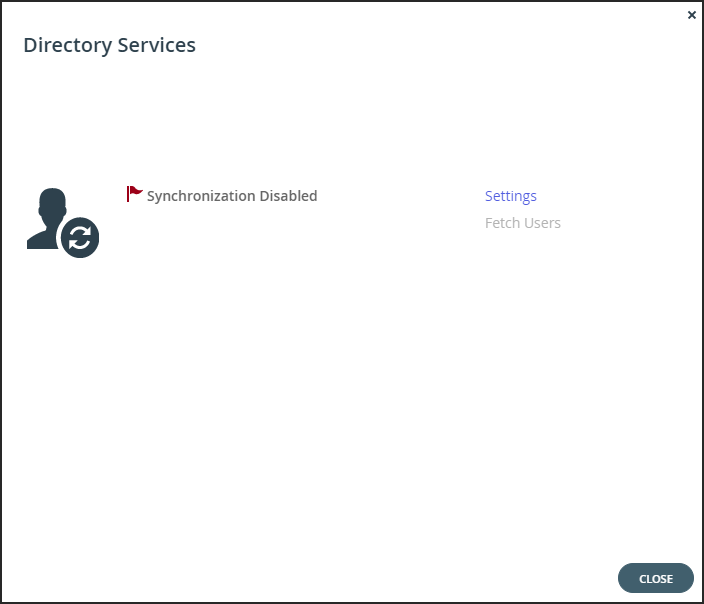
Click Settings to set directory settings, including enabling connecting to a directory service. If you have already connected to a directory service, you can fetch all the users from the domain by clicking Fetch Users, as described in Manually Fetching User Data.
After clicking Settings, the Directory Services Settings window is displayed.
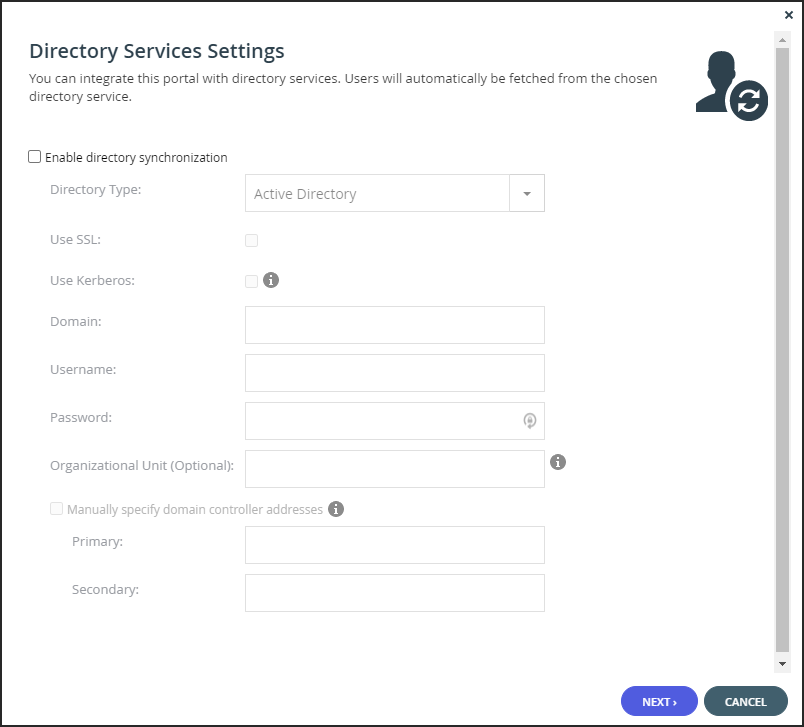
Enable Directory Synchronization – Enable integration with a directory domain.
Directory Type – The type of directory with which to integrate portal:- Active Directory
- LDAP
- Apple Open Directory
After selecting the directory type the fields are enabled and match the type selected.
Active Directory

Use SSL – Connect to the Active Directory domain using SSL.
Use Kerberos – Use the Kerberos protocol for authentication when communicating with the Active Directory domain. This is useful for achieving Single Sign-on (SSO) with Windows computers. If unchecked, NTLM is used.NoteOnly one virtual portal, per system, can use Kerberos.
Domain – The name of Active Directory domain with which you want to synchronize users.
Username – The name to use for authenticating to Active Directory.
Password – The password for authenticating to Active Directory.
Organizational Unit (Optional) – The name of the organizational unit within the Active Directory domain.
Manually specify domain controller addresses – The IP address of the Active Directory domain controllers. If unchecked, DNS is used to automatically find the domain controllers.- Primary – The address of the primary domain controller.
- Secondary – The address of the secondary domain controller.
LDAP Directory Server
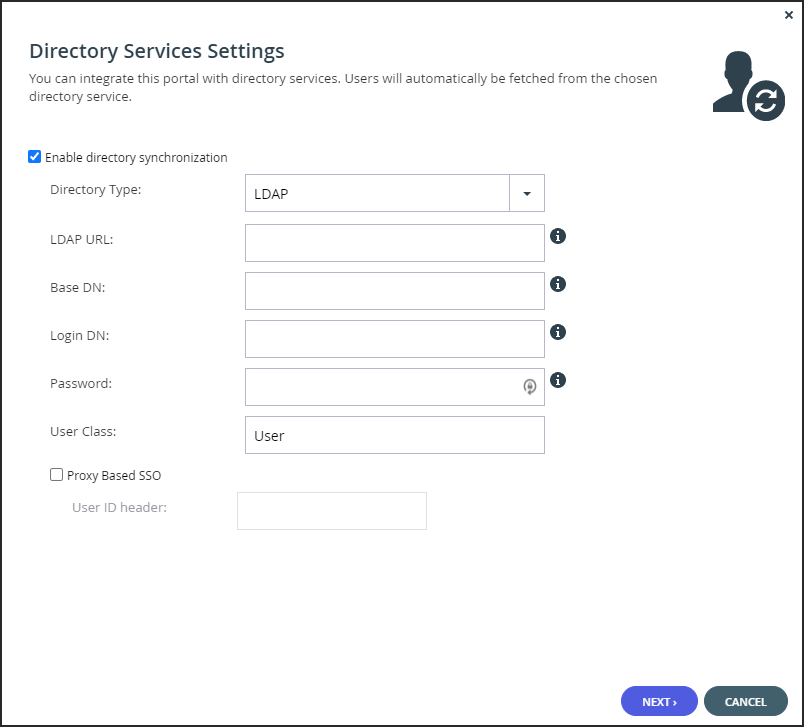
LDAP URL – The URL to connect to the LDAP server. Both ldap and ldaps are supported. The default port is 389 for ldap and 636 for ldaps.
Base DN – Optional: The base DN of the LDAP server.
Login DN – The bind DN: The distinguished name of a user with full user read rights, used for binding to the directory. For example,cn=Manager,dc=company,dc=com
Password – The password to use for binding to the LDAP server.
User Class – The LDAP object class for user objects in the LDAP directory.
Proxy Based SSO – To configure an access manager that supports proxy-based SSO, also known as reverse proxy-based SSO:- User ID Header – The attribute that your access manager adds to each incoming HTTP request.
Apple Open Directory Server

LDAP URL – The URL to connect to the Apple Open Directory server.
Base DN – Optional: The base DN of the Apple Open Directory server.
Login DN – The distinguished name of a user with full user read rights, used for binding, authenticating, to the LDAP server, also known as bind DN.
Password – The password to use for binding to the Apple Open Directory server.
Proxy Based SSO – To configure an access manager that supports proxy-based SSO, also known as reverse proxy-based SSO:- User ID Header – The attribute that your access manager adds to each incoming HTTP request.
Click NEXT.
Active Directory
The portal connects to the domain and the UID/GID Mappings window is displayed.
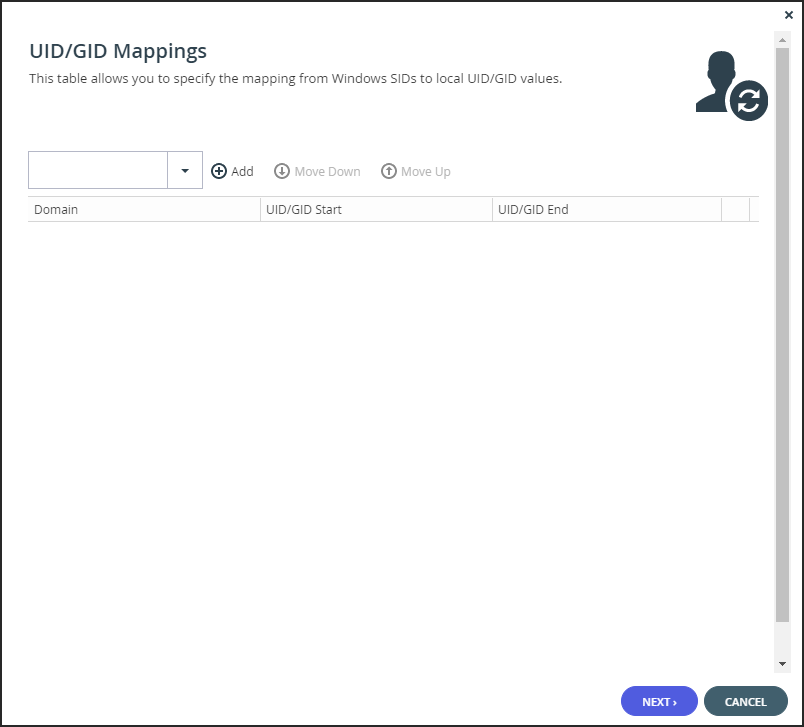
- To add the other Active Directory domains in the tree/forest, do the following for each one:
- Select the user to add to the group and click Add.
- In the Add domain field, enter the Active Directory domain name, or select it from the drop-down list.
- Click Add.
The domain is added. - In the UID/GID Start field enter the starting number in the range of portal user and group IDs (UID/GID) to assign to users and user groups from this Active Directory domain.
- In the UID/GID End field enter the ending number in the range of portal user and group IDs (UID/GID) to assign to users and user groups from this Active Directory domain.
- You can re-order the list of added domains by selecting a domain and clicking Move Up or Move Down.
The order in which domains are displayed represents the order in which the domains are displayed in lists throughout the portal interface. - To remove an Active Directory domain, select the domain row and click .
The domain is removed. - Click NEXT.
The Access Control window is displayed.
LDAP
The portal connects to the LDAP server and the Advanced LDAP Mappings window is displayed. To configure the portal to match a custom LDAP schema:- Edit the LDAP mappings: Click each attribute that maps to the corresponding user properties.
The following user properties must be mapped to LDAP attributes:
username – The user name in the portal to uniquely identify the user. This can map to any LDAP attribute that uniquely identifies the user, such as userPrincipalName.
password – The user password. The corresponding LDAP attribute is userPassword.
email – The user email. The corresponding LDAP attribute is mail.
firstName – The user first name. The corresponding LDAP attribute is givenName.
lastName – The user family name. The corresponding LDAP attribute is sn.
memberOf – The group the user is a member of. The corresponding LDAP attribute is memberOf. - Click NEXT.
The Access Control window is displayed.
Apple Open Directory
The portal connects to the Apple Open Directory server and the Access Control window is displayed.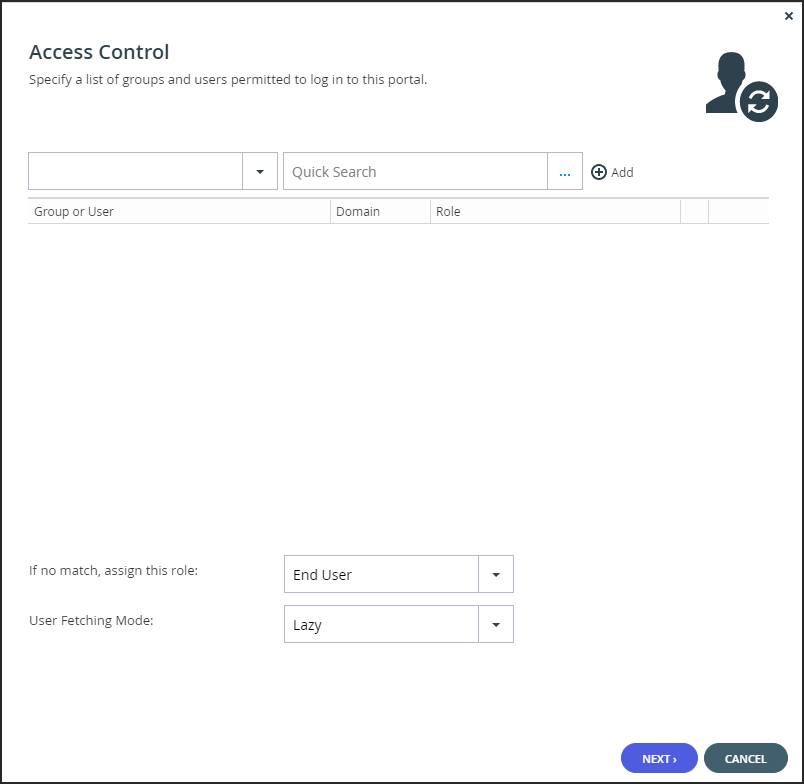
Add each directory user and user group allowed to access the portal:
- In the drop-down list, select one of the following:
Domain Users – Search the users defined in directory service.
Domain Groups – Search the user groups defined in directory service. - Select the user or user group from the drop-down list or in the Quick Search field, enter a string that is displayed anywhere within the name of the user or user group you want to add.
- Select the user or group and click Add.
The user or user group is added to the list of users and user groups with access to the portal.
- In the drop-down list, select one of the following:
To remove a user or group, select the row and click
 .
.
The user or user group is removed.In each user and user group's row, click in the Role column, then select the user role from the drop-down list.
Disabled – The user account is disabled. The user cannot access the end user portal view.
End User – The user can access the End User Portal.
Read/Write Administrator – The user can access the end user portal view as an administrator with read-write permissions.
Read Only Administrator – The user can access the end user portal view as an administrator with read-only permissions.
Support – The user can access the end user view portal as an administrator and has read/write access to devices, user accounts, folders, and folder groups, and read-only access to all other settings in the portal.To assign a role for a directory user or user group with no match in the access control list, select the user role from the If no match, assign this role drop-down list: Disabled, End User, Read/Write Administrator, Read Only Administrator, Support.
To automatically fetch new users and create home folders for them, without the need to perform a manual fetch for them or to require them to sign in to the portal, select Eager from the User Fetch Mode drop-down list.
Lazy – Users are created and data associated with them after either the user signs in to the portal or a manual fetch is performed for the users.
Eager – Users in groups in the access control list are immediately created and home folders created for them.Click NEXT.
The Wizard Completed window is displayed.Click FINISH. The Apply Changes window is displayed.
While the changes are being applied you can either stop the process, by clicking STOP or close the window while the process continues to run in the background by clicking CONTINUE IN BACKGROUND.Click CLOSE.
Synchronization with the directory server is enabled.
Click Fetch Users to retrieve the users from the directory, to use in the portal.
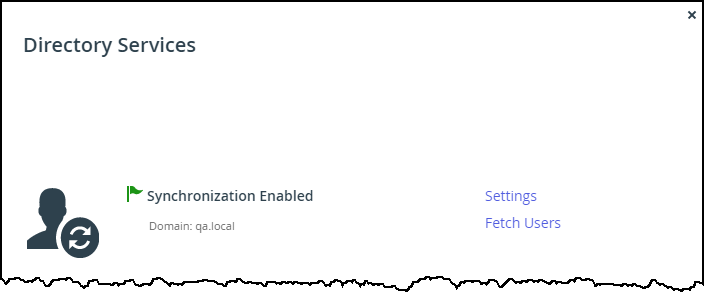
Click CLOSE.


 .
.
The users in the portal are automatically updated at midnight of every night with the users in the directory. To immediately fetch the users, see Manually Fetching User Data.
Was this article helpful?