Restoring Files From Backup
- 5 Minutes to read
- Print
- DarkLight
- PDF
Restoring Files From Backup
- 5 Minutes to read
- Print
- DarkLight
- PDF
Article Summary
Share feedback
Thanks for sharing your feedback!
The CTERA Edge Filer provides a number of ways to restore files to previous versions stored on the cloud, or to recover deleted files from the cloud. Some of the methods can be used by administrators, while other methods enable end users to restore their own files.
You can restore files and folders to the CTERA Edge Filer using any of the following:
- The CTERA Edge Filer user interface's Cloud Backup Control Panel
This can be done by administrators only. See Restoring Files and Folders from the Cloud Backup Control Panel. - The CTERA Edge Filer user interface's Files view
This can be done by both administrators and end users. See Restoring Files and Folders From the Files View. - The Virtual Cloud Drive
This can be done by both administrators and end users. See Restoring Files and Folders Using the Virtual Cloud Drive. - Microsoft Windows Previous Versions Interface
This can be done by both administrators and end users. See Restoring Files and Folders Using Microsoft Windows Previous Versions Interface. - The CTERA Portal
You can access the CTERA Portal and restore files from there. This can be done by administrators only.
Restoring Files and Folders from the Cloud Backup Control Panel
You can restore individual files or folders that were backed up to cloud storage. Alternatively, you can simultaneously restore all backed up files and folders, in order to roll back the disk contents to a previous point-in-time.
Note
If the same files already exist on your computer, they are overwritten with the files you selected for restoration. Files that have been deleted since the date of the selected files will be recreated. Files that exist on your computer, but which do not exist in cloud storage or were not selected for restoration, are not affected.
To restore files, the CTERA Edge Filer must be connected to the CTERA Portal.
To restore backed up files from the Cloud Backup Control Panel:
- In the Configuration view, select Cloud Backup > Control Panel in the navigation pane.
The Control Panel page is displayed.

- Click Restore.
The Restore Files wizard opens, displaying the Select Files to Restore window.
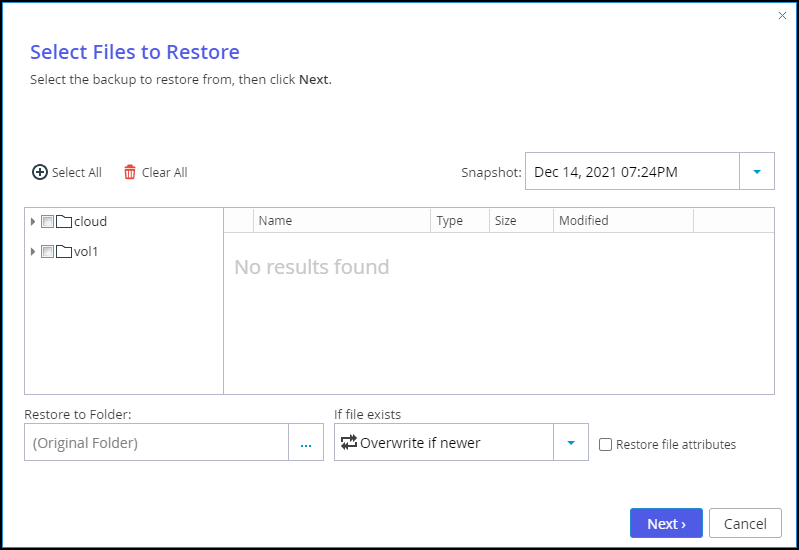
- In the Snapshot drop-down list, select the snapshot from which you want to restore files.
- Specify which files and folders you want to restore, by doing any of the following:
- To select individual files and folders:
- In the left pane, expand the nodes and click on the desired folders.
The folder contents are displayed in the right pane. - Check the boxes next to the folders and files to restore.
- In the left pane, expand the nodes and click on the desired folders.
- To select all files, click Select All. The folder icons change to .
- To deselect all files, click Clear All.
- To select individual files and folders:
- To restore files to a location other than the original location, click in the Restore to Folder field, and then browse to the desired location.
- Click the down arrow next to the If file exists option and select the action to take when restoring files that already exist on the drive.
- Overwrite
- Append modification date
- Skip
- Overwrite if newer
- To restore file attributes, check Restore file attributes.
- Click Next.
- Click Finish.
A progress bar is displayed, showing the progress of the restore operation. - Click the down arrow under the progress bar at the end of the progress bar and select a menu item to toggle between the following restore information.
- The effective throughput.
- Bandwidth usage.


Canceling the Current Restore Process
When restoring files from the Control Panel, you can cancel a running file restore process by clicking Cancel.
Restoring Files and Folders From the Files View
- In the Files view, make sure you are viewing the Show Shares tree pane view.
- Drill-down to the folder or files you want to restore.
- Click the CURRENT option.
A list of snapshots is displayed.
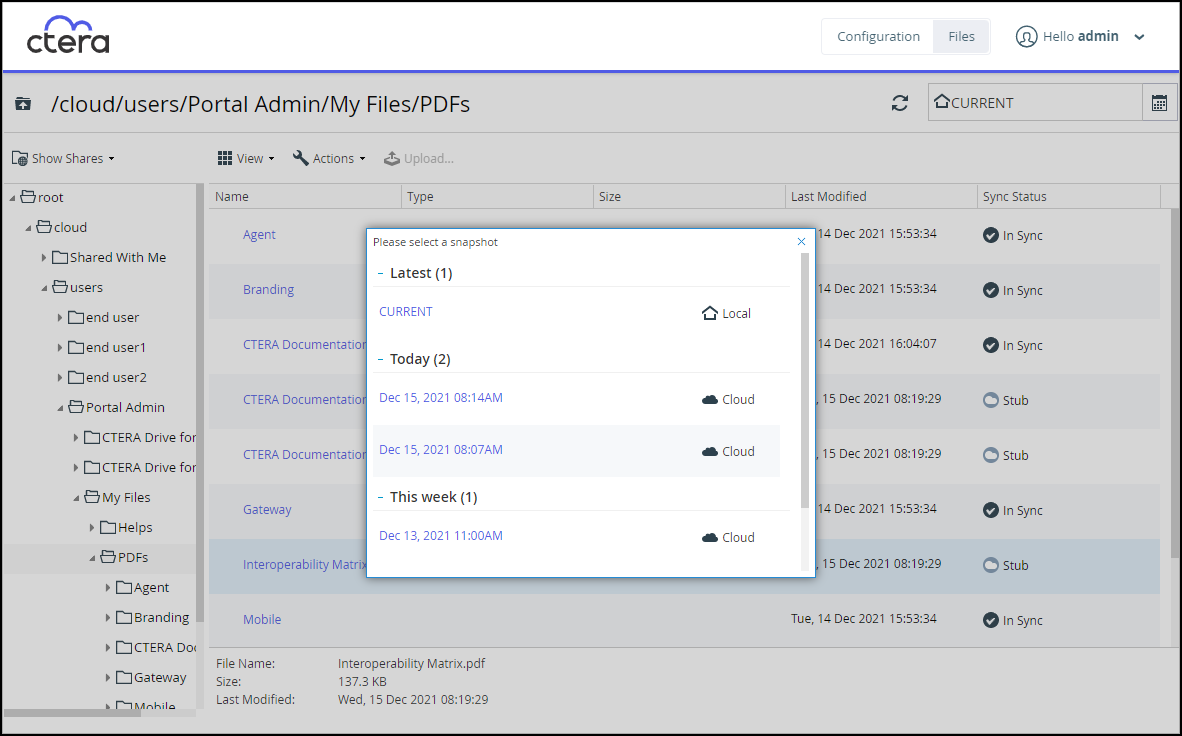
- Select the snapshot containing the files or folder you want to restore.
The content of the snapshot for that date is displayed.
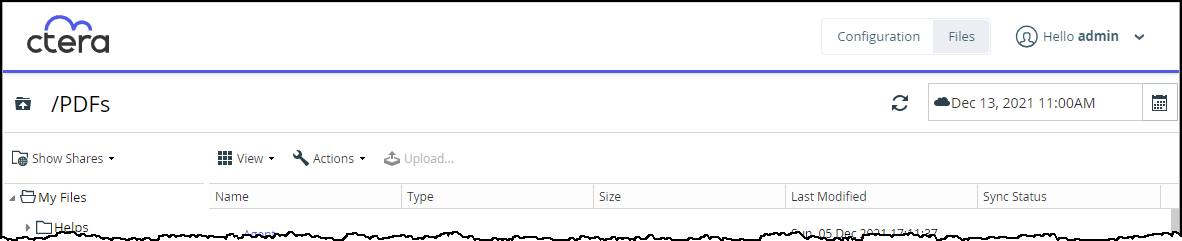
- Select the files and folders to restore and click Actions > Copy.
- Click the CURRENT option to display the Latest Version snapshot.
- Drill down to the location where you want to restore the folders or files.
- Click Actions > Paste to Paste the selected files and folders you copied to the Latest Version folder.


Restoring Files and Folders Using the Virtual Cloud Drive
When Windows File Sharing (SMB) is enabled, you can restore previous versions of files and folders via the Virtual Cloud Drive. The operating system to which the files or folders are being restored must support Windows File Sharing.
To restore an individual file or folder to a previous version from the virtual cloud drive:
- Display the network share containing the file or folder.
See Viewing Network Shares Using Windows File Sharing. - Open
PreviousVersions\Cloud, and then browse to the file or folder and date. - Copy the file or folder to another location.
Restoring Files and Folders Using Microsoft Windows Previous Versions Interface
Microsoft Windows Previous Versions enables you to restore individual files or folders that were backed up to cloud storage, directly from your PC. You can restore files to previous versions, or recover deleted files.
To restore an individual file or folder to a previous version using Windows Previous Versions:
- Display the network share containing the desired file or folder.
See Viewing Network Shares Using Windows File Sharing. - Open the relevant network share, and browse to the desired file or folder.
- Right-click the file or folder and select Properties.
The Properties window is displayed. - Click the Previous Versions tab.
The Previous Versions tab is displayed. - In the File versions or Folder versions list, select the version you want to restore.
- Click Restore and then Restore again in the confirmation box.
The file is restored.
To restore a deleted file:
- Display the network share containing the desired file or folder.
See Viewing Network Shares Using Windows File Sharing. - Open the relevant network share, and browse to the folder that contained the file prior to the file's deletion.
- Right-click the folder and select Properties.
The Properties window is displayed. - Click the Previous Versions tab.
The Previous Versions tab is displayed. - In the File Versions list, locate the deleted file.
- Click Restore.
The file is restored.
Was this article helpful?