- 16 Minutes to read
- Print
- DarkLight
- PDF
Amazon S3
- 16 Minutes to read
- Print
- DarkLight
- PDF
All AWS S3 buckets that support instsant access, including Standard, Standard-IA, Intelligent-Tiering, and Glacier Instant Retrieval are supported. Refer to AWS documentation for the differences between these storage types.
All data in transit to and from a storage node and at rest, stored in the Amazon S3 storage node, is encrypted. In addition, SSE-S3 encryption is automatically set on all S3 buckets.

As soon as you specify that the storage node is Amazon S3, an AWS Snowball option is added to the New Storage Node window. For details, see Setting Up the CTERA Portal with AWS Snowball.
Bucket Name – A unique name for the Amazon S3 bucket that you want to add as a storage node.
Use Access and Secret Keys – Use Amazon S3 access credentials for the storage node.
- Access Key ID – The AWS S3 access key ID.
- Secret Access Key – The AWS S3 secret access key.
Use AWS IAM Role Policy – When the portal is also running as an AWS EC2 instance, you can define an IAM policy and then assign this policy to an EC2 role which is then attached to the portal instance, via Instance Settings > Attach/Replace IAM Role in the AWS Management Console. If you set up this type of policy, you do not need to specify the Access and Secret keys to access the storage node. For an example IAM policy, see the instructions for installing a portal in AWS.
Endpoint – The endpoint name of the S3 service. The default value for Amazon S3 is s3.amazonaws.com. The port for the endpoint can be customized by adding the port after the URL, using a colon (:) separator. The default port is 80.
Use HTTPS – Use HTTPS to connect with the storage node.
- Trust all certificates – Do not validate the certificate of the object storage. Normally this is unchecked.
Direct Mode – Data is uploaded and downloaded directly to and from the storage node and not via the portal. If direct mode is defined for the storage node, CTERA recommends setting the deduplication method to fixed blocks and keeping the default 4MB fixed block size. For details, see Default Settings for New Folder Groups.
Once Direct Mode is set, the Use HTTPS option is also checked and cannot be unchecked.
Add Metadata Tags – Use custom metadata to support information lifecycle management rules (ILM) on the storage node to differentiate between backup and cloud drive blocks. Checking Add Metadata Tags implements the ILM, enabling storage tiering so that data can be routed across different object storages based on whether the data is backup or cloud drive related.
Integrating CTERA Portal with S3-Versioned Buckets
This section describes the procedure to use with AWS S3 storage buckets when versioning is used for CTERA Portal data. When versioning is enabled, you want to ensure that versioned objects are retained for seven (7) days. To ensure that versioned data is deleted from the S3 bucket at the same time that the metadata is deleted from the portal database, you need to create a lifecycle rule in AWS.
If, for any reason, you want to keep versioning for longer than seven days, you can choose a number greater than 7.
To set up versioning:
- From your Amazon Web Services account, sign-in to the AWS Management Console and select Services.
- Under Storage, select S3.
- Click the CTERA Portal bucket from the S3 buckets list and then select the properties tab to check that Versioning is enabled.
The properties for the bucket are displayed.
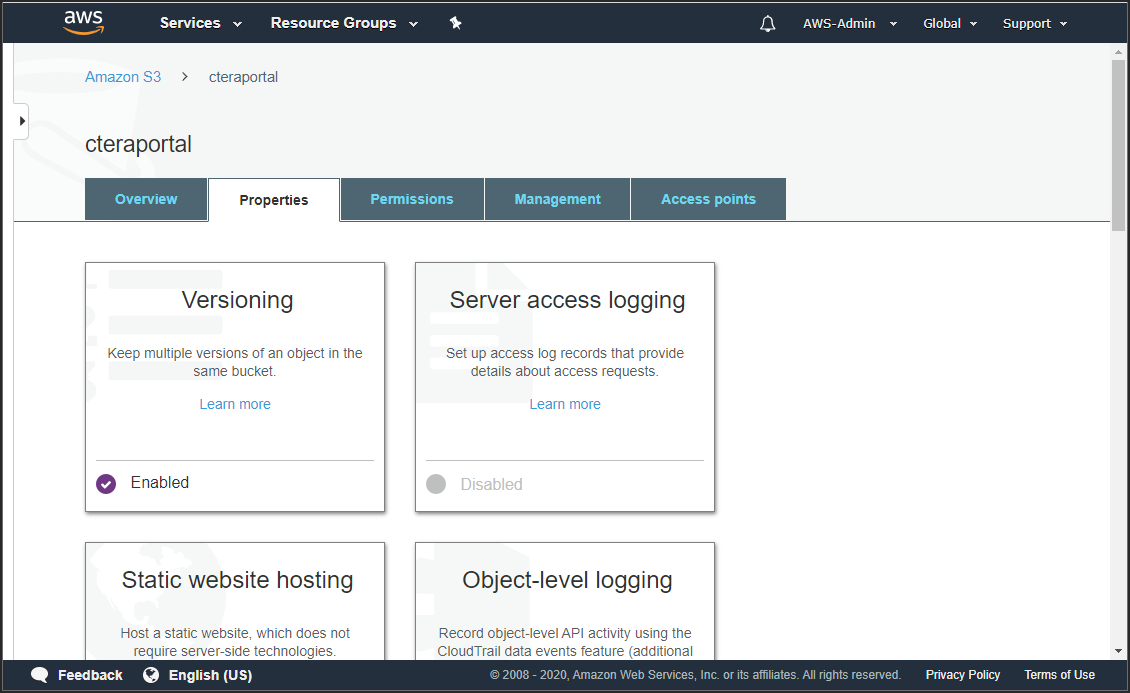
When Versioning is enabled, you are paying for multiple versions of the same document, which you will want to remove in line with the CTERA Portal retention policy. - Select the Management tab.
The management details for the bucket are displayed.
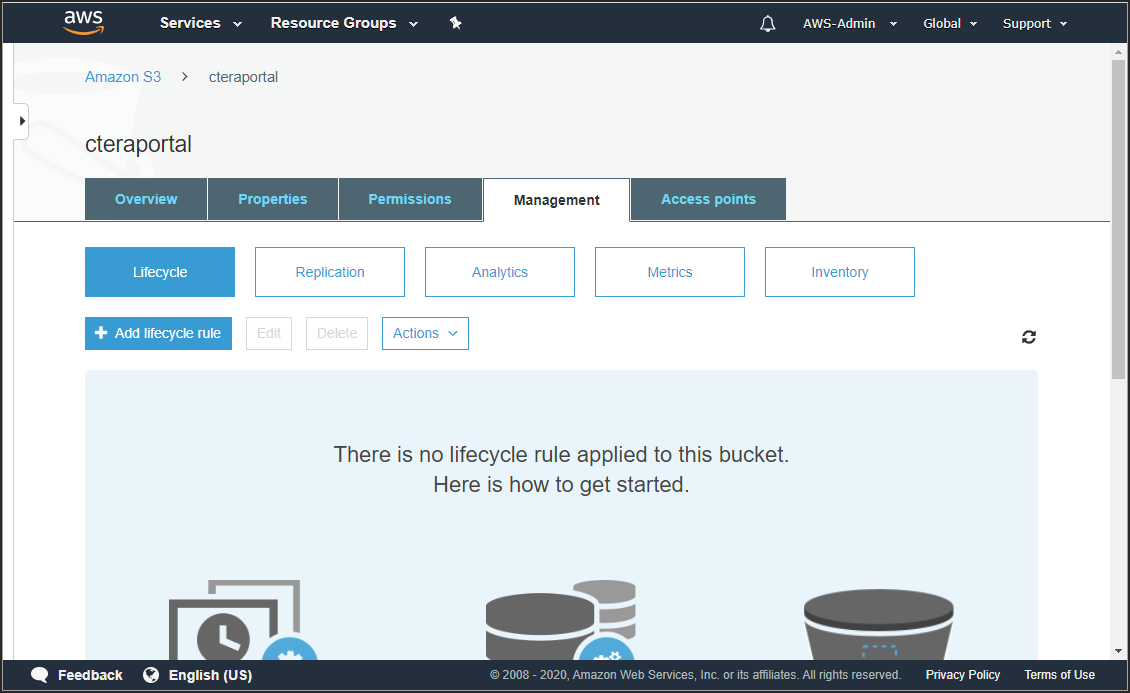
- Click Add lifecycle rule.
The Lifecycle rule wizard is displayed.
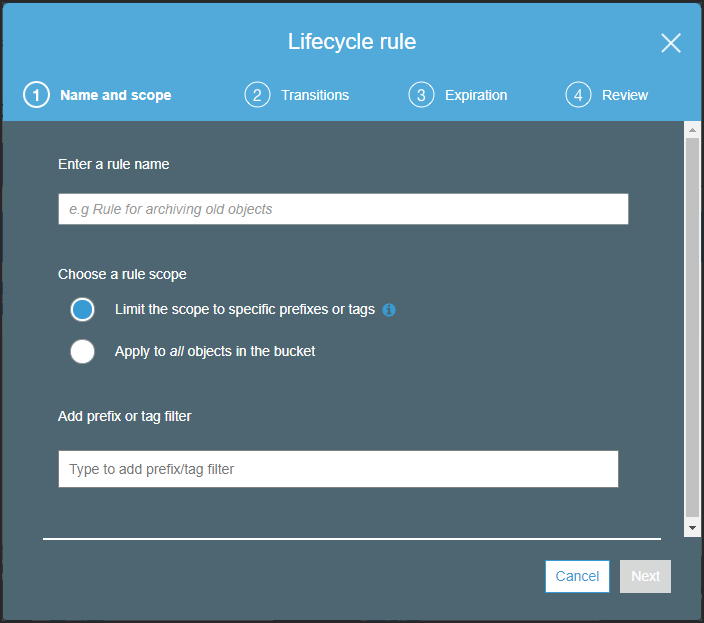
- Enter a name for the rule and select the Apply to all objects in the bucket option.
- Click Next.
The Transitions step is displayed.
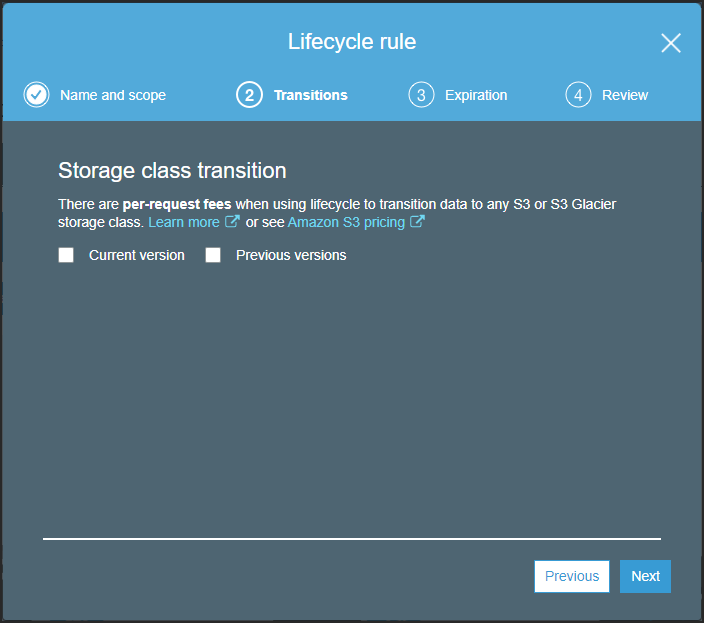
- Select Previous versions.
After checking Previous versions, the Transitions step is redisplayed with the option to add a transition storage type.
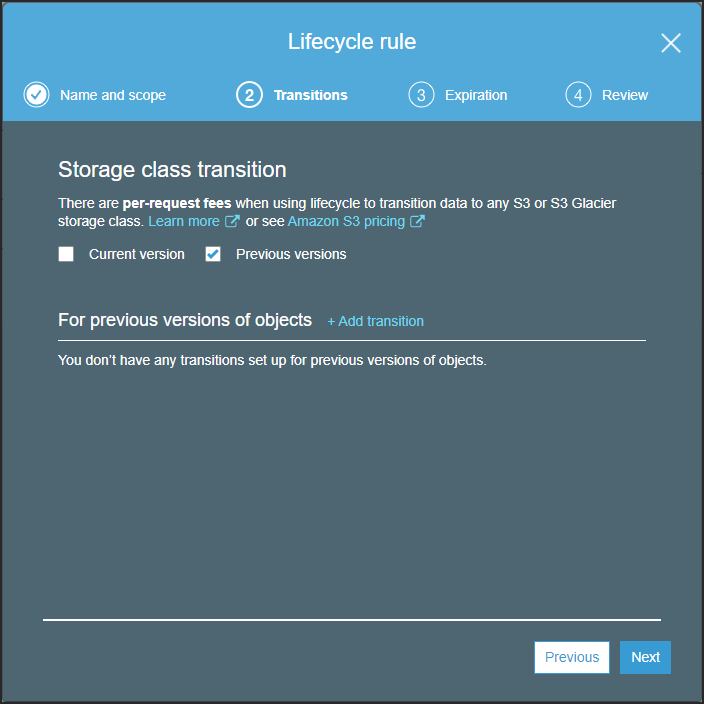
- Without adding a transition, click Next.
The Expiration step is displayed.
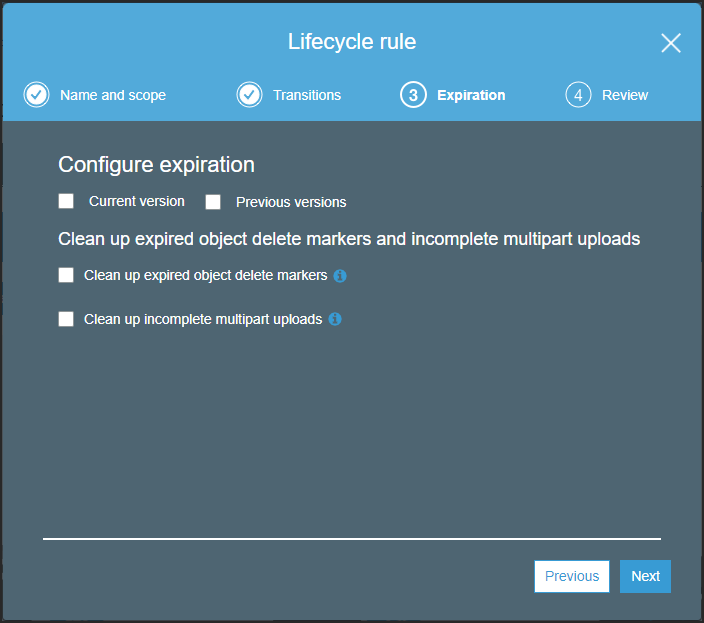
- Select Previous versions.
The Expiration step is redisplayed with the option to specify the number of days to wait before deleting a previous version.
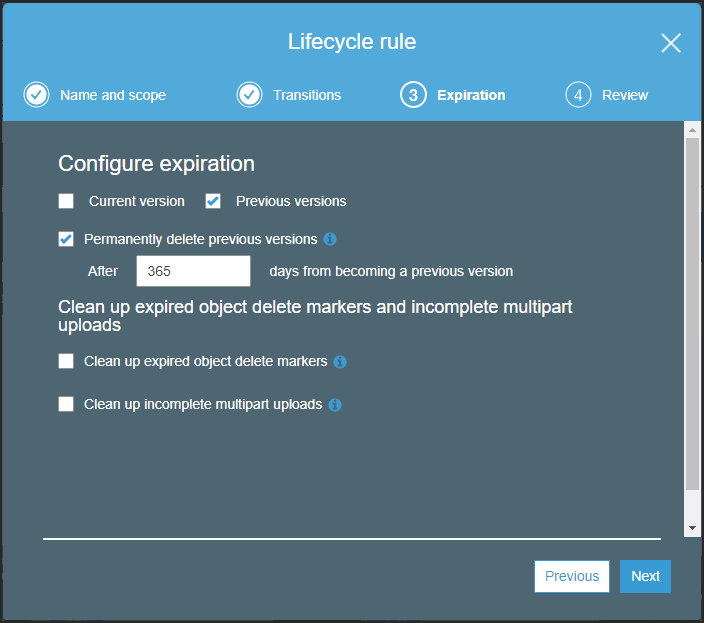
- Specify seven (7) days, after which the previous version is permanently deleted.
- Check Clean up expired object delete markers.
- Click Next.
The Review step is displayed.
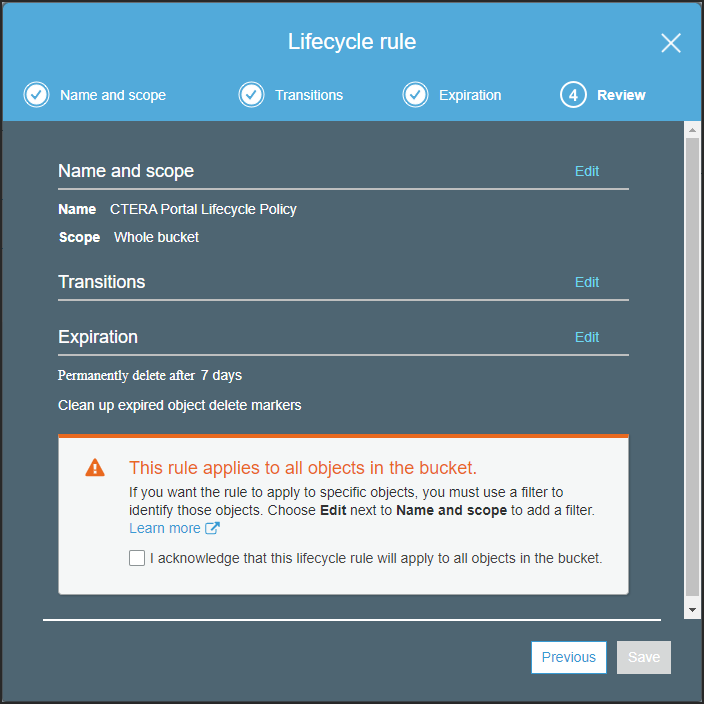
- Review the details of the rule and if satisfied, check the acknowledgment.
- Click Save.
Lifecycle rules run once a day at midnight UTC.
The first time the rule runs, it can take up to 48 hours.
Using AWS Intelligent Tiering For CTERA Portal Storage
Each object in Amazon S3 has a storage class associated with it. Amazon S3 offers a range of storage classes for the objects that you store. You choose a class depending on your use case scenario and performance access requirements.
The STANDARD storage class is the default storage class if you don't specify a storage class when you upload an object to AWS. However, Amazon also offer a storage class that automatically optimizes frequently and infrequently accessed objects, the INTELLIGENT_TIERING storage class.
The INTELLIGENT_TIERING storage class is designed to optimize storage costs by automatically moving data to the most cost-effective storage access tier, without performance impact or operational overhead.
How Does Intelligent Tiering Work
The INTELLIGENT_TIERING storage class is suitable for objects larger than 128 KB that you plan to store for at least 30 days. The storage class stores objects in two access tiers: one tier that is optimized for frequent access and another lower-cost tier that is optimized for infrequently accessed data. Amazon S3 monitors access patterns of the objects in the storage class and moves data on a granular object level that has not been accessed for 30 consecutive days to the infrequent access tier.
With intelligent tiering, you are charged a monthly monitoring and automation fee per object instead of retrieval fees. If an object in the infrequent access tier is accessed, it is automatically moved back to the frequent access tier, but no fees are applied when objects are moved between access tiers within the INTELLIGENT_TIERING storage class.
The bigger the block size, the larger the savings. CTERA recommends using the INTELLIGENT_TIERING storage class when the block size is set to 1MB or larger. If the block size is less than 1MB, contact CTERA support to see whether there is a saving. The larger the average object size the more negligible is the monitoring and automation fee as part of the whole fee. Whether you use intelligent tiering or not is mainly dependent on the following considerations:
- The average block size of your objects. The INTELLIGENT_TIERING storage class is suitable for objects larger than 128KB. In CTERA Portal files are broken down in to blocks and the block size is controlled by the Average Block Size setting in the Virtual Portal Settings. The default average block size is 512KB.Note
Use Fixed Block Size if direct mode is defined for the storage node and CTERA recommends keeping the default 4MB fixed block size.
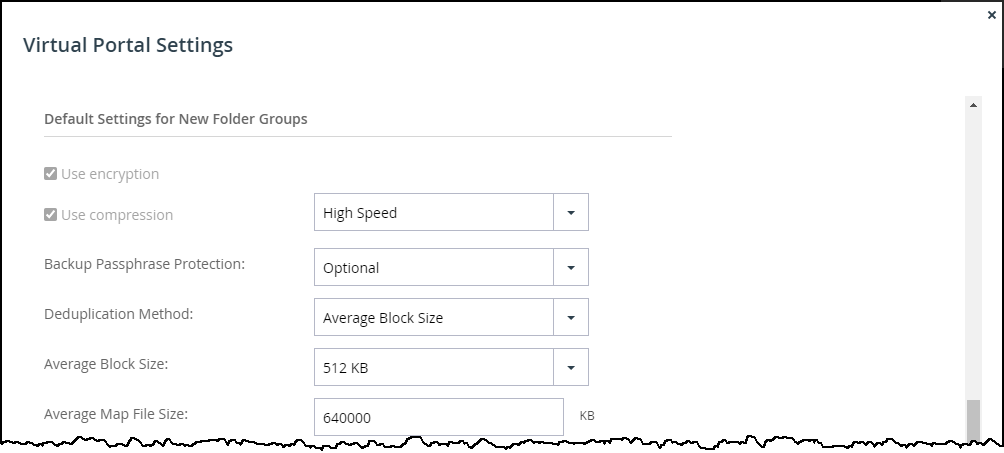
CTERA Portal file maps are typically small and are not included in the intelligent tiering transition rule. - The percentage of infrequently accessed data.
- The percentage of objects stored for less than 30 days. The INTELLIGENT_TIERING storage class is suitable for objects that you plan to store for at least 30 days and if you delete an object before the end of the 30-day minimum storage duration period, you are charged for 30 days. CTERA Portal retains deleted files for at least 30 days, to enable undeleting a file, meaning that this requirement can be ignored.
Changing Storage to Intelligent Tiering
Before transitioning storage to the INTELLIGENT_TIERING storage class, CTERA recommends checking the average size of the objects being stored and the days they are held in storage.
To transition storage to intelligent tiering storage:
- From your Amazon Web Services account, sign in to the AWS Management Console and select Services.
- Under Storage, select S3.
- Click the CTERA Portal bucket from the S3 buckets list and then select the Management tab.
The management details for the bucket are displayed.
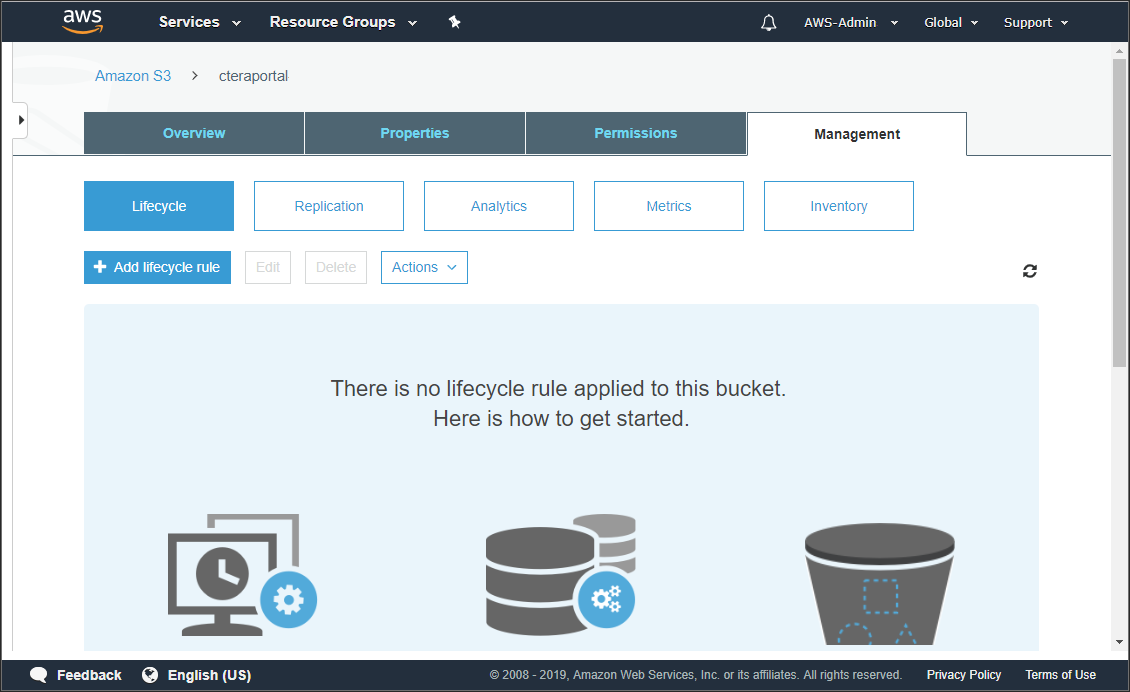
- Click Add lifecycle rule.
The Lifecycle rule wizard is displayed.
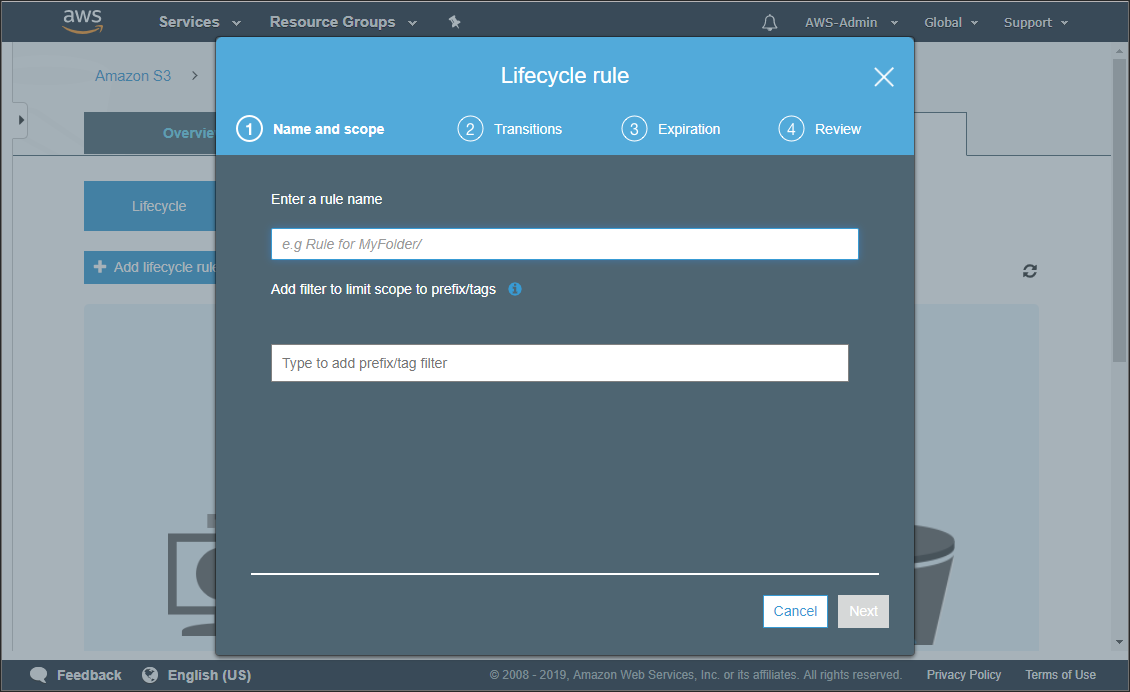
- Enter a name for the rule and in the filter text box enter blocks and the press Enter.
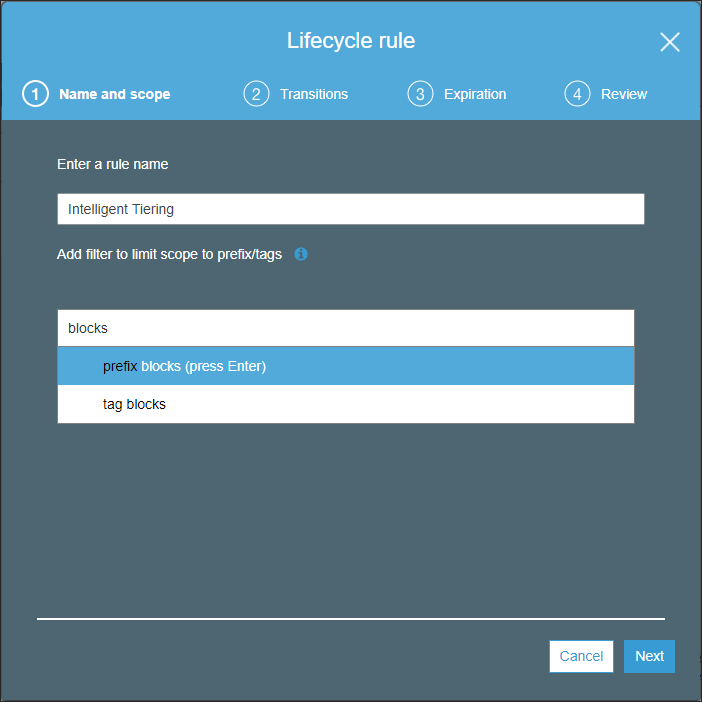
- Click Next.
The Lifecycle rule wizard Transitions screen is displayed.
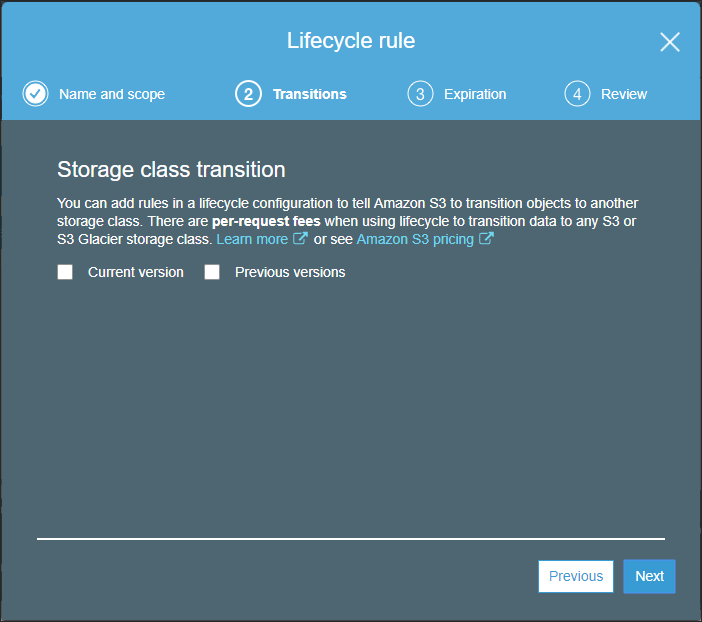
- Check Current version.
The Transitions screen is changed to include the ability to add transitions. - Click Add transition and from the Object creation drop-down select Transition to Intelligent-Tiering after.
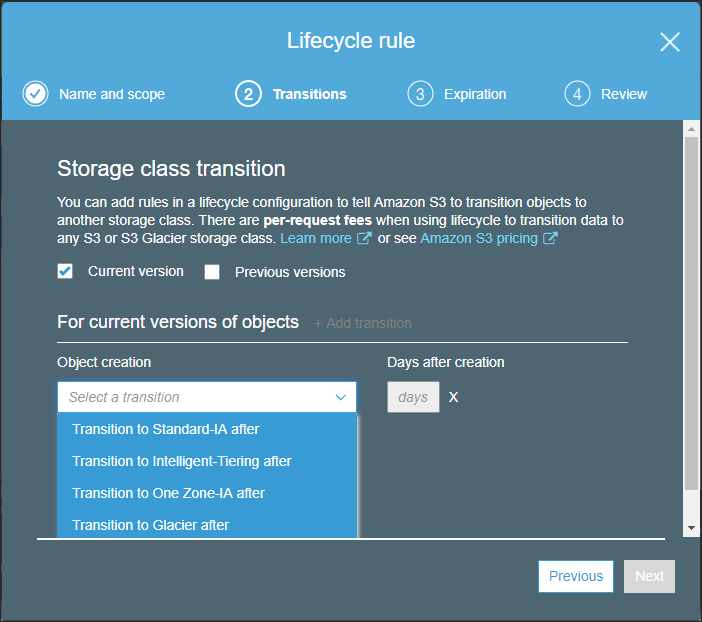
- Specify 7 days to wait until the transition is performed.
- Click Next.
The Lifecycle rule wizard Expirations screen is displayed.
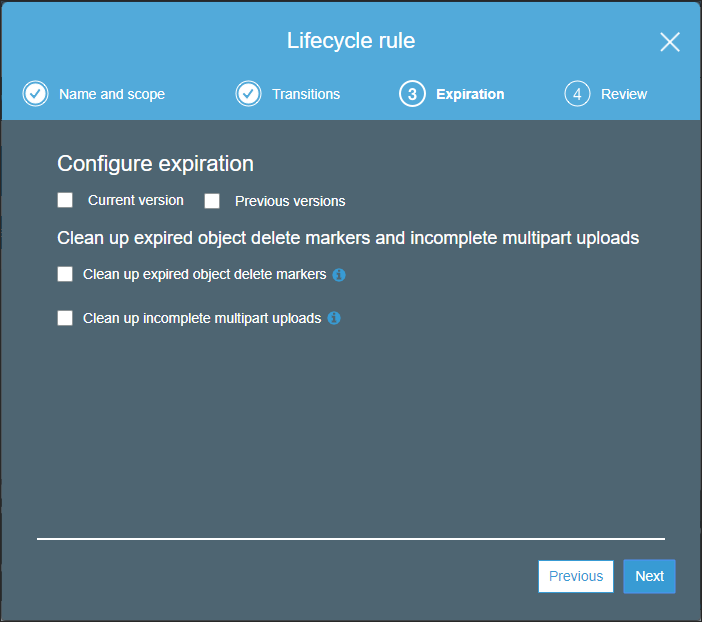
- Leave the defaults, everything unchecked, and click Next.
The Lifecycle rule wizard Review screen is displayed.
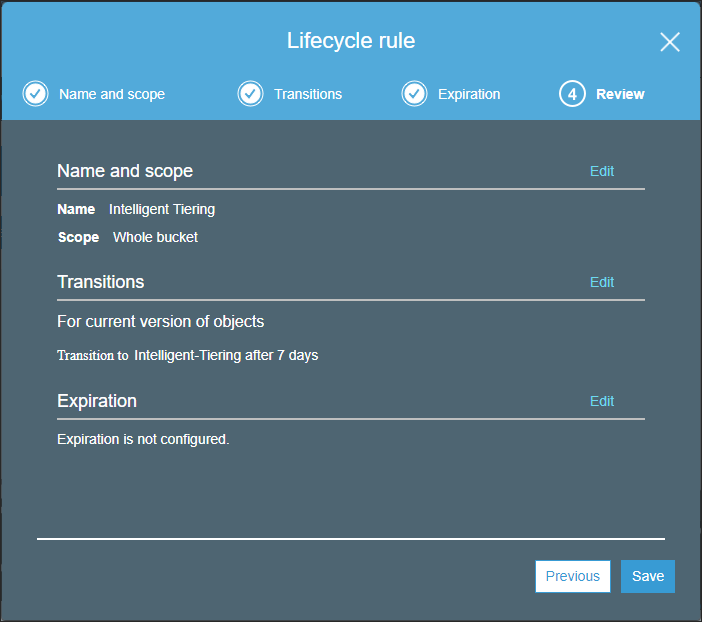
- Click Save.
The management details for the bucket are displayed showing the added lifecycle rule.
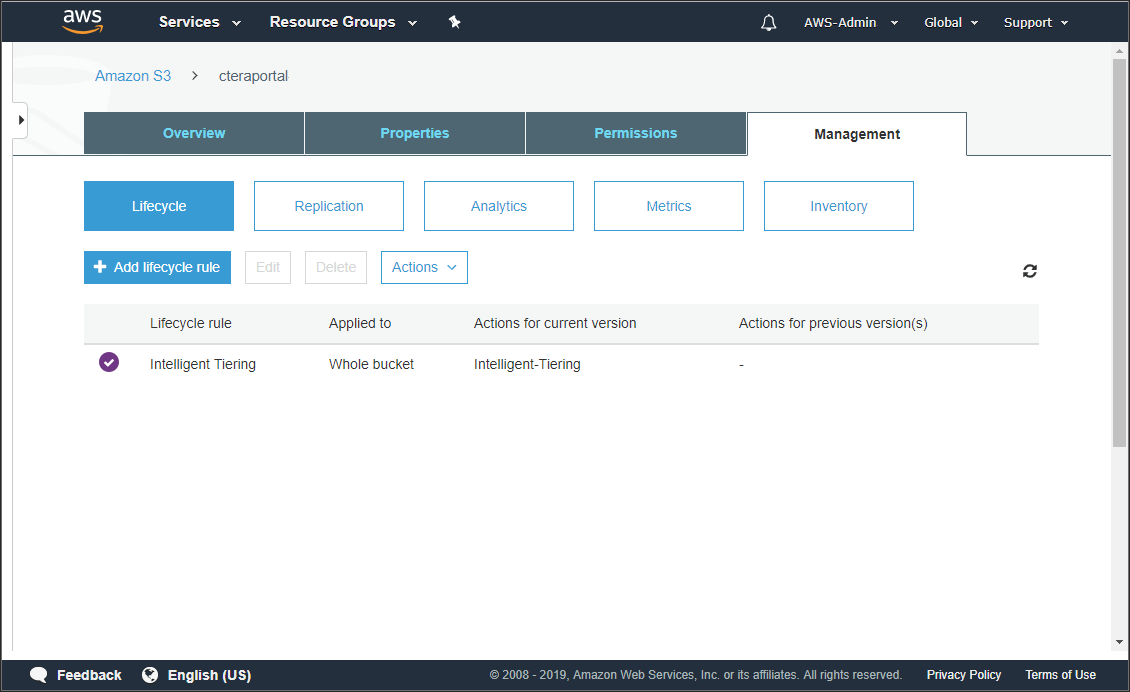
Use management metrics to validate the storage transition.
To access management metrics for an S3 bucket:
- From your Amazon Web Services account, sign in to the AWS Management Console and select Services.
- Under Storage, select S3.
- Click the CTERA Portal bucket from the S3 buckets list and then select the Management tab.
The management details for the bucket are displayed.
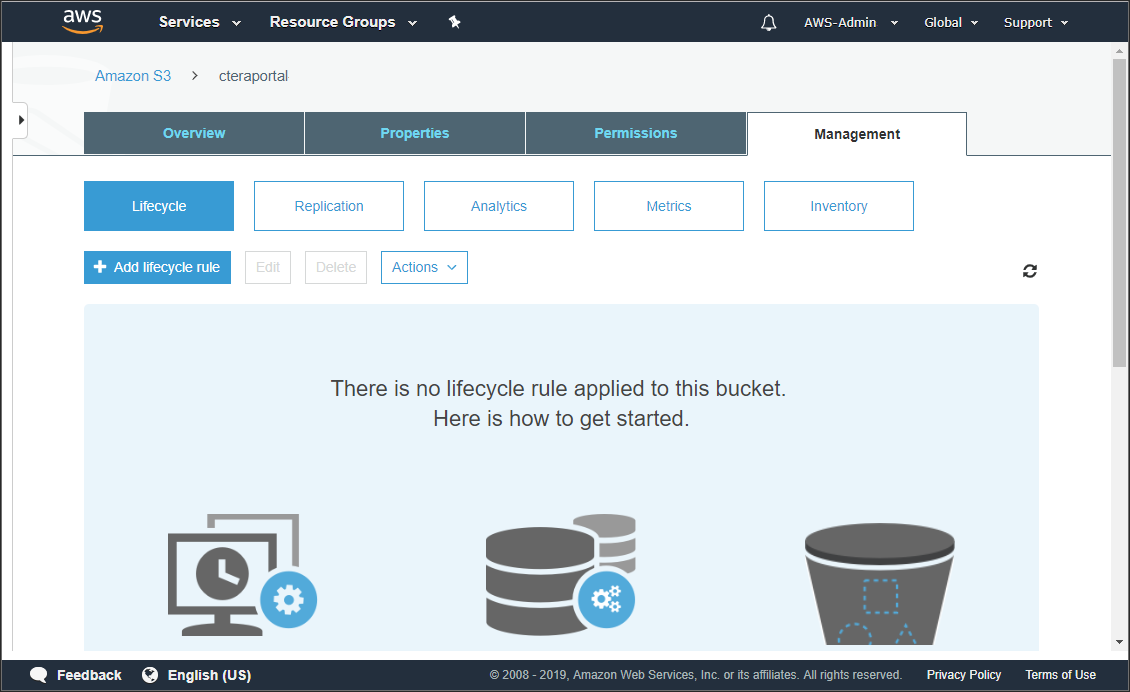
- Click Metrics.
The metrics for the bucket are displayed. Graphs are displayed after transitioning to the INTELLIGENT_TIERING storage class.
Setting Up the CTERA Portal with AWS Snowball
To use AWS Snowball you must have CTERA Edge Filer 7.0.1783.22 or higher.
The AWS Snowball service is part of the AWS Snow Family and uses physical storage devices, Snowball Edge devices, to transfer large amounts of data between your on-premise storage and Amazon S3 storage in the cloud at faster-than-Internet speeds. By working with AWS Snowball, you can save time and money when ingesting large quantities of data from an edge filer to an AWS S3 storage node managed by a CTERA Portal. You install one or more AWS Snowball Edge devices on the same network as the CTERA Edge Filer so that the data is first moved from the CTERA Edge Filer to the Snowball Edge device and from there to the AWS account where it is managed by Amazon to move it to the appropriate AWS S3 storage bucket.
Snowball is intended for transferring large amounts of data. If you want to ingest less than tens of terabytes of data, Snowball might not be your most economical choice.
An AWS Snowball Edge device can handle around 80TB of data. If you are transferring more than the maximum storage for a Snowball Edge device, you need multiple Snowball Edge devices. Each Snowball Edge device must be associated with a different AWS S3 bucket. Therefore, for each Snowball Edge device required, a separate Amazon S3 storage node is required, with each storage node associated with a different AWS S3 bucket.
After all the data has been written to the Snowball Edge devices it is transferred to Amazon, using an AWS courier and Amazon is responsible for populating the S3 buckets with the data. When the data is stored on multiple Snowball Edge devices, all the devices must be shipped at the same time.
You associate each Amazon S3 storage node defined in the CTERA Portal with an AWS Snowball Edge device.
To set up Snowball Edge devices:
- Refer to AWS documentation.
CTERA requires that each Snowball Edge device must be connected to a single ASWS S3 bucket. You need to know for each server the respective bucket when you set up the CTEAR Portal. Also, the Snowball Edge devices must be on the same network as the CTERA Edge Filer.
To set up Snowball usage in the CTERA Portal:
Calculate how many AWS Snowball Edge devices and Amazon S3 storage node are required. Divide the amount of storage to migrate to CTERA by the maximum usable storage possible on one AWS Snowball Edge device.
For example, if the existing file server holds 460TB of data you need 6 AWS Snowball Edge devices to handle the data and therefore 6 AWS storage buckets, with each storage bucket assigned an Amazon S3 storage node.NoteDeduplication and compression often reduce the final amount of storage required by the storage nodes at the end of the process.
Define the Amazon S3 storage node or nodes, one node for each AWS bucket.
In the global administration view, select Main > Storage Nodes in the navigation pane.
The STORAGE NODES page is displayed.
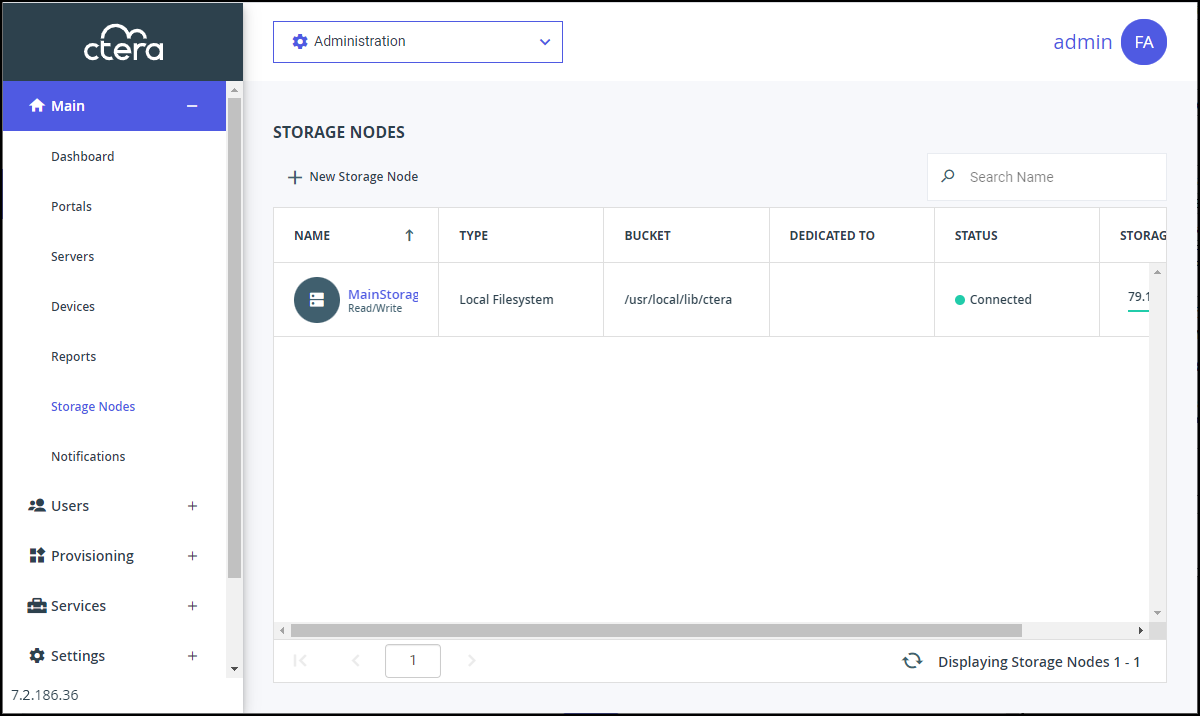
Click New Storage Node.
The New Storage Node window is displayed.Enter the generic details for the storage node.
Type – The type of storage node. Select Amazon S3 from the drop-down text box. As soon as you specify that the storage node is Amazon S3, an AWS Snowball option is added to the New Storage Node window.
Storage Node Name – A unique name to identify the storage node.
Dedicated to Portal – When using Snowball, you must dedicate the storage node to one virtual portal selected from the drop-down list.Complete the additional fields that are displayed.
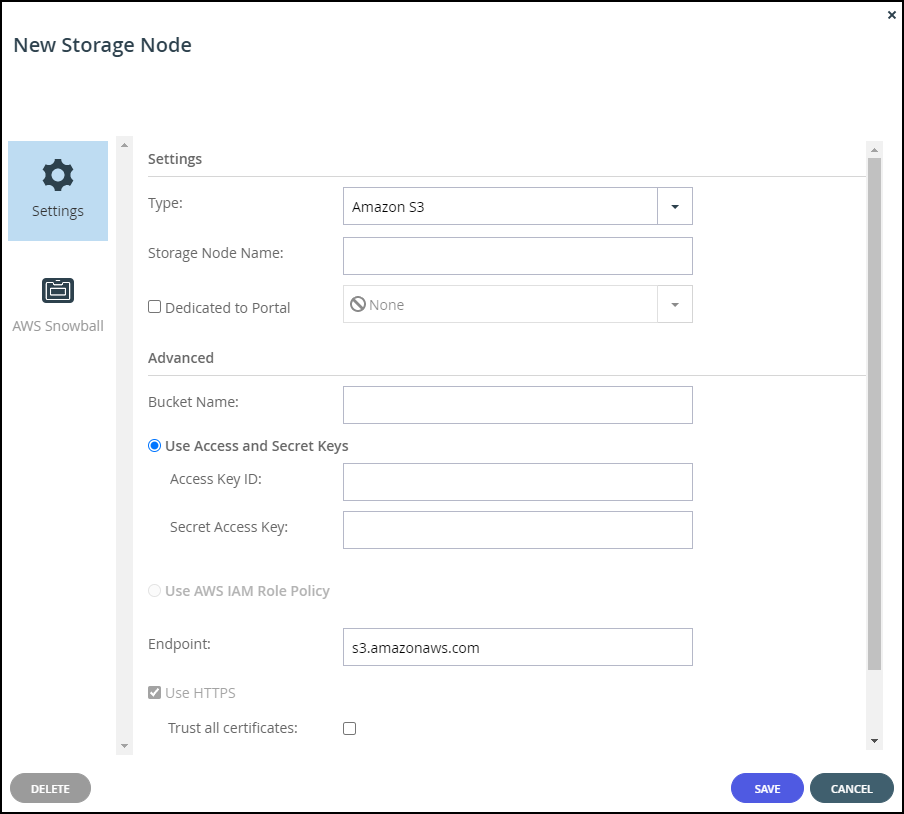
Bucket Name – The unique name of the Amazon S3 bucket that you want to add as a storage node.
Use Access and Secret Keys – Use Amazon S3 access credentials for the storage node. These are the credentials for the bucket in AWS S3, and not for the bucket on the Snowball Edge device.- Access Key ID – The AWS S3 access key ID.
- Secret Access Key – The AWS S3 secret access key.
Use AWS IAM Role Policy – When the portal is also running as an AWS EC2 instance, you can define an IAM policy and then assign this policy to an EC2 role which is then attached to the portal instance, via Instance Settings > Attach/Replace IAM Role in the AWS Management Console. If you set up this type of policy, you do not need to specify the Access and Secret keys to access the storage node. For an example IAM policy, see the instructions for installing a portal in AWS.
Endpoint – The endpoint name of the S3 service. The default value for Amazon S3 is s3.amazonaws.com. The port for the endpoint can be customized by adding the port after the URL, using a colon (:) separator. The default port is 80.
Use HTTPS – Use HTTPS to connect with the AWS S3 storage node.- Trust all certificates – Do not validate the certificate of the object storage. Normally this is unchecked.
Direct Mode – Data is uploaded and downloaded directly to and from the storage node and not via the portal. Direct mode must be defined for the storage node. CTERA recommends setting the deduplication method to fixed blocks and keeping the default 4MB fixed block size.
NoteOnce Direct Mode is set, the Use HTTPS option is also checked and cannot be unchecked.
Add Metadata Tags – For internal use. This must be unchecked.
Click AWS Snowball.
The AWS Snowball window is displayed.
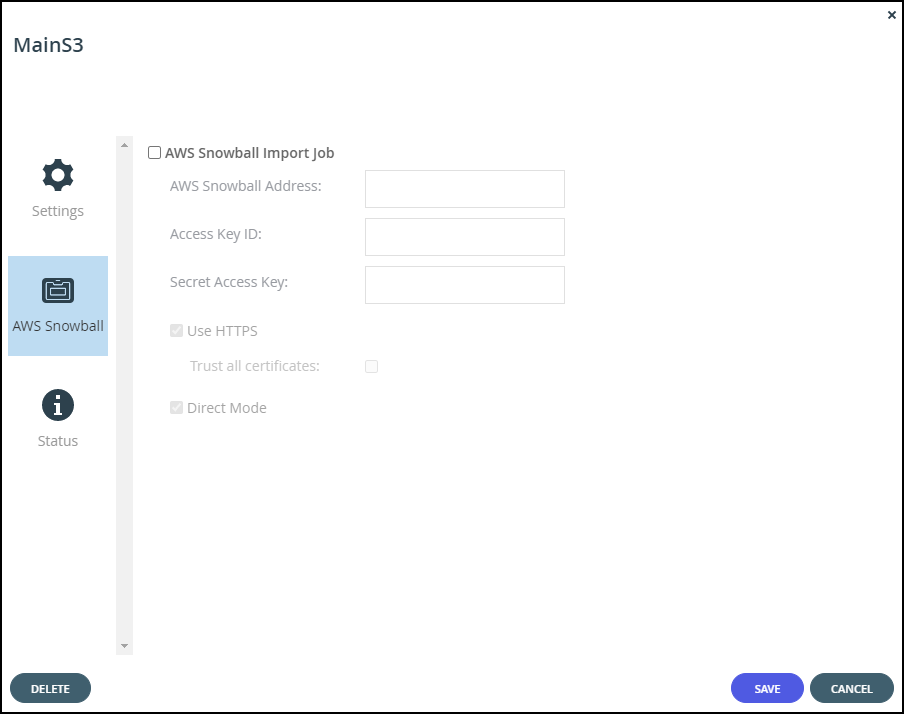
Check AWS Snowball Import Job and then specify the Snowball Edge device details:
AWS Snowball Address – The address of the Snowball Edge device, including the port, either 8443 when using HTTPS or 8080 when using HTTP.
Access Key ID – The AWS Snowball Edge device access key ID.
Secret Access Key – The AWS Snowball Edge device secret access key.
Use HTTPS – Use HTTPS to connect with the storage node. Only check this box if SSL is configured on the Snowball Edge device and you require high security. Typically, since the Snowball Edge device is on the local network this can be left unchecked.- Trust all certificates – Trust any security certificate installed on the Snowball Edge device. Since the Snowball Edge device certificate is typically untrusted, this should be checked.
Direct Mode – Data is uploaded directly to the Snowball Edge device. You cannot change this setting.
- Trust all certificates – Trust any security certificate installed on the Snowball Edge device. Since the Snowball Edge device certificate is typically untrusted, this should be checked.
Click SAVE.

When the edge filer is connected to the portal, you can optionally use the edge filer Migration Tool to migrate the data from the existing file server to the edge filer, step 1 in the diagram, which then writes the data directly to the Snowball Edge devices, step 2 in the diagram. At the same time the edge filer writes the metadata to the CTERA Portal, step 2 in the diagram.
While the data is being written to the Snowball Edge devices, it can be accessed from the edge filer but not from the portal or other edge filers which do not have access to the Snowball Edge device. If you want to access the data from the edge filer, you have to disable streaming of data until the data has been fully moved to the CTERA Portal, step 5 in the diagram, described in Managing Streaming to the CTERA Edge Filer.
After all the data has been written to the Snowball Edge devices it is transferred to Amazon, using an AWS courier, step 3 in the diagram. Amazon is responsible for populating the S3 buckets with the data, step 4 in the diagram. When the data is stored on multiple Snowball Edge devices, all the devices must be shipped at the same time.
While the data is being transferred to Amazon and moved in to the S3 buckets, it cannot be accessed from any edge filer nor from the portal.
When the process is complete the job completion report is available from the AWS Management console. Verify that the job completed successfully, from the job report, or if there were errors, check these errors in the Download failure log. For details, refer to AWS documentation.
After Amazon completes the job of moving your data into the S3 buckets, you must uncheck AWS Snowball Import Job in each of the storage nodes.

Unchecking AWS Snowball Import Job causes the Amazon S3 storage nodes to be treated as standard storage nodes so that the data can be accessed from the portal and any edge filer, agent or mobile device connected to the portal.
If you keep AWS Snowball Import Job checked, files that have blocks on the storage node checked as Snowball will be inaccessible from the portal or from any CTERA Edge Filers, agents and mobile devices connected to the portal.
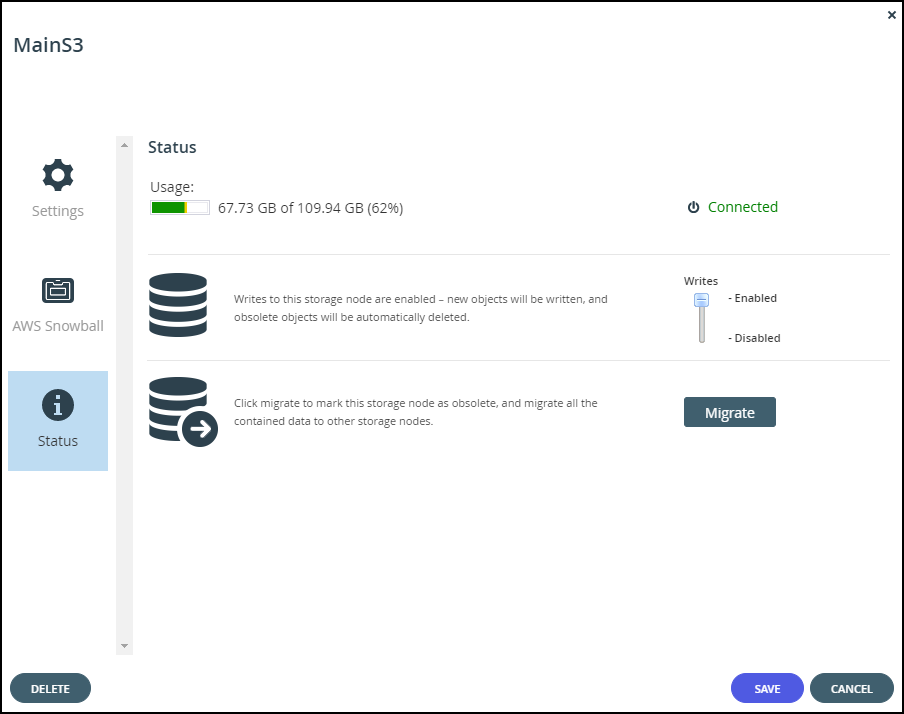
After the migration has completed, optionally define all the Amazon S3 storage nodes as read-only except for one which will remain a read/write node.
To optionally define storage nodes as read-only:
- In the global administration view, select Main > Storage Nodes in the navigation pane.
The STORAGE NODES page is displayed. - For each Amazon S3 storage node, except for one, click the Status option.
- Move the Writes slider to Disabled.
Managing Streaming to the CTERA Edge Filer
While the data is being written to the Snowball Edge devices, it can be accessed from the edge filer but not from the portal or other edge filers which do not have access to the Snowball Edge device. If you want to access the data from the edge filer, you have to manage streaming data.
To manage streaming data:
- Run the following CLI in the edge filer:
set /config/cloudsync/cloudExtender/minFileSizeForStreamingInMB 2147483646NoteSee Use the Gateway Command Line Interface (CLI) for details about running CLI commands in an edge filer.
After the data has been moved to the CTERA Portal, enable streaming from the CTERA Portal by running the following CLI in the edge filer: set /config/cloudsync/cloudExtender/minFileSizeForStreamingInMB 10


