Folder and File Functionality
- 21 Minutes to read
- Print
- DarkLight
- PDF
Folder and File Functionality
- 21 Minutes to read
- Print
- DarkLight
- PDF
Article Summary
Share feedback
Thanks for sharing your feedback!
Tapping a folder opens the folders and displays files in the that folder.
Tapping a file, either opens the file or if the file cannot be opened, downloads the file to the device.
You can perform some or all of the following functions on folders and files:
- Creating a Folder
- Searching for Folders or Files
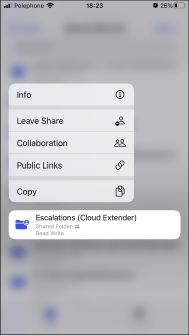
- Displaying Information About a Folder or File
- Sharing a Copy of a File with an External User
- Making a File Available Offline
- Inviting Users or Groups to Collaborate on a Folder or File
- Leaving a Shared Folder
- Creating a Public Link to Share a Folder or File
- Managing Versions
- Renaming a Folder or File
- Copying or Moving Folders or Files
- Deleting Folders and Files
- Uploading Content
- Android only: Sorting the Displayed List
- iOS only: Shortcuts
These functions are available depending on the specific folder or file.
| iOS | Android | ||
|---|---|---|---|
| Example Folder Options | Example File Options | Example Folder Options | Example File Options |
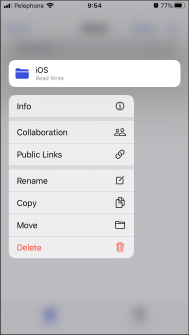 | 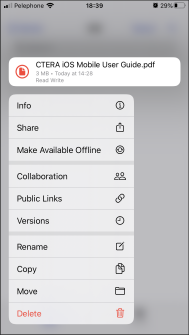 | 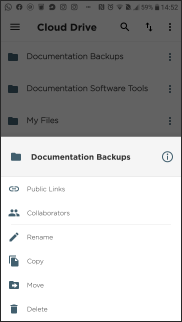 | 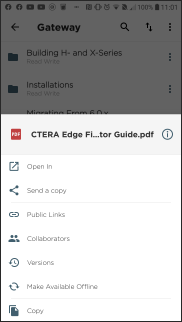 |
Creating a Folder
You can create a folder under a selected folder.
To create a folder:
Navigate to the folder you want to be the parent folder.
For iOS:
- Tap
 in the top right corner.
 - Tap New Folder.
For Android:
- Tap
 in the bottom right corner.
 - Tap Folder.Note
In the Cloud Drive you can only create a folder. When not in the top cloud drive folder, other options as well as the New Folder option are displayed.
- Tap
Enter the name of the folder and tap OK.
NoteYou must enter a name as you cannot create a folder without a name. Also, folder names cannot contain the following characters: < : ? / > and *.
 in the top right corner.
 in the bottom right corner.
The folder is created.
Searching for Folders or Files
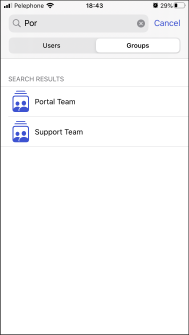
You can search either in the whole cloud drive, the Shared With Me or Shared By Me folders or in any of their folders or subfolders. The search can consist of any part of the name you are searching for and all names that contain the search string are listed. For example, searching for por, will return a list of files that include the include the word por, such as portal, Portal, and support.
Note
Wildcard characters, such as an asterisk, *, cannot be used in the search.
To search for folders and files in the cloud drive:
- Navigate to the folder you want to start the search from.
- For iOS: Tap the Search box.
For Android: Tap .
. - Enter the name of the folder or file to find.Note
You can tap the microphone icon and speak the search phrase instead of typing it.
- Tap whether you want the search in the current folder or in the whole cloud drive.
- For iOS: Tap Search.
For Android: Tap in the keyboard.
 .
.All the folders and files matching the search criteria are listed.
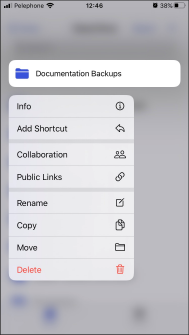
Displaying Information about a Folder or File
To display information about a folder or file:
- Navigate to the folder or file.
- For iOS: Long press the relevant item.
For Android: Tap next to the item.
Options are displayed. - Tap the
 icon.
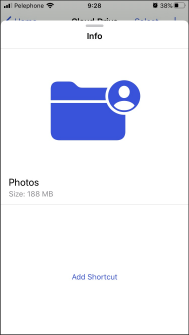
icon.
 next to the item.
 icon.
icon.Information about the folder or file is displayed.
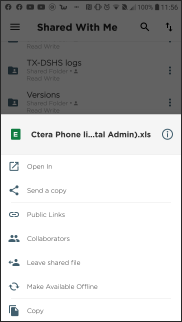
Sharing a Copy of a File with an External User
To share a file:
- Navigate to the file.
- For iOS: Long press the relevant item.
For Android: Tap next to the item.
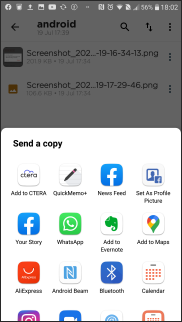
Options are displayed. - For iOS: Tap Share.
For Android: Tap Send a copy.
The file is downloaded, if it is not already in the cache. - Select the application to send the copy.
Making a File Available Offline
To make opening a file that is frequently accessed, you can download it to the mobile device before you need to open it.
Note
You can only work with files offline that are less than 20MB.
For details about managing files that are marked for offline access, also refer to Managing Offline Access.
To mark a file for offline access:
- Navigate to the file you want to work with offline.
- For iOS: Long press the relevant item.
For Android: Tap next to the item.
Options are displayed. - Tap Make Available Offline.
The file is downloaded to the mobile device. Even when there is no Internet connection, you still have access to the file.
Files that are available offline are listed with an icon:  .
.
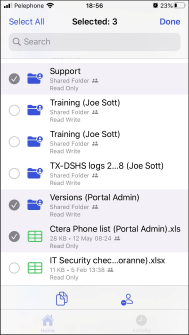
To mark more than one file for offline access:
- Navigate to the folder with the files you want to work with offline.
- Tap Select and select all the files in the folder that you want to be offline.
- Tap Offline,
 .
.
 .
.Files that are available offline are listed with an icon: .
To display the files that have offline access:
For iOS: In the CTERA Mobile app Home screen, under Locations, tap Available Offline.
For Android:- Tap
 in the top left corner.
The CTERA Mobile app menu is displayed.

- Tap Available Offline.
The Available Offline screen is displayed.
iOS Android 
- Tap
 in the top left corner.


To remove a file from offline access:
For iOS:
- Either, in the CTERA Mobile app Home screen, under Locations, tap Available Offline.
The list of files that are available offline is displayed as thumbnails.
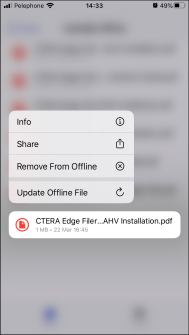
Or, navigate to the file you want to work with offline. - Long press the relevant item.
- In the options that are displayed, tap Remove From Offline.
For Android:
Either:
- Tap in the top left corner.
The CTERA Mobile app menu is displayed. - Tap Available Offline.
The Available Offline screen is displayed. - Tap next to the item to remove from offline access.
The options for the file are displayed.
Or:
- Navigate to the file you want to remove from offline access. The offline files are marked by the
 icon.
icon. - Tap next to the item to remove from offline access.
Options are displayed.
- Tap
Tap Remove Available Offline.
- Either, in the CTERA Mobile app Home screen, under Locations, tap Available Offline.

The file is removed from the Available Offline list.
iOS only: To remove more than one file from offline access:
- Either, in the CTERA Mobile app Home screen, under Locations, tap Available Offline.
The list of files that are available offline is displayed as thumbnails.
Or, navigate to the folder with files you want to remove from offline access. The offline files are marked by the icon. - Tap Select and select all the files in the folder that you want to be offline.
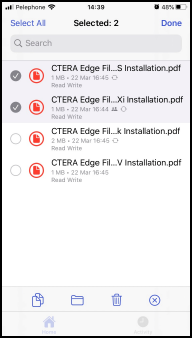
- Tap Remove Offline,
 .
.

 .
.The file is removed from the list.
Note
If one of the files you select is not available offline, the option to remove the files from offline access is not displayed.
Syncing a File With Offline Access
If the file that is offline was updated on the CTERA Portal, you can update the local offline file.
To synchronize a file with offline access with the server:
For iOS:
- In the CTERA Mobile app Home screen, under Locations, tap Available Offline.
The Available Offline screen is displayed. - Long press the relevant item.
- In the options that are displayed, tap Update Offline File.
- In the CTERA Mobile app Home screen, under Locations, tap Available Offline.
For Android:
1. Tap in the top left corner.
The CTERA Mobile app menu is displayed.
2. Tap Available Offline.
The Available Offline screen is displayed.
3. Tap next to the item to resync.
The options for the file are displayed.
4. Tap Update File.

Inviting Users or Groups to Collaborate on a Folder or File
Collaboration projects allow you to easily share files and folders with fellow workers. When project collaboration is enabled, you can create a project and invite co-workers to join the project as project members. Project members receive an email notification inviting them to collaborate on the project.
To invite collaboration on a folder or file:
Navigate to the folder or file for collaboration.
For iOS: Long press the relevant item.
For Android: Tap next to the item to create collaborators for.
Options are displayed.iOS Android Example Folder Options Example File Options Example Folder Options Example File Options 


 Note
NoteThe options displayed depend on what is enabled for the chosen folder or file.
You can only add collaborators to folders and files in Shared With Me, if you are the owner or have permission to reshare.For iOS: Tap Collaboration.
For Android: Tap Collaborators.iOS Android Example Folder Options Cloud Drive Top Folder Other Folder or File 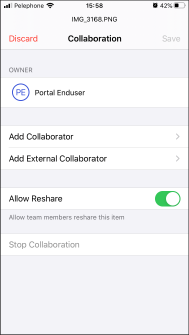

For iOS:
For co-workers, tap Add Collaborator.
Select either Users or Groups.
Enter the user name or email, or the group name to collaborate with.
NoteYou can enter a few letters and then search for matched.
Repeat entering users or groups to collaborate with, until you have added everyone you want.
For external collaborators, tap Add External Collaborator.
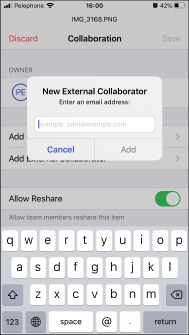
Enter the email address of the collaborator and tap Add.

Tap the name of a collaborator to edit the collaborator properties, or group of collaborators.
Co-worker Collaborator External Collaborator 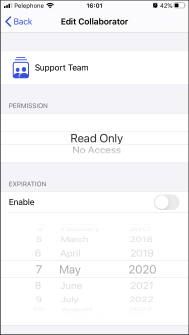
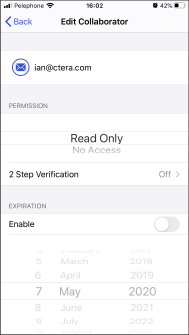
- Scroll the PERMISSION options to change the share permission.
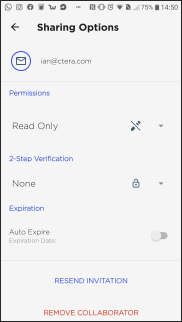
- Under EXPIRATION, slide the Enable button to the right to add an expiration date for the collaboration with this collaborator.
The default is that the collaboration never expires. - For an external collaborator, if you want 2-step verification, tap 2 Step Verification and tap Email and then tap Save.
Before the collaborator can access the folder or file, they are sent an email with a verification code that they have to enter for access. - Tap Back.
Slide the Allow Reshare button to the right to allow collaborators to reshare the folder or file.
Tap Save.
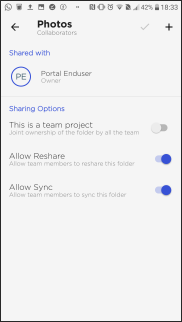
For Android:
- Tap + in the top right corned to add collaborators.
The Invite Collaborator screen is displayed.
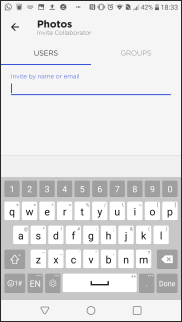
- Select either Users or Groups.
- Enter the user name or email, or the group name to collaborate with. As you enter characters, matches are displayed.
- Repeat entering users or groups to collaborate with, until you have added everyone you want.
- Tap

to return top the Collaborators screen.
The Collaborators screen is redisplayed with the new collaborators displayed.
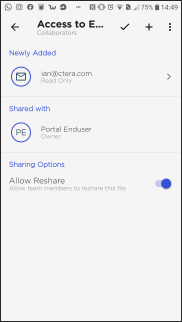
- Flip **This is a team project **on, to have joint ownership of all the collaborators.
- Flip **Allow Reshare **on, to allow collaborators to reshare the folder or file.
- Flip **Allow Sync **on, to allow collaborators to sync to the shared folder.
- Tap the name of a collaborator to edit the properties.
- Tap the permission to change the share permission. For example, from Read Only to Editor.
- If displayed, tap 2-Step Verification to set a second level of security: None, Email, or SMS. If you select SMS, you have to enter the collaborators phone number, including the international code to where the SMS verification will be sent.
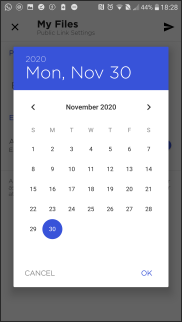
- Flip Auto Expire on and then tap the date to change the expiration date. If no date is displayed, the default, the collaboration never expires.
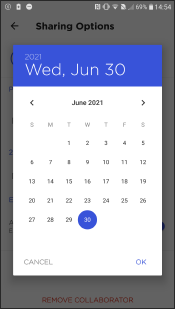
- Select the date to end the collaboration and tap OK.
- Tap .
- Tap
 to save your changes.


 to save your changes.
Folders or files that have collaborators are listed with an icon: .
To remove a collaborator from a folder or file:
Navigate to the folder or file with collaboration.
For iOS: Long press the relevant item.
For Android: Tap next to the item with collaborators to remove.
Options are displayed.iOS Android Example Folder Options Example File Options Example Folder Options Example File Options NoteThe options displayed depend on what is enabled for the chosen folder or file.
For iOS: Tap Collaboration.
For Android: Tap Collaborators.iOS Android 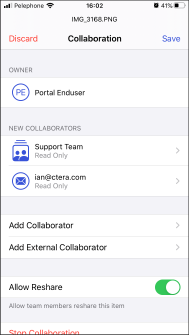

For iOS:
If the collaboration was on one of your folders or files:- Tap Stop Collaboration at the bottom of the screen.
- Tap Yes in the confirmation box that is displayed.
If the collaboration was on one of the folders or files in Shared With Me:
- Tap the collaborator to remove.Stop Collaboration at the bottom of the screen.
- Tap Delete at the bottom of the screen.
- Tap Save at the top right of the Collaboration screen.
For Android:
- Tap REMOVE COLLABORATOR and YES in the prompt and then tap
 to save your changes.


 to save your changes.
Leaving a Shared Folder
If you no longer require the content of folders that were shared with you, you can leave the share. After leaving a shared folder, you can no loner access it nor any of the folders and files it contains, unless the folder owner reshares the folder with you.
Note
You can only leave a root folder. You cannot leave individual files or subfolders.
To leave a shared folder:
- For iOS:
- Navigate to the Shared With Me folder.
- Long press the shared folder to leave.
- Tap Leave Share.
- Tap Yes in the confirmation box that is displayed.
- For Android: Tap next to the item to create collaborators for.
In the Shared With Me folder, tap next to the folder and select Leave shared folder or Leave shared file.
Leave Shared Folder Leave Shared File 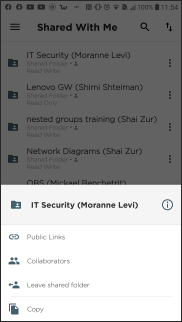
A prompt is displayed to confirm the option.
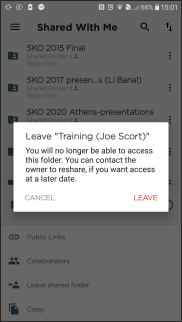
Tap LEAVE in the prompt.


iOS only: To leave more than one shared folder:
- Navigate to the Shared With Me folder.
- Tap Select and select all the folder that you want to leave.
- Tap Leave Share,
 .
.

 .
.Creating a Public Link to Share a Folder or File
Securely share folders or files with your team members or external users.
To create a public link to share d folder or file:
- Navigate to the folder or file you want to create the link for.
- For iOS: Long press the relevant item.
For Android: Tap next to the relevant item.
Options are displayed.
| iOS | Android | ||
|---|---|---|---|
| Example Folder Options | Example File Options | Example Folder Options | Example File Options |
| | | |
Note
The options displayed depend on what is enabled for the chosen folder or file.
Tap Public Links.
iOS: Create Link screen Android: Public Link Settings screen 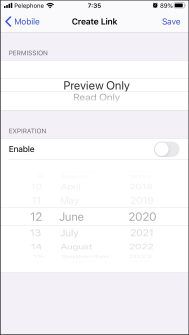
iOS:
- Scroll the PERMISSION options to change the share permission.
- Under EXPIRATION, slide the Enable button to the right to add an expiration date for the public link.
NoteThe default is that the link never expires.
- Tap Save.
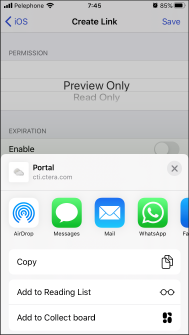
The link is generated and the following screen is displayed.
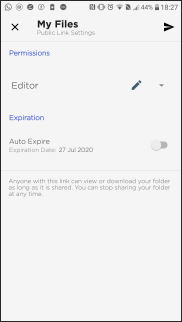
Android:
- Tap the permission to change the share permission, which is dependent on the original folder permissions and whether the public link is for a folder (for example, Editor, Read Only), or a file (for example, Read Only, Preview Only)
- To change the expiration from the default, flip **Auto Expire **to on and then tap the date to display a calendar, in which you can set the expiration date.
- Tap
 .
.
The link is generated and the Send Link screen is displayed.
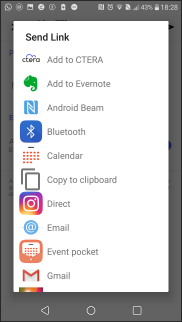
Send the link via one of the options presented, email, message, etc.


 .
.
Folders or files that have public links are listed with an icon: .
To change public link settings or remove a public link from a folder or file:
Navigate to the folder or file you want to create the link for.
For iOS: Long press the relevant item.
For Android: Tap next to the relevant item.
Options are displayed.iOS Android Example Folder Options Example File Options Example Folder Options Example File Options NoteThe options displayed depend on what is enabled for the chosen folder or file.
Tap Public Links.
iOS: Create Link screen Android: Public Link Settings screen 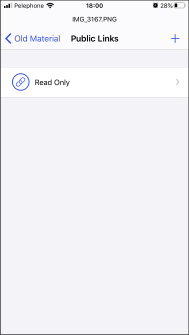
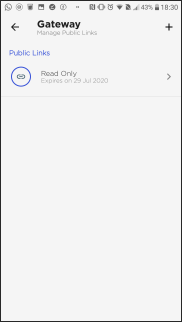
To add another public link, tap
 in the top right corner and follow the procedure in Creating a Public Link to Sharfe a Folder or File .
Tap the public link to change the permissions or expiration of the link, or to reshare the link or to delete the link.
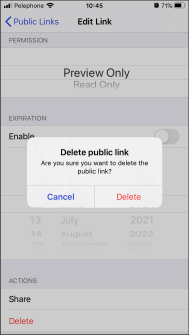
iOS: Edit Link screen Android: Public Link Settings screen 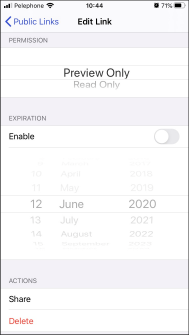

You can change the permission for the link, the expiry date, share the link or delete the link.
iOS:
- Tap **Delete **to delete the link.
- When deleting a link, tap Delete in the confirmation box that is displayed.
Android:
- To delete the link, tap DELETE LINK.
A confirmation box is displayed. - Confirm you want to delete the public link by tapping DELETE.
Or,
- To share the link, tap SHARE LINK.
The Send Link screen is displayed. - You send the link via one of the options presented, email, message, etc.
 next to the relevant item.

 in the top right corner and follow the procedure in


Managing Versions
The CTERA Portal saves old versions of folders and files.
iOS: You can list the previous versions of a file and if required, view a previous version.
Android: You can list the previous versions and if required, open a previous version, copy a previous version to another folder or restore the previous version, either overwriting the current version or keeping both versions.
Navigate to the folder or file you want to list the versions.
For iOS: Long press the relevant item.
For Android: Tap next to the relevant item.
Options are displayed.iOS Android Example Folder Options Example File Options Example Folder Options Example File Options NoteThe options displayed depend on what is enabled for the chosen folder or file.
Tap Versions.
iOS: The Previous Versions screen is displayed.- Tap the version you want.
The version is downloaded and displayed as a thumbnail.
Android:
- Tap next to the version you want.
The current version is listed without the
option. For a folder, tapping the current version displays the folder contents for the version. Also, tapping next to the version displays a View Files option, and tapping this option displays the folder contents for the version. - Tap the option you want with the file:
Open In – To view the file, as described in Viewing and Editing Files.
Send a copy – Send a copy of the file via one of the options presented, email, message, etc.
Restore – To restore the file. If a file with the same name exists, restore options are displayed.
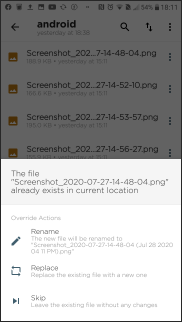
Rename – The file is restored with a different name.
Replace – The file overwrites the current file.
Skip – the file is not restored.
- Tap the version you want.
 next to the relevant item.

Renaming a Folder or File
To rename a folder or file:
Navigate to the folder or file you want to rename.
For iOS: Long press the relevant item.
For Android: Tap next to the relevant item.
Options are displayed.iOS Android Example Folder Options Example File Options Example Folder Options Example File Options NoteThe options displayed depend on what is enabled for the chosen folder or file.
Tap Rename.
The name is displayed highlighted.iOS Android 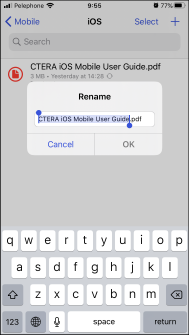
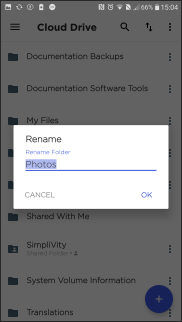
Enter a new name.
Tap OK.


The folder or file is renamed.
Copying or Moving Folders or Files
You can copy or move a folder and its contents or a file to a different location in the cloud drive. The following restrictions apply to copying and moving folders and files:
- You cannot move folders or files that you do not own.
- You cannot move the My Files folder, but you can move folders or files within the folder.
- You cannot copy or move the Shared With Me folder, but you can copy folders or files within this folder.
Note
If you have shared a file and then move it, anyone trying to access the file will not be able to.
To copy or move a folder or file:
Navigate to the folder or file you want to copy or move.
For iOS: Long press the relevant item.
For Android: Tap next to the relevant item.
Options are displayed.iOS Android Example Folder Options Example File Options Example Folder Options Example File Options NoteThe options displayed depend on what is enabled for the chosen folder or file.
Tap Copy or Move.
The top of the Cloud Drive hierarchy is displayed.Navigate to where you want to copy the folder or file.
iOS:
Either tap Select in the top right corner to copy the folder or file to the chosen folder or tap to create a new folder under the current folder and then, after creating the folder, tap Select in the top right corner to copy or move the folder or file to the new folder.
For details about creating a folder, see Creating a Folder.
Android:
Either tap , in the top right corner, to create a new folder, or tap Copy or Move in the bottom right corner, to complete the operation.
If you tapped, see Creating a Folder. After creating the new folder, tap Copy or Move in the bottom right corner, to complete the operation.
The folder or file is copied or moved to the new location.
 to create a new folder under the current folder and then, after creating the folder, tap Select in the top right corner to copy or move the folder or file to the new folder.
 , in the top right corner, to create a new folder, or tap Copy or Move in the bottom right corner, to complete the operation.
iOS only: To copy or move more than one folder and file at the same time:
- Navigate to the parent folder with the subfolders and files you want to copy or move.
- Tap Select and select all the files in the folder that you want to copy or move.
- Tap Copy,
 , or Move,
  .
.
The top of the Cloud Drive hierarchy is displayed. - Navigate to where you want to copy the folders and files.
- Either tap Select in the top right corner to copy the items to the chosen folder or tap to create a new folder under the current folder and then, after creating the folder, tap Select in the top right corner to copy or move the items to the new folder.
For details about creating a folder, see Creating a Folder.
 , or Move,
  .
.The folders and files are copied or moved.
Deleting Folders and Files
You can delete folders and files.
You can delete an individual folder or file or select multiple folders and files to delete.
To delete a folder or file:
Navigate to the folder or file you want to delete.
For iOS: Long press the relevant item.
For Android: Tap next to the relevant item.
Options are displayed.iOS Android Example Folder Options Example File Options Example Folder Options Example File Options NoteThe options displayed depend on what is enabled for the chosen folder or file.
Tap Delete.
iOS: Tap Yes in the confirmation box that is displayed.
Android: Tap DELETE in the confirmation box that is displayed.
The folder or file is deleted.
iOS only: To delete more than one folder and file at the same time:
- Navigate to the parent folder with the subfolders and files you want to delete.
- Tap Select and select all the files in the folder that you want to copy.
- Tap Delete,
 .
. - Tap Yes in the confirmation box that is displayed.
 .
.The folders and files are deleted.
Android only: To view deleted folders and files and undelete a deleted folder or file:
Tap
in the top right corner.
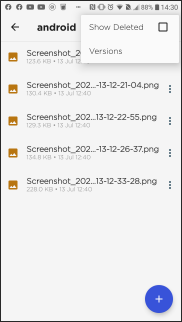
Tap the Show Deleted check box.
The screen is displayed with the deleted folders and files.NoteEvery folder shows the deleted folders and files in that folder until you unselect the Show Deleted option in any screen.
To undelete a folder or file, tap
next to the item to undelete and tap Restore.

Uploading Content
You can upload files, content from photos, or new photos taken with the device camera, to the CTERA Mobile app.
Note
iOS: You can also upload content from the iOS Files app.
To upload content to the CTERA Portal:
- Navigate to the folder where you want the uploaded item.
- iOS: Tap
 in the top right corner.
Android: Tap in the bottom right corner.
Options are displayed.NoteYou can only create a folder in the Cloud Drive and not upload content.
- iOS:
Tap Upload File, Upload Image, or Use Camera.
Upload File – The iOS Files app is displayed. Select the file to upload.
Upload Image – The iOS Photos app is displayed. Select the image to upload.
Use Camera – The iOS Camera app is opened enabling you to take a photo. After taking the photo the result is displayed and you can either retake it or use the photo, in which case it is uploaded to the folder.If necessary, you are prompted to allow opening the camera from the CTERA Mobile app.
Tap Upload or From Camera.
Upload – The content from the Android device is displayed. Select the file to upload.
From Camera – The camera app is opened enabling you to take a photo. After taking the photo the result is displayed and you tap OK to upload the photo to the folder.
 in the top right corner.
 in the bottom right corner.
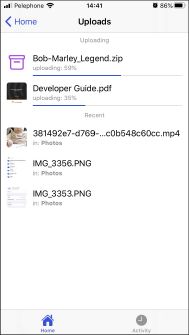
To view what is being uploaded or recently was uploaded:
- iOS: In the CTERA Mobile app Home screen, under Locations, tap Uploads.
Android:- Tap in the top left corner.
The CTERA Mobile app menu is displayed.

- Tap in the top left corner.


- Tap Uploads.
The Uploads screen is displayed.
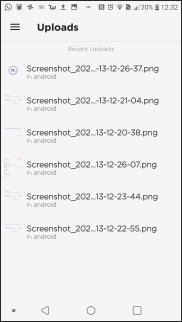

The list of files that are being uploaded or that were recently uploaded is displayed.
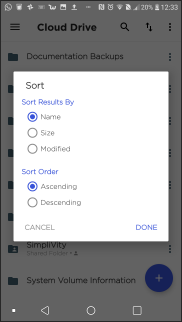
Android only: Sorting the Displayed List
You can sort displayed lists in ascending or descending order, based on:
- The folder name or file names
- The folder size or file sizes.
- The last modified date either of the folder or of the files in a folder.
To sort a list:
- Navigate to the display to sort.
- Tap
 in the top right of the screen.
The Sort options are displayed.
 Note
NoteEvery folder shows the deleted folders and files in that folder until you unselect the Show Deleted option in any screen.
- Tap the criteria for sorting the content:
Name – Alphabetically by the folder or file names.
Size – According to size.
Modified – According to the date the folders or files were modified. - Tap whether you want the list sorted in ascending or descending order.
- Tap DONE.
 in the top right of the screen.
The list is redisplayed sorted in the requested order.
Note
Every list is sorted according to the selected sort options.
iOS only: Shortcuts
Shortcuts enable quick access to folders that you want to get to, without having to navigate through the whole folder structure. The shortcuts are displayed in the Home screen, and you tap a shortcut to jump directly to that folder.
You can only create shortcuts to your folders that are not in Shared With Me.

To create a shortcut to a folder:
- Navigate to the folder you want to be a shortcut.
- Long press the folder.
Options are displayed.
 Note
NoteThe options displayed depend on what is enabled for the chosen folder or file.
- Tap Add Shortcut.
You can also tap Info and in the Info screen that is displayed, tap Add Shortcut.
The shortcut is added to your list of shortcuts on the Home screen.


Note
Signing out of the CTERA Mobile app removes all the shortcuts.
Was this article helpful?