Managing Storage Nodes
- 5 Minutes to read
- Print
- DarkLight
- PDF
Managing Storage Nodes
- 5 Minutes to read
- Print
- DarkLight
- PDF
Article Summary
Share feedback
Thanks for sharing your feedback!
CTERA Portal can write your data to storage nodes from many different vendors. The STORAGE NODES page in the global administration view enables you to easily add new storage nodes, dedicate storage nodes to virtual portals, stop and start writing to different storage nodes, and migrate data seamlessly from one storage node to another storage node.
Note
CTERA recommends that whenever you create a new S3 bucket to use as the backend storage for a storage node, you enable object lock when creating the bucket. For most S3 buckets, after the bucket is populated with content, you cannot set object lock. Note that with Amazon S3 buckets you can set the object lock after populating the bucket, described in https://aws.amazon.com/about-aws/whats-new/2023/11/amazon-s3-enabling-object-lock-buckets/.
What Storage Node to Use
Storage considerations include company policy, cost, and total size required.
CTERA provides a storage node with the installation, Local Filesystem, which can be used up to a maximum of 20TB.
NFS storage, EMC Isilon (NFS), Generic (NFS), and NetApp (NFS), storage nodes can be used for storage up to 100TB.
All other storage nodes, such as Amazon S3 and IBM Cloud Object Storage (S3), support unlimited storage.
Using More than One Storage Node
You can define multiple storage nodes. When there are multiple storage nodes, CTERA manages the writes so that the nodes are balanced in the following cases:
- When multiple storage nodes are defined that are not dedicated to specific virtual portals. If a storage node is down, data is not written to that node, but to the other storage nodes that are up.
- When multiple storage nodes are dedicated to the same virtual portal. If a storage node dedicated to the virtual portal is down, data is not written to that node, but to the other storage nodes dedicated to the same virtual portal, that are up.
Note
Each block is written to a single storage node. If you want the same block to be written to another location, you have to use the storage provider functionality, such as Amazon Cross-Region Replication (CRR).
When there are storage nodes of different types, for example, Amazon S3 and Microsoft Azure Blob Storage, a block from a single file can be written to one storage node while another block from the same file is written to another storage node of a different type.
Cloud Storage Routing: Grouping Storage Nodes in a Storage Class
Cloud storage routing uses storage classes, which represent a group of one or more storage nodes that share a similar business requirement, such as location. For example, a storage class can consist of a number of storage nodes all in the same location. Each cloud folder group can be assigned to a storage class to enable the cloud folder group content to be written to a specific storage node.
Storage classes can be used to provide the following main benefits:
- Data sovereignty (GDPR)
- Cost savings
- Business efficiency
Data Sovereignty
Data sovereignty has become critical as strict rules dictate where data is stored and how it is moved, including differing laws and regulations across countries and regions. With CTERA Cloud Storage Routing, organizations can maintain data sovereignty, as well as compliance with GDPR and other regulations.
Cost Savings
By being able to select the cloud provider that exists nearest where the data creation is, huge cost savings can be achieved. Also, you can configure the routing to ensure that folder group content that is not accessed regularly, such as archived data, is always written to cheaper storage.
Business Efficiency
Your organization needs quick access to data in order to function efficiently. Until now, this hasn’t always been possible, with data often stored in different places and especially when utilizing cloud data storage providers. CTERA Cloud Storage Routing provides low-latency access to data, ensuring that your teams always have access to the data they need.
The team portal administrator can define cloud folder groups to write to a specific storage class, optimizing use of that cloud folder group with one or more of the benefits outlined above.
Storage classes are defined using CLI. The storage nodes are assigned initially to a default storage class. The storage class can be changed from the default when the storage node is defined. After the storage node is defined the storage class cannot be changed.
Defining a Storage Class
Storage classes are defined using CLI. To run the CLI from the portal user interface, see Execute CLI Commands from the Global Admin User Interface. Use the following CLI to create a storage class: add /storageClasses/ name <name>
where <name> is the name you call the storage class.
Assigning a Storage Class to a Storage Node
After defining the storage class, as described above in Defining a Storage Class, you can assign it to a specific storage node as part of the general storage node definition, described in Adding and Editing Storage Nodes
Changing the Name of a Storage Class
After defining a storage class, as described above in Defining a Storage Class, you can change the name using the following CLI: set /storageClasses/<currentSCName>/ name <newSCName> where <currentSCName> is the name of the storage class to change and <newSCName> is the name to change it to.
Viewing Storage Nodes
To view all storage nodes in the system:
In the global administration view, select Main > Storage Nodes in the navigation pane.
The STORAGE NODES page is displayed.
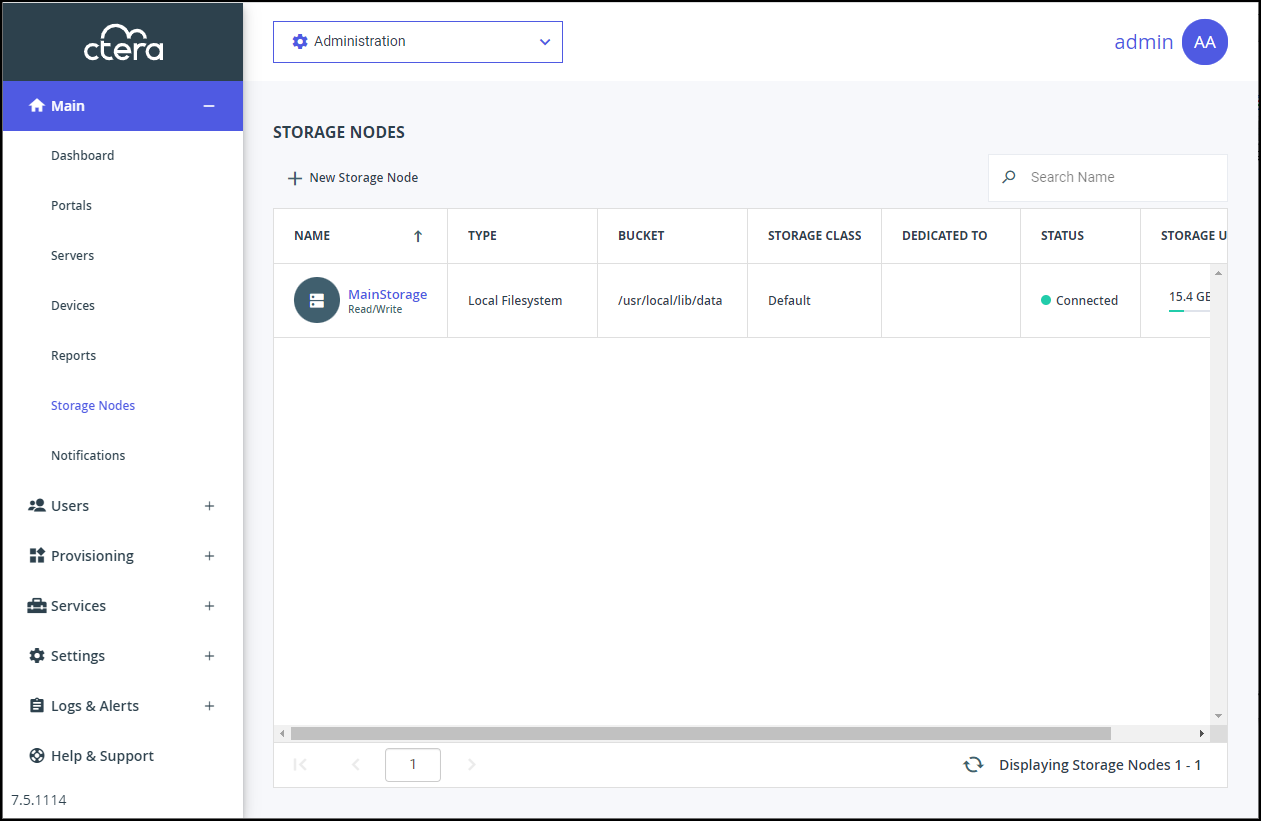
The following information is displayed for each storage node:
NAME – The storage node's name.- Status (under the name) – Whether the storage node is read/write enabled or read and delete only.
TYPE – The storage node's type.
BUCKET – The name of the storage node's bucket.
STORAGE CLASS – The group of one or more storage nodes to which this storage node belongs.
DEDICATED TO – The name of a single virtual portal to which the storage node is dedicated, if applicable. The storage node is used for this virtual portal and no other virtual portal uses it. The virtual portal will only write to storage nodes that are dedicated to it and not to other storage nodes.
STATUS – The storage node's current status. This can be either of the following:- Connected
- Not Connected
The portal does not attempt to store new blocks in storage nodes that are not connected.
STORAGE USAGE – The amount of storage available, followed by the amount of used storage. This field is only relevant for the Local Filesystem storage node, which is the default storage node when setting up the CTERA Portal.

To view details of a specific node:
- In the global administration view, select Main > Storage Nodes in the navigation pane.
The STORAGE NODES page is displayed. - Click the storage node name.
The storage node window is displayed with the storage node name as the window title.
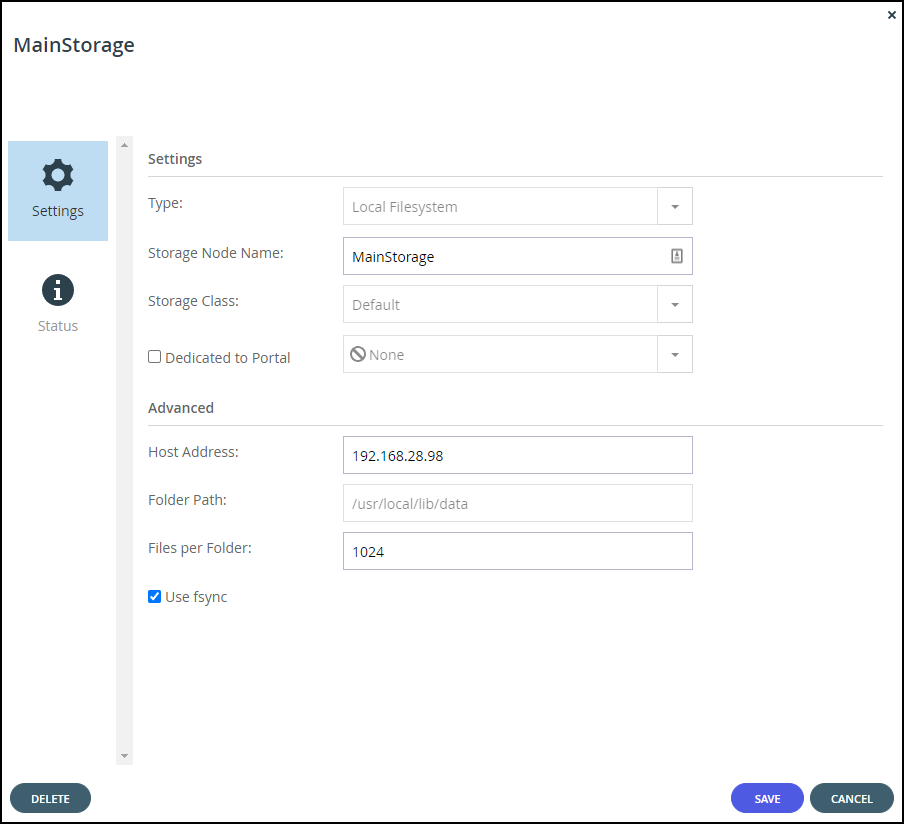
The details displayed depend on the type of storage node.

Was this article helpful?