Virtual Portal Settings
- 17 Minutes to read
- Print
- DarkLight
- PDF
Virtual Portal Settings
- 17 Minutes to read
- Print
- DarkLight
- PDF
Article Summary
Share feedback
Thanks for sharing your feedback!
Password Policy
CTERA Portal features a password strength policy to comply with security standards. You can:
Configure a password rotation cycle (in months)
Prevent the re-use of the last X passwords
Determine the number of character groups required in a user’s password. The available character group values are:
- Lowercase characters
- Uppercase characters
- Numerical characters
- Special characters such as “!@#$”
Prevent users from using their personal details in their password, including first name, last name, email, username, and company name.
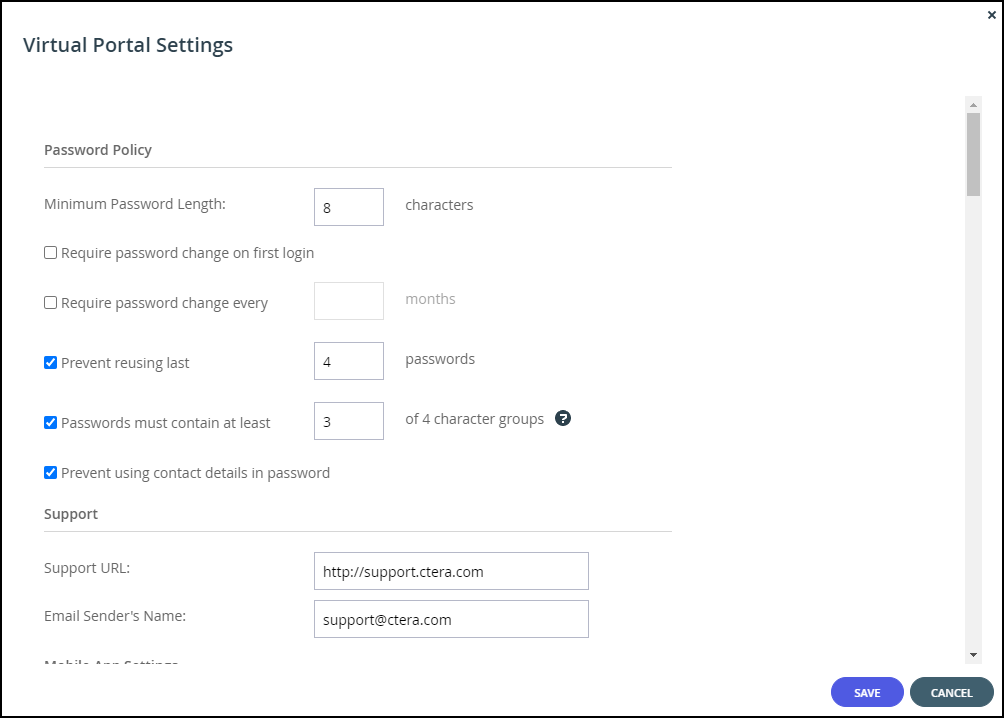
Minimum Password Length – The minimum number of characters that must be used in a CTERA Portal account password.
Require password change on first login – Force users to change their password on their first login.
Require password change every – Force users to change their password after a certain number of months: Specify the number of months. When the specified number of months has elapsed, the user's password expires, and a new password must be provided on their next login.
Prevent reusing last... passwords – Prevent users from reusing a specified number of their previous passwords when they change their password. Specify the number of previous passwords you want this to apply to.
Passwords must contain at least.... of 4 character groups – Require users to choose passwords that contain at least a specified number of the following character groups:- Lowercase characters
- Uppercase characters
- Numerical characters
- Special characters such as “!@#$”
Prevent using contact details in password – Prevent users from using their personal details in their password, including first name, last name, email, username, and company name.

Support Settings

Support URL – The URL to which CTERA Portal users browse for customer support.
Email Sender's Name – The email address that is displayed in the From field of notifications sent to users by the virtual portal.
Mobile App Settings

Allow file downloads – When checked, prevents mobile users from downloading files from the portal to their mobile devices.
Allow file uploads – When checked, prevents mobile users from uploading files to the portal from their mobile devices.
Android – The URL of the Android app store.
Apple iOS – The URL of the Apple app store.
General Settings

Delete files of zero quota users after – The storage folders of customers who have no quota (for example, customers with expired trial accounts) are deleted automatically after a certain number of days. Enabling this option helps free storage space. A notification is sent to the customer prior to deletion, prompting the customer to purchase cloud storage in order to avoid the scheduled deletion of their files. Storage folders of over-quota users with a non-zero quota are not deleted. The default value is 14 days.
Automatically create home folders – A personal folder is automatically created for each new user account. This folder is given the home folder name entered in the Home Folder name field.
- Home Folder name – The name of the personal folder created for each new user account.
User Registration Settings

Invitation to register is valid for:... days – The validity period, in days, for registration invitations sent to users by team portal administrators. If a user has not registered for the service after the number of days specified in this field, the invitation expires.
Allow self-registration in reseller portal – Allow end users to sign up for a portal account, by surfing to the portal and filling in a form. If this check box is cleared, the registration form is not displayed in the portal, and users can be defined only by an administrator. If selected, the Require voucher, Require email confirmation, and Require company fields are enabled.
- Require voucher – Require end users to supply a valid voucher code when registering a new CTERA Portal account.
Require email confirmation – Require end users to confirm their registration by email, in order for their CTERA Portal account to be activated. This is recommended, since it ensures that the user has entered a valid email address.
Require company – Require end users to specify their company, when registering a new CTERA Portal account.
Reseller Portal Settings

Enable vouchers support – Enable the use of vouchers in the CTERA Portal. If this option is cleared, the Provisioning > Vouchers menu item is not displayed in the reseller portal's menu.
Team Portal Settings

Enable Sharing of Personal Folders – Enable team portal members to share personal folders with other team portal members.
- Sharing Folder name – The name of the folder in each user's cloud drive folder hierarchy in which other users' personal folders that were shared with the user are displayed.
Allow collaborators to re-share content – Enable team portal members who are listed as collaborators for a file or folder to re-share the file or folder to other users.
Allow collaborators to leave shared folders – Enable team portal members to leave a folder that they have been listed as a collaborator. Once a member leaves a shared folder, they have no access to the folder unless they are re-added as a collaborator.
Allow users to request team projects with independent quota – Enable team portal members to request a team project, so that storage for the project does not use personal storage.
Default Settings for New Folder Groups

Note
CTERA recommends consulting CTERA before changing the defaults. Changes to these values do not affect existing folder groups.
Use encryption – Data in newly created folder groups is stored in encrypted format by default.
Note
Passphrase protection is only available in encrypted folders.
Use compression – Specify which data compression method is selected by default for newly created folder groups:
- High Compression – gzip compression is used.
- High Speed (default) – Snappy compression is used.
Backup Passphrase Protection – The policy regarding whether using passphrase protection for backups is optional for users.
- Optional (default) – Users may choose whether to protect backups with a passphrase.
- Required – Users must use a passphrase to protect backups.
- Disabled – Users cannot protect backups with a passphrase.
Note
Data protected with a user-defined passphrase cannot be retrieved if the passphrase is lost.
Deduplication Method – Whether to use the average block size or a fixed block size for deduplication. The options in the window change depending on what is selected: Average Block Size or Fixed Block Size. Use Fixed Block Size if many of the folder groups include large files where deduplication is not common, such as media files. CTERA also recommends using Fixed Block Size if direct mode is defined for the storage node, which enables files to be transferred to and from the CTERA Edge Filer or CTERA Agent direct to storage, bypassing the portal. For details, refer to the storage nodes that support this capability in Adding and Editing Storage Nodes.
Fixed Block Size/Average Block Size – The fixed or average block size used by the folder group.
Note
Fixed Block Size applies to Cloud Drive folders and not to Backup folders. That is, Backup folders always use Average Block Size.
The default value when set to Fixed Block Size is 4MB. The default value when set to Average Block Size is 512MB. CTERA Portal deduplication splits each stored file into blocks. Increasing the Average Block Size or Fixed Block Size causes the files to be split into larger chunks before storage, and results in increased read/write throughput at the cost of a reduced deduplication ratio. For example, with the default 4MB fixed block size, a file of 3MB will be uploaded as a single 3MB block and a file of 5MB will be uploaded as two blocks, 4MB and 1MB. Increased block size is useful for workloads that require high performance, as well as for those that do not gain greatly from deduplication. For example, where the stored files consist mostly of videos, images, and music files that are not frequently modified. Decreasing the average block size can result in better deduplication, since the portal can better identify finer-grained duplicate data. If direct mode is defined for the storage node, CTERA recommends keeping the default 4MB fixed block size.
Average Map File Size – The average map file size used by new folder groups. CTERA Portal uses file maps to keep track of the blocks each file is made of. The Average Map File Size represents the maximum size of file that will be represented using a single file map object. For example, if the average map file size is set to 100MB, files of up to approximately 100MB will have one file map, files of up to approximately 200MB will have two file maps, and so on. Reducing the average map file size causes more file maps to be created per file. This may result in smoother streaming of files; however, it will also result in some extra overhead for creating, indexing, and fetching the additional file maps. The default value is 640,000KB.
Default Settings for New User

Interface Language – The default language for new users. This language can be overridden by end users in the End User Portal.
Reseller Portal
- Backup Deduplication Level – The default deduplication level to use for backup folders, for all new users. Deduplication is performed on the device before the data is uploaded to the portal:
- User – Create a single folder group for each user account, containing all of the user account's backup folders. Deduplication is performed for the user account's folder group.
- Folder – Create a folder group for each of a user account's devices, containing all of the device's backup folders. Deduplication is performed separately for each of the user account's folder groups, decreasing the benefits of deduplication.
- Cloud Drive Deduplication Level – The default deduplication level to use for cloud folders, for all new users. Deduplication is performed on the device before the data is uploaded to the portal:
- User – Create a single folder group for each user account, containing all of the user account's cloud folders. Deduplication is performed for the user account's folder group.
- Folder. Create a folder group for each of a user account's devices, containing all of the device's cloud folders. Deduplication is performed separately for each of the user account's folder groups, decreasing the benefits of deduplication.
Team Portal
- Backup Deduplication Level – The default deduplication level to use for backup folders, for all new users in team portals. Deduplication is performed on the device before the data is uploaded to the portal:
- User – Create a single folder group for each user account, containing all of the user account's backup folders. Deduplication is performed for the user account's folder group.
- Portal – Create a single folder group for each virtual portal, containing all of the backup folders in the team portal. Deduplication is increased but performance impacted and this setting is not recommended for large portals.
- Folder – Create a folder group for each of a user account's devices, containing all of the device's backup folders. Deduplication is performed separately for each of the user account's folder groups, decreasing the benefits of deduplication.
- Cloud Drive Deduplication Level – The default deduplication level to use for cloud folders, for all new users in team portals. Deduplication is performed on the device before the data is uploaded to the portal:
- User – Create a single folder group for each user account, containing all of the user account's cloud folders. Deduplication is performed for the user account's folder group.
- Portal – Create a single folder group for each virtual portal, containing all of the cloud folders in the team portal. Deduplication is increased but performance impacted and this setting is not recommended for large portals.
- Folder – Create a folder group for each of a user account's devices, containing all of the device's cloud folders. Deduplication is performed separately for each of the user account's folder groups, decreasing the benefits of deduplication.
Cloud Drive Settings

The logging level for the Cloud Drive; for user, Log User File Access, and admin, Log Admin File Access:
- None – The access log does not include file access events.
- Writes Only – The access log only includes what files were uploaded or deleted.
- Reads and Writes – The access log includes what files were uploaded, deleted, copied and moved.
Public Links

By default, public link is valid for – The number of days for which public link to a folder is valid.
Maximum validity period – The maximum validity period a user can choose for a public link when sharing a folder by public link.
Collaboration

Shares automatically expire after – The time period after which invitations to share files expires. This time period is applied to all users.
Note
When a file is shared for collaboration, an entry is written to the Access log.
External Collaboration

How external collaboration is authenticated when a user sends an invitation to collaborate on files or folders. The default is applied with the end user able to select from any of the enabled options to override the default.
None – No user authentication is applied.
Email – The invitation recipient receives a time limited authenticated link to the file or folder. On every access, a new 6 digit passcode challenge is sent to the recipient by email. The recipient must enter the passcode before accessing the file or folder. This ensures that the invitation is not usable in case the invitation link is accidentally forwarded to another person, or posted on a public website.
Note
Email must be enabled for the plug-in to Microsoft Outlook that enables sending email attachments as public links to files on the portal Cloud Drive. The plug-in syncs attached files to the portal Cloud Dive and inserts public links to the files into the email body.
SMS – The invitation recipient receives a time limited authenticated link to the file or folder. On every access, a new 6 digit passcode challenge is sent to the recipient by text message. The recipient must enter the passcode before accessing the file or folder. This ensures that the invitation is not usable in case the invitation link is accidentally forwarded to another person, or posted on a public website.
Display "Remember me on this browser" option – When checked, a Remember me checkbox is displayed in the user interface when the user accesses the file or folder via the link and the user can opt to be remembered on the computer. In this case, a passcode is not sent every time the user wants to access the file or folder. If this option is not checked, a Remember me checkbox is not displayed and the users receive a passcode to their email or SMS on every access to the file or folder.
Office 365 Integration

Office 365 is a cloud-based office suite offered by Microsoft, which allows users to create and edit files using lightweight, web browser-based versions of Microsoft Office applications, such as Word, Excel, and PowerPoint.
Implementation of Office 365 is dependent on the type of customer:
- Enterprise Customers – For enterprises offering their users access to Microsoft Office applications, CTERA supports using Office Online Server (OOS), an on-premise version, which is installed in the enterprise data center or in a private cloud.Note
Microsoft allows customers with a Microsoft Volume Licensing account to download OOS from the Volume License Servicing Center at no cost but the customer is restricted to view-only functionality. Customers that require document creation, edit and save functionality in OOS need the following from Microsoft: either an on-premises Office suite license with Software Assurance or an Office 365 ProPlus subscription.
- CSPs – For CSPs offering their customers the ability to create and edit Microsoft Office applications, CTERA supports using Office 365 Online, hosted by Microsoft in a public cloud. This requires the CSP to directly enter into an agreement with Microsoft. For more details, contact Microsoft.
To integrate Office Online in a CTERA Portal:
- Install the Office Online Server (OOS), as described in: https://technet.microsoft.com/en-us/library/jj219455(v=office.16).aspx#DeploymentTypes, under the section Deploy a single-server Office Online Server farm that uses HTTPS.
As part of the procedure make sure that TLS 1.2 support is enabled. You can verify that TLS 1.2 support is enabled by checking the registry keys for the server. The following registry keys must be set:[HKEY_LOCAL_MACHINE\SOFTWARE\Microsoft\.NETFramework\v4.0.30319] "SchUseStrongCrypto"=dword:00000001 [HKEY_LOCAL_MACHINE\SOFTWARE\Wow6432Node\Microsoft\.NETFramework\v4.0.30319] "SchUseStrongCrypto"=dword:00000001NoteDifferent portals can use the same OOS server.
- Make sure that ports 443 and 80 are open from the CTERA Portal to the Office Online Server.Note
If you have more than one Office Online Server in the farm, Microsoft requires that port 809 is open between all the servers in the farm.
- Make sure that the certificate is recognized by the CTERA Portal: It might need adding to the portal trust store.
In the Virtual Portal Settings window:
- Verify that the discovery URL, the URL for the Office Online Server, is displayed correctly, with the format ‘https://servername/hosting/discovery‘.
- Configure the settings for OOS:
Enable Office 365 Integration – If checked, Office 365 can be used to create, view and edit Microsoft Word, Excel, and PowerPoint files stored in CTERA Portal.
Office Online Server (OOS) – Use Office 365 on-premise: Office Online Server.
Office 365 Online – Use Office 365 Online. This option is aimed at CSPs, who require a Microsoft O365 license.
WOPI Discovery URL – The URL to enable using Office 365 with files stored on the portal. This URL is either the URL for a local server when using Office Online Server on-premise or the URL received from Microsoft when using Office Online as a service from Microsoft. Different portals can use the same WOPI URL.
Troubleshooting
Other web sites also include instructions to install the Office Online Server (OOS), with graphics to help you, for example, https://www.getfilecloud.com/supportdocs/display/cloud/Installing+Office+Online+Server+on+Windows+2012+R2+Server to install OOS on a Windows 2012 R2 Server.
If required, import a certificate, via the certmgr.msc application, to Personal > Certificates.
If you have problems and need to refer to the OOS logs, they are located by default on the OOS server under C:\ProgramData\Microsoft\OfficeWebApps\Data\Logs\ULS
For the Office 365 Workflow, see What is the Office 365 Workflow Between the Browser, Microsoft Office Online and a CTERA Portal.
Preview Only Mode

Customize the watermark and footnote added to shared files restricted to previewing.
Adding a Customized Watermark

Text – The text to be displayed diagonally each page of a file restricted to previewing only. The following variables are supported in the text field: ${recipient}, ${date} and ${company}.
Opacity – The level of opacity of the watermark text. The greater the opacity the more covered the content under the watermark.
Font Size – The size of the text to use for the watermark.
Color – The watermark text color.
Adding a Customized Footnote

Text – The text to be displayed at the bottom of each page of a file restricted to previewing only. The following variables are supported in the text field: ${recipient}, ${date} and ${company}.
Opacity – The level of opacity of the footnote text. The less the opacity the fainter the footnote text.
Font Size – The size of the text to use for the footnote.
Color – The footnote text color.
Remote Access Settings

Remote access must be enabled in the CTERA Edge Filer in Cloud Services > Remote Access, in the Configuration view. If it is disabled, when trying to access the edge filer from the portal, the following message is displayed:
Remote Access is disabled Remote Access is disabled
Remote access is currently not available for this device.
Remote Access Redirection – Whether Web clients attempting to remotely access a CTERA Edge Filer are redirected to communicate directly with the CTERA Edge Filer, instead of relaying communications through the CTERA Portal:
- Public IP Redirect – Redirect Web clients to the device's public NAT IP. The inbound port 80 or 443 towards the endpoint device must be open.
- Private IP Redirect – Redirect Web clients to the device's private IP address. The same network is used by both device and end user, who can reach the IP address. If the device is in the same network/network subnet, the redirection works.
- No Redirect – Do not redirect communications between Web clients and the device. Relay all communications through the CTERA Portal. No special ports are required. The Portal acts as a mediator and the HTTP is tunneled to the device through the open 995 connection to the Portal.
Use HTTPS for remote access – Use HTTPS for remotely accessing devices, using the remote access service.
For example, if a device is named dev1 and the portal is named portal.mycompany.com, then enabling this option will cause the client's browser to be automatically redirected from the HTTP URL http://dev1.portal.mycompany.com to the HTTPS-secured URL https://portal.mycompany.com/devices/dev1
Advanced

Send CTTP keepalive messages every – Prevent proxy or load balancer servers from preemptively terminating connection between a device and the CTERA Portal. This may be relevant if the device is configured to use a proxy server and there are connectivity problems during Cloud Backup or Cloud Sync. This is because some proxy servers and load balancers are configured to close open connections that are not transferring any data after a certain amount of time, thereby causing connectivity problems.
For details about CTTP, see What is the CTTP Transport Protocol.
In the field provided, specify an interval, in seconds, smaller than the timeout value configured on the proxy or load balancer server.
Was this article helpful?