Managing Collaboration Permissions
Users and groups can:
- Share files and folders through the end user portal.
- Create public links for access to files and folders
- Create team projects: shared folders without individual owners.
To set collaboration permissions, you define rules that give the required permissions to specified users or user groups:
- User rules get precedence over group rules.
- Deny rules have higher priority than Allow rules.
To add collaboration permissions:
- Select Settings > Control Panel in the navigation pane.
The Control Panel page is displayed.

- Select Collaboration Permissions under Cloud Drive Settings.
The Collaboration Permissions page is displayed.
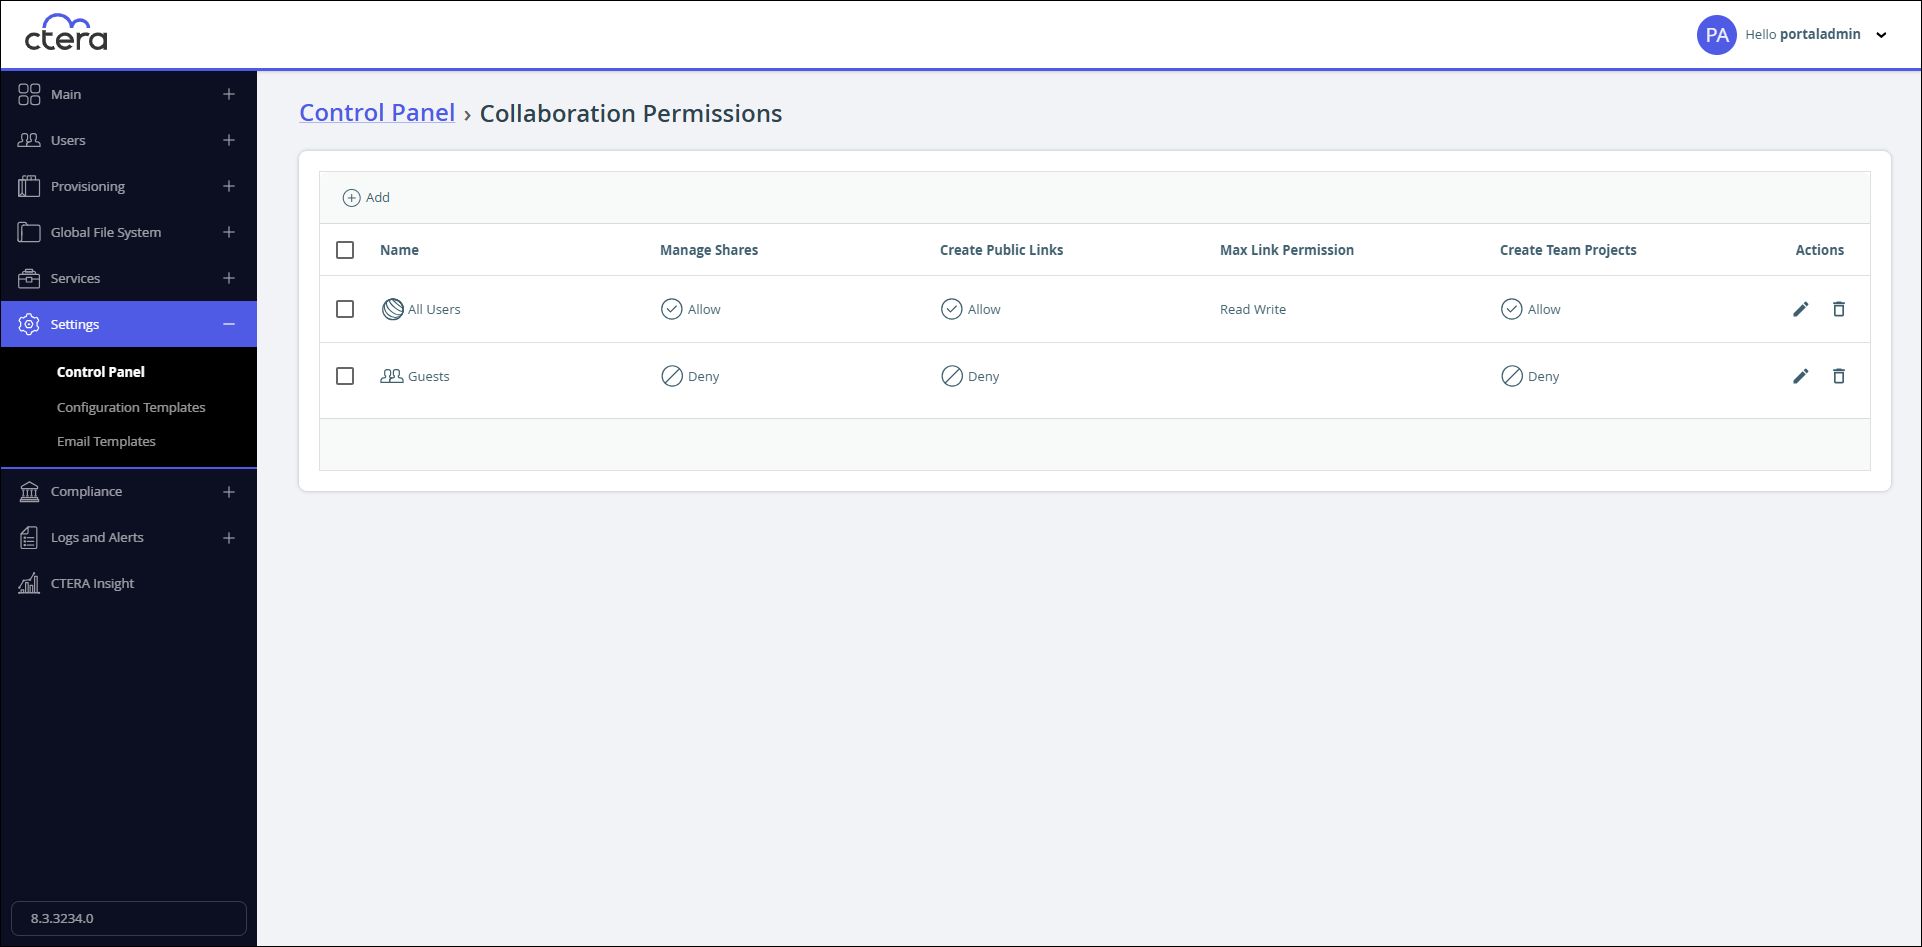
- Click Add to define a collaboration permission.
- Click
Setin the Name field to select to whom the permission applies.- If you select
All Usersthe permission applies to every user. If you selectLocal Usersor the Active Directory Users, the permission is for specific users, otherwise, if you selectLocal Groupsor the Active Directory Groups, you can apply the permission to all users in a specified group. - Click OK.
- If you select
- In the Manage Shares column select Allow or Deny to allow or deny sharing files and folders with specified users, groups, or external email addresses.
- In the Create Public Links column select Allow or Deny to allow or deny creating a public link to any folder or file and then sending the link to anyone else they choose.
- In the Max Link Permission column select the link permission:
Read Write,Read Only,Preview Only, orUpload Only
Read/Write share recipients are able to view and print the file using the CTERA Portal’s integrated document preview server and copy and download the content.
Read Only share recipients are able to view and print the file using the CTERA Portal’s integrated document preview server and download the content.
Preview Only share recipients are able to view files using the CTERA Portal’s integrated document preview server. Users with this permission are unable to download or copy, or print the content. The file is protected with a watermark and content shared in Preview Only mode cannot be synchronized for offline access by CTERA Devices, for example, CTERA Edge Filers or CTERA Drive Mobile.
Upload Only share recipients are able to upload content to the folder but cannot see any of the content that is in the folder. - In the Create Team Projects column select Allow or Deny to allow or deny creating shared folders that are not displayed as shared by an owner because they are intended for team collaboration.
- Click
 in the Actions column to create the permission.
 - Click Save.
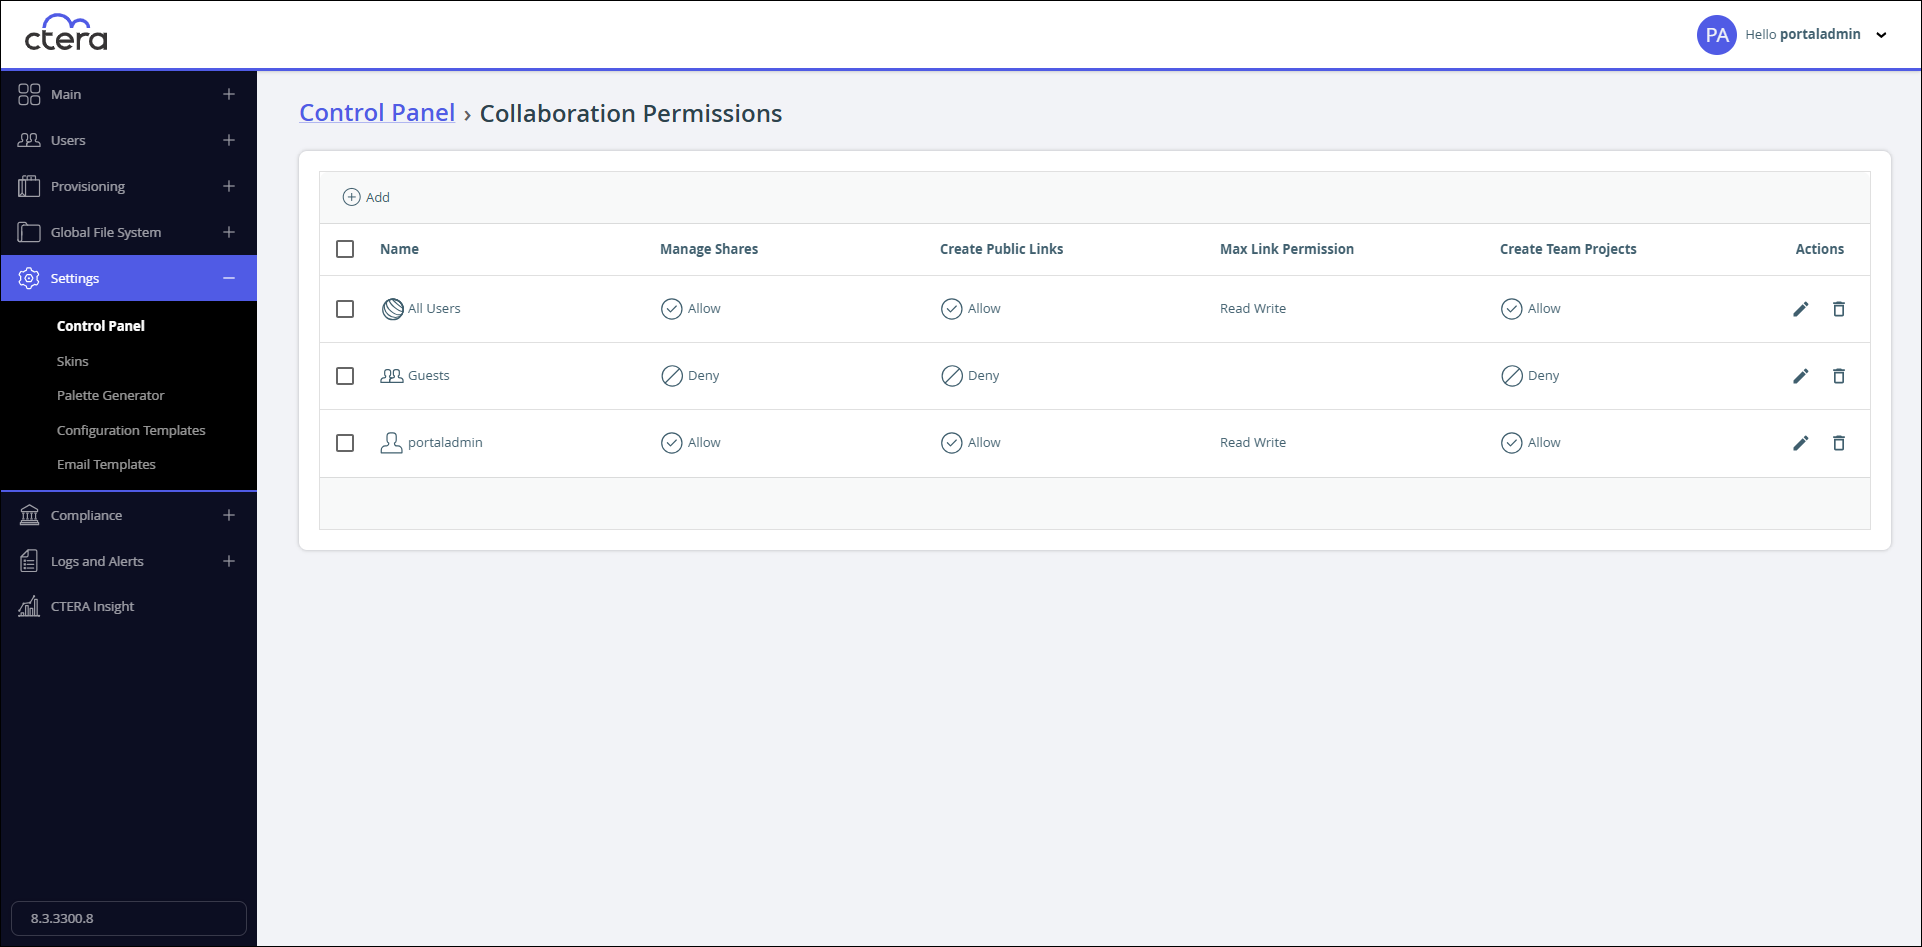
To edit or delete collaboration permissions:
- Select Settings > Control Panel in the navigation pane.
The Control Panel page is displayed.

- Select Collaboration Permissions under Cloud Drive Settings.
The Collaboration Permissions page is displayed.The Collaboration Permissions page is displayed.
- Click
 to edit the permission or
  to delete the permission.
 - If editing the permission, after the changes click in the Actions column to save the changes.
- Click Save.
Setting Collaboration Policy
You can implement a corporate data sharing policy for collaboration with external users. You can define a policy to restrict external collaboration by specific users or groups and define the sanctioned collaboration domains.
Actions performed on data shared with users outside of your corporate domain are logged in the access log and visible to the content owner, collaborators, and portal administrators.
Collaboration policy rules control:
- Which portal members can enable which external users to collaborate on data stored on the portal.
- What minimum type of authentication external users need if portal users share data with them.
- The highest level of access permission the external users are allowed by the specified portal members.
Optionally, each policy rule can apply to a subset of your portal members, allowing different collaboration rules for different portal users.
Any external user email address which is not specifically denied by any collaboration policy rule will be allowed to collaborate.
The policy is not applicable to files and folders shared via public links or collaboration with internal users. Collaboration limits for internal users can be set as described in Managing Collaboration Permissions
To add a collaboration policy rule:
- Select Settings > Control Panel in the navigation pane.
The Control Panel page is displayed.

- Select Collaboration Policy under Cloud Drive Settings.
The Collaboration Policy page is displayed.

- Click Create to define a policy.
- Click
Setin the From field to select to whom the policy applies.
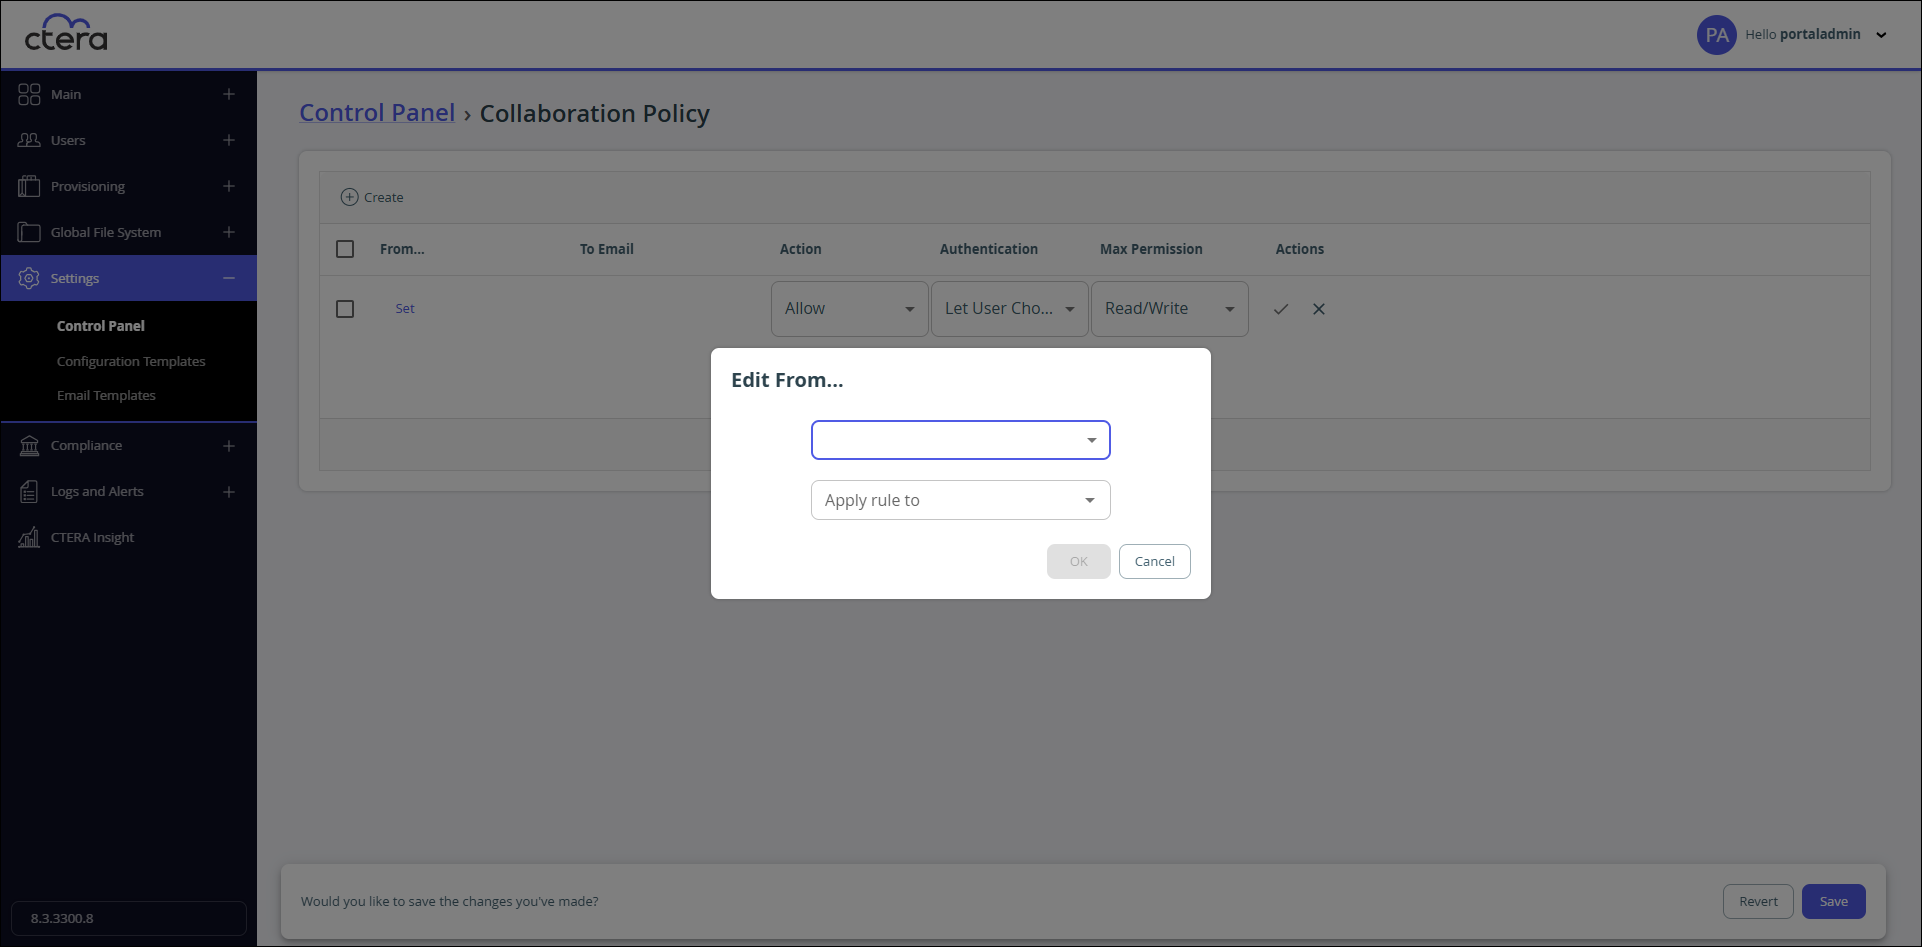
- If you select
All Usersthe policy applies to every user. If you selectLocal Usersor the Active Directory Users, the policy is for specific users, otherwise, if you selectLocal Groupsor the Active Directory Groups, you can apply the policy to all users in a specified group. - Click OK.
- If you select
- In the To Email column, specify which external recipient email addresses the policy will apply to. You can enter an email address or you can specify an entire domain, by using wildcards. For example, to specify all gmail addresses, enter
*@gmail.comor@gmail.com - In the Action column select Allow or Deny to allow or deny the specified user or user group to collaborate on files and folders with external users at the specified email addresses.
- In the Authentication column, set which authentication methods the external users will have to use in order to access the shared files or folders:
Let User Choose – The end user chooses which authentication method to use to authenticate the external user for access to the shared file or folder.
Email – The invitation recipient receives a time limited authenticated link to the file or folder. On every access, a new 6 digit passcode challenge is sent to the recipient by email which must be entered to access the file or folder. - In the Max permission column, set the highest permission level that the user can grant the external collaborator on any shared files:
- Read/Write
- Read Only
- Preview Only
- Upload Only
NoteRead/Write share recipients are able to view and print the file using the CTERA Portal’s integrated document preview server and copy and download the content.
Read Only share recipients are able to view and print the file using the CTERA Portal’s integrated document preview server and download the content.
Preview Only share recipients are able to view files using the CTERA Portal’s integrated document preview server. Users with this permission are unable to download or copy, or print the content. The file is protected with a watermark and content shared in Preview Only mode cannot be synchronized for offline access by CTERA Devices, for example, CTERA Edge Filers or CTERA Drive Mobile.
Upload Only share recipients are able to upload content to the folder but cannot see any of the content that is in the folder. - You can move rules up and down the list on the policy page. When a user invites an external user to collaborate, the first rule on the list, from the top downwards, that matches the external users' email address applies.
- Click in the Actions column to create the policy.
- Click Save.

To edit or delete collaboration policies:
- Select Settings > Control Panel in the navigation pane.
The Control Panel page is displayed.

- Select Collaboration Policy under Cloud Drive Settings.
The Collaboration Policy page is displayed.

- Click to edit the policy or to delete the policy.
- If editing the policy, after the changes click in the Actions column to save the changes.
- Click Save.