The ability to manage the CTERA Edge Filer from the CTERA Portal matches the CTERA Edge Filer procedure.
- Click the DEVICES option in the navigation pane.

This page displays all of your devices that are registered to your account. - Select the CTERA Edge Filer with shares you want to manage.
- Click the Shares tab.
- Click New Share.
The Select a Folder to Share wizard opens, displaying the volumes and folders on the CTERA Edge Filer. - Select the volume, folder, or subfolder on which you want to define the share.
- To create a new subfolder to select as a nested share, select the parent folder, click New Folder, and then assign the subfolder a name.
- You can define nested shares based on subfolders within your own cloud drive, which are available to users based on the permissions defined when creating the share. If the share has NT ACL settings, these settings are applied to the nested share and to every share below this share. For example, if the administrator has a personal cloud drive named MyGateway, to which he migrated a full old Windows File Server with the following structure:
If, before the Windows File Server migration,/Cloud /WIN-File-Server /Share1 /Share2 /My Files /Shared with me\\Win-File-Server\Share1and\\Win-File-Server\Share2shares were exposed in the old file server, users logged in to MyGateway can access the content of the shares:\\MyGateway\Share1and\\MyGateway\Share2after they are defined:Share1 = \\MyGateway\Cloud\WIN-File-Server\Share1 Share2 = \\MyGateway\Cloud\WIN-File-Server\Share2
- Click Next and then assign the network share a name.
- Click Next to choose through which sharing protocols to expose this share.
The Sharing Protocols window is displayed.
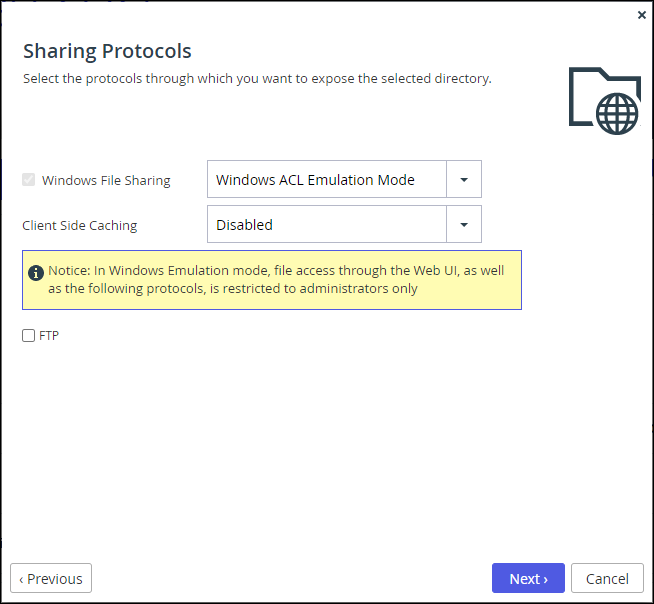
Users access the shared files and folders through standard Windows client computers; for example, using Windows File Explorer through the SMB access provided by the CTERA Edge Filer.Windows File Sharing is checked by default and cannot be deselected.
To copy the files with their ACLs to the CTERA Edge Filer, see Copying Files From an External File Server to the CTERA Edge Filer. - Specify how you want to share the files.
FTP – Users will be able to access and download files on this share from the FTP site. To configure the FTP server, go to Shares > FTP Server. - Click Next.
The Block File Types window is displayed.
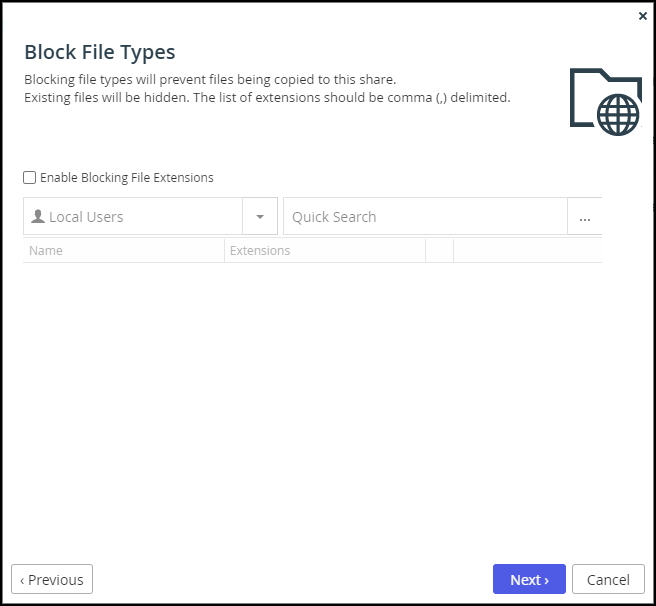
- Check Enable Blocking File Extensions to block file extensions.
Enter the file extensions per user and group:- In the Local Users drop-down list, select one of the following:
Local Users – Search the users defined locally on the CTERA Edge Filer.
Domain domain Users – Search the users belonging to the domain called domain.
Local Groups – Search the user groups defined locally on the CTERA Edge Filer.
Domain domain Groups – Search the user groups belonging to the domain called domain. - In the Quick Search field, type a string that is displayed anywhere within the name of the user or user group you want to add, or click ... to list the users.
A list of users or user groups matching the search string is displayed. - Select the user or user group in the table.
The user or user group is added to the list of users and user groups for who, you want to block some file extensions. - For each user and user group, click in the Extensions field, and then specify the extensions to block, with each extension separated by a comma (,). List only the letters of each file extension. For example, to block EXE files, list the
exefile extension; to block PDF files, list thepdffile extension. To block both EXE and PDF files, list them asexe,pdf. Blocked extensions are not case sensitive.
Wildcards (for example,*.exe) are not supported.
- In the Local Users drop-down list, select one of the following:
- Click Next.
The NFS (UNIX File Sharing) window is displayed.
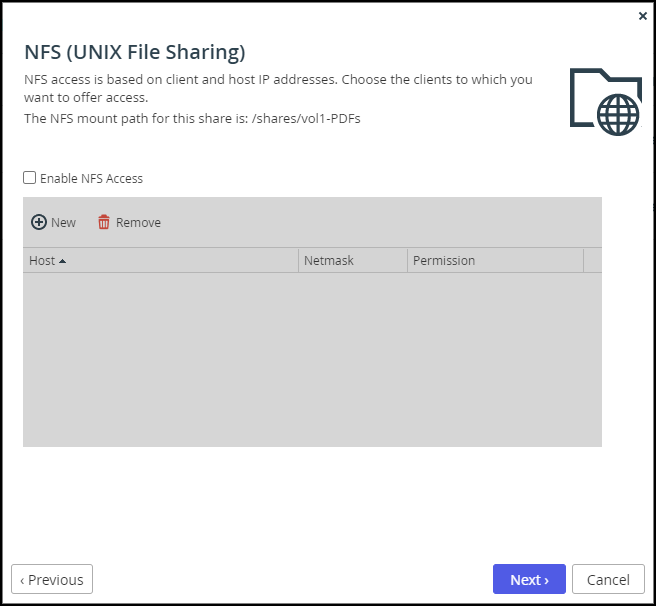 Note
NoteThe NFS mount path for the share, when NFS access is enabled, is displayed.
- Check the Enable NFS Access option to enable NFS clients to access the share. Both NFS versions 3 and 4 protocols are supported, depending on the protocol used by the client.
- Click New to configure each client to which you want to grant access. A row is displayed in the table:
- Enter the client's IP address in the Host field and the netmask in the Netmask field.
- Select the permitted level of access to the network share via NFS. Options are None, Read Only, or Read/Write.
NoteAll shares on all edge filers for the same portal cloud folder must be NFS enabled.
- Click Next.
The Configure Permissions window is displayed.
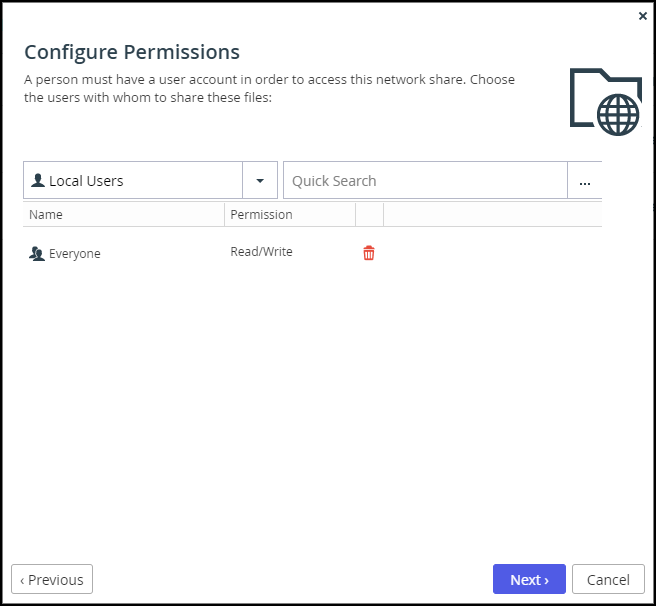
- Specify the share permissions.Note
These permissions are not inherited from the CTERA Portal.
- Click Next and then click Finish.
Click  next to the share to edit it or remove it.