CTERA Portal versions that run on CentOS 7 need to be upgraded to run on CentOS 9.
CTERA is releasing portal versions running on CentOS 9 for the following versions:
- 8.1
- 8.2
To upgrade your portal to CentOS 9 you must first upgrade your portal to the latest 8.1.x CentOS 7 release (8.1.1417.36). You need to upgrade both the image and software.
8.2.x portals run only on CentOS 9.
8.1.x portals from version 8.1.1417.41 run only on CentOS 9.
You do not need to upgrade your portal to a later major version in order to move it to CentOS 9. That is, if you are using CTERA Portal version 8.1.x, you can continue to use this version on CentOS 9 and you do not need to upgrade to CTERA Portal 8.2.x.
Upgrading an 8.x image also upgrades the software.
Upgrading a CentOS 7 Portal Cluster to CentOS 9 By Disk Replacement
The following procedures for ESXi and AWS replaces the operating system disk running on CentOS 7 with the new operating system disk running on CentOS 9.
You can also upgrade the portal cluster using the failover method for all platforms, including both ESXi and AWS.
Preparing the CTERA Portal to Move to CentOS 9
Before moving the CTERA Portal to CentOS 9, you need to create a migration backup on the existing portal. The migration backup script backs up essential configuration files from the CentOS 7 root disk to the data disk. These files will then be restored to the CentOS 9 root disk at the end of the upgrade.
To create a migration backup:
-
Shutdown all the portal servers.
First stop preview servers and then application servers. Next stop the replication database server and finally stop the main database server.- Using SSH, log in as
rootto each CTERA Portal server. - Run the following command:
portal-manage.sh stop
When the server has stopped, the
Donemessage is displayed on the screen. - Using SSH, log in as
-
Get the latest migration.sh script from CTERA support.
NoteThe migration.sh script is often modified to be more efficient. Always use the latest script from CTERA.
-
Copy the script, migration.sh, to $datadir on every VM in the portal cluster.
-
Navigate to datadir:
cd $datadir -
Make sure you have execute permissions on the script if you run commands without using the
bashcommand interpreter:chmod +x migration.sh -
On every VM in the portal cluster, run the migration.sh script:
bash migration.sh backup -
Shutdown each VM in the portal cluster.
-
Continue with the procedure for your platform for each VM in the portal cluster in the following order:
First the main database server followed by the replication database server and then the application servers and finally any preview servers.
ESXi Platform
Before performing the following procedure, make sure you have completed the preparation described in Preparing the CTERA Portal to Move to CentOS 9.
- Log in to vSphere Client Console and using the OVA from CTERA for the CentOS 9 server version 8.1.1417.36.1, create a new server, as described in Installing CTERA Portal Instances under ESXi in the Installing a CTERA Portal article.
- Make copies of the root disk, a copy for each server VM in the portal cluster. Save each copy to the folder that contains the CentOS 7 root disk for that VM.
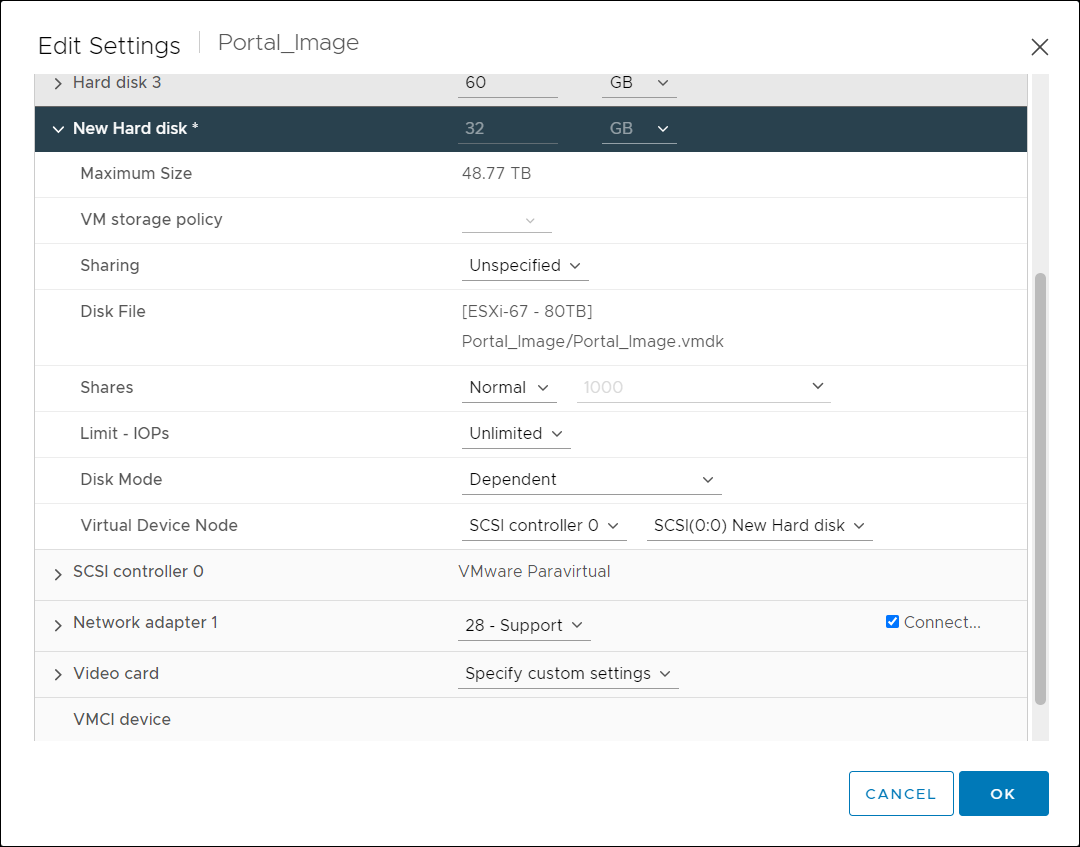
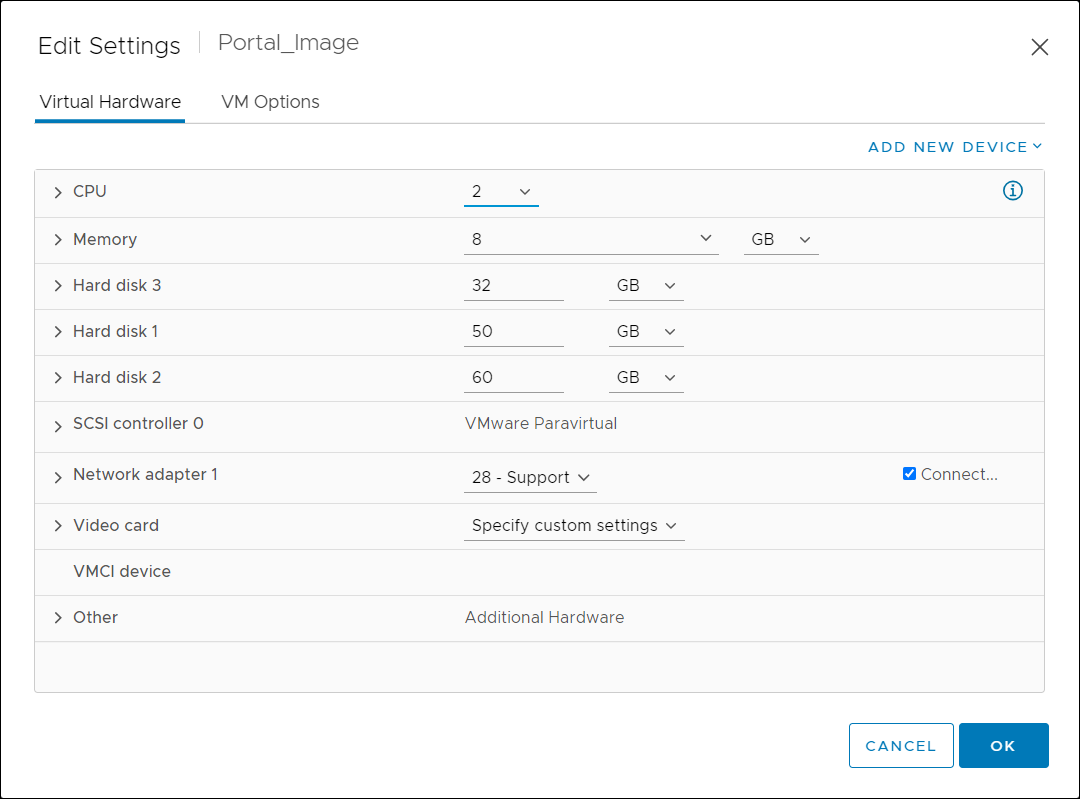
- Expand Hard disk 1 and note the Disk File location.
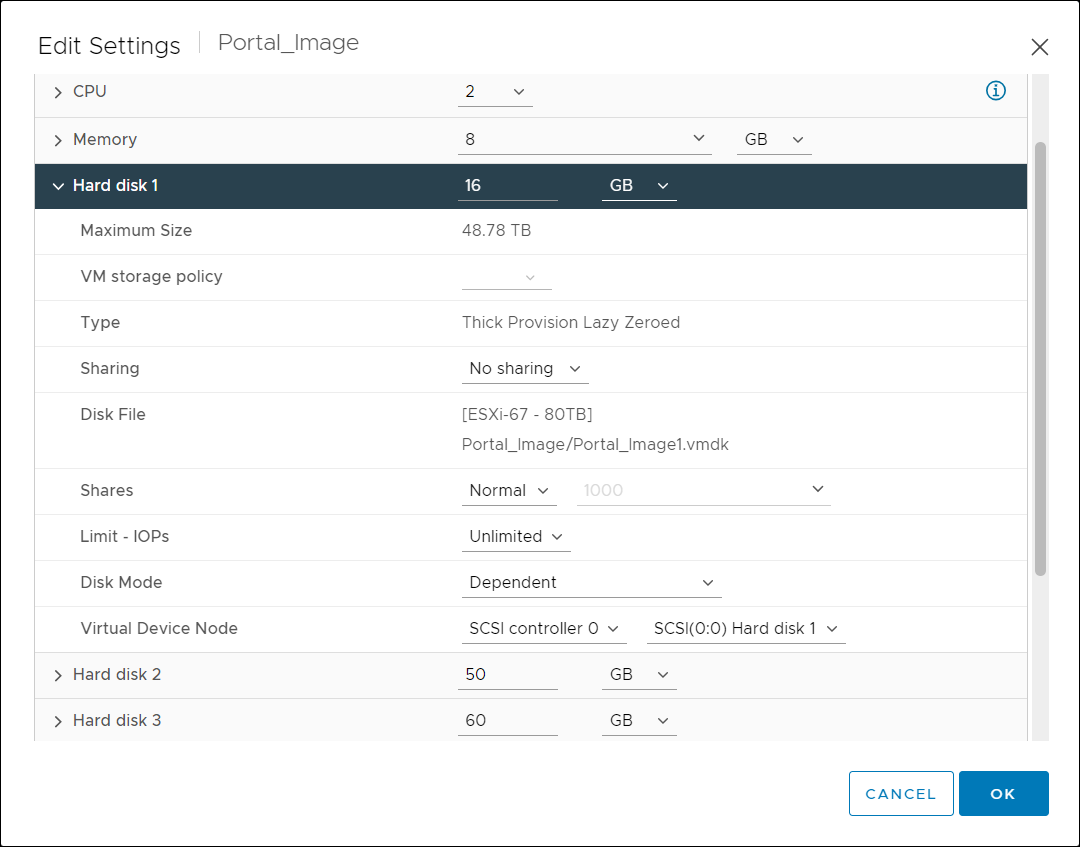 Note
NoteThe above screenshot shows the default portal settings with a 16GB root disk and two data disks, 50GB and 60GB. Apart from the root disk, your environment might have a different number of disks and with different sizes.
The disk file location is also displayed in the VM Summary tab, in the Related Objects area.
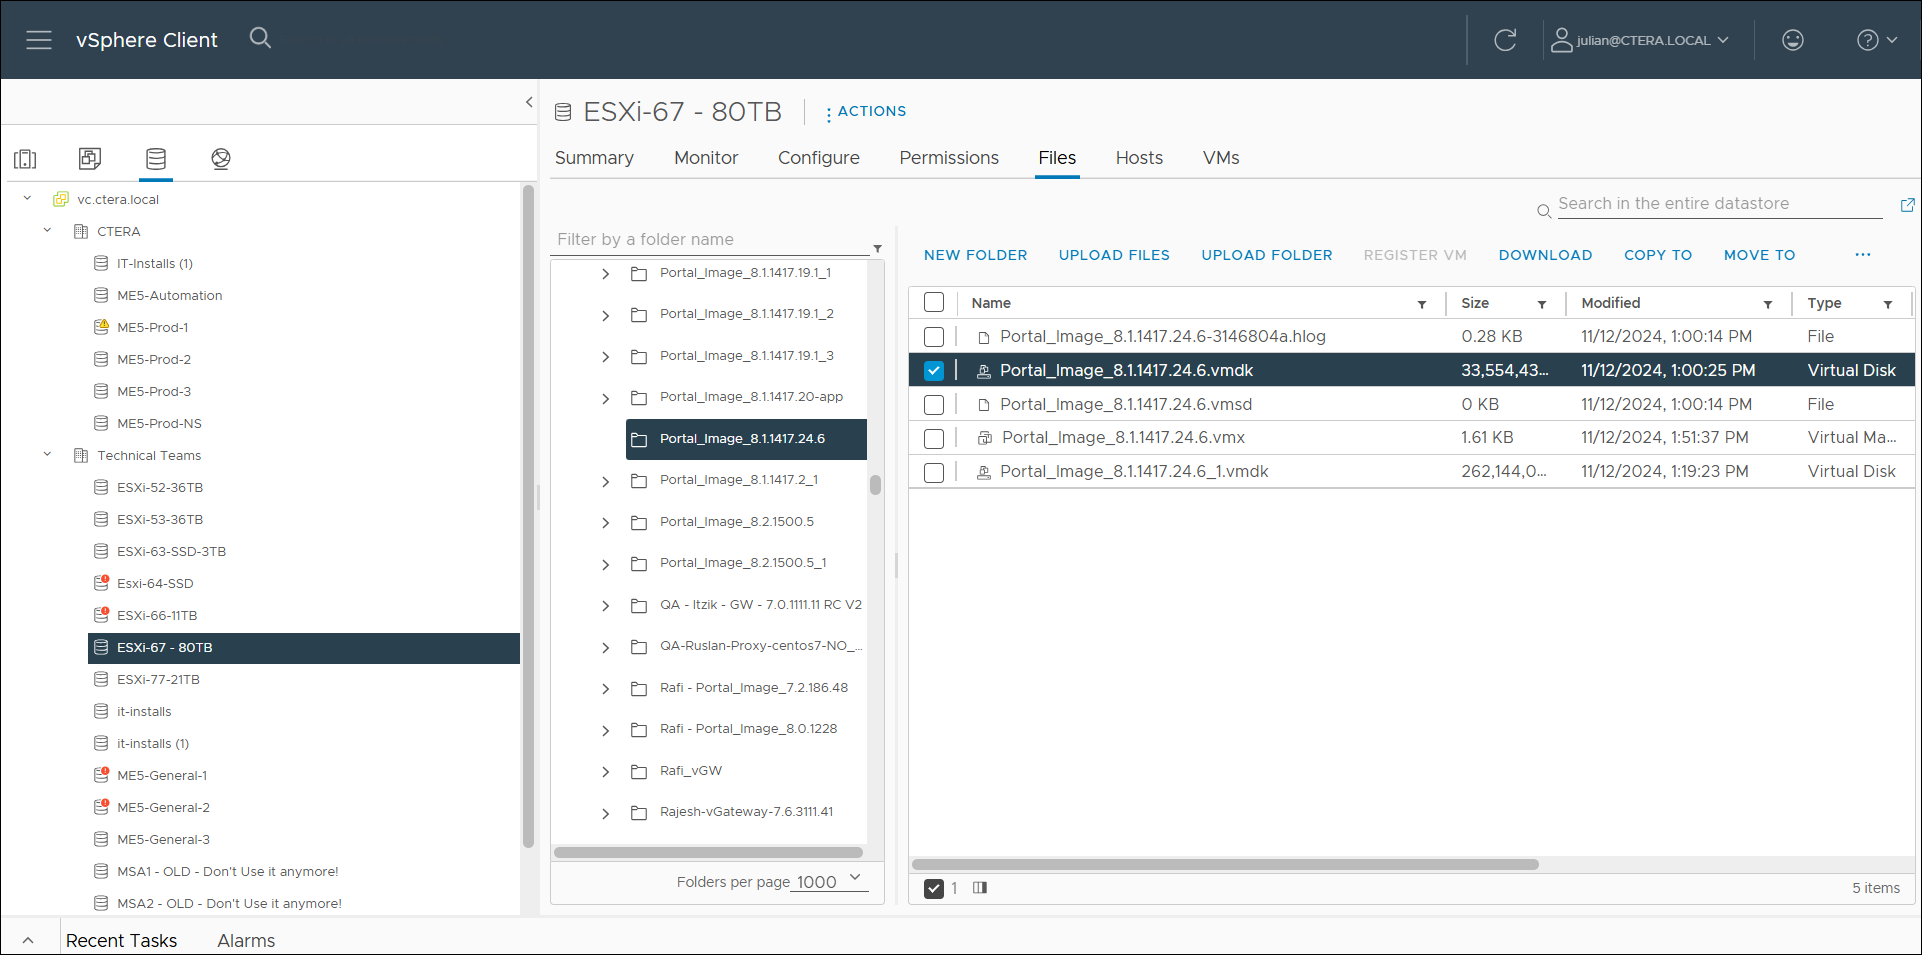
- In Storage,
 , navigate to the vmdk for Hard disk 1.
Note
, navigate to the vmdk for Hard disk 1.
NoteSelect the storage volume and then the Files tab. You can then filter the list of folders using the portal name.
- Select the 32GB vmdk disk, 33554432KB, and click COPY TO.
For example, for an 8.1.x CentOS 9 portal:
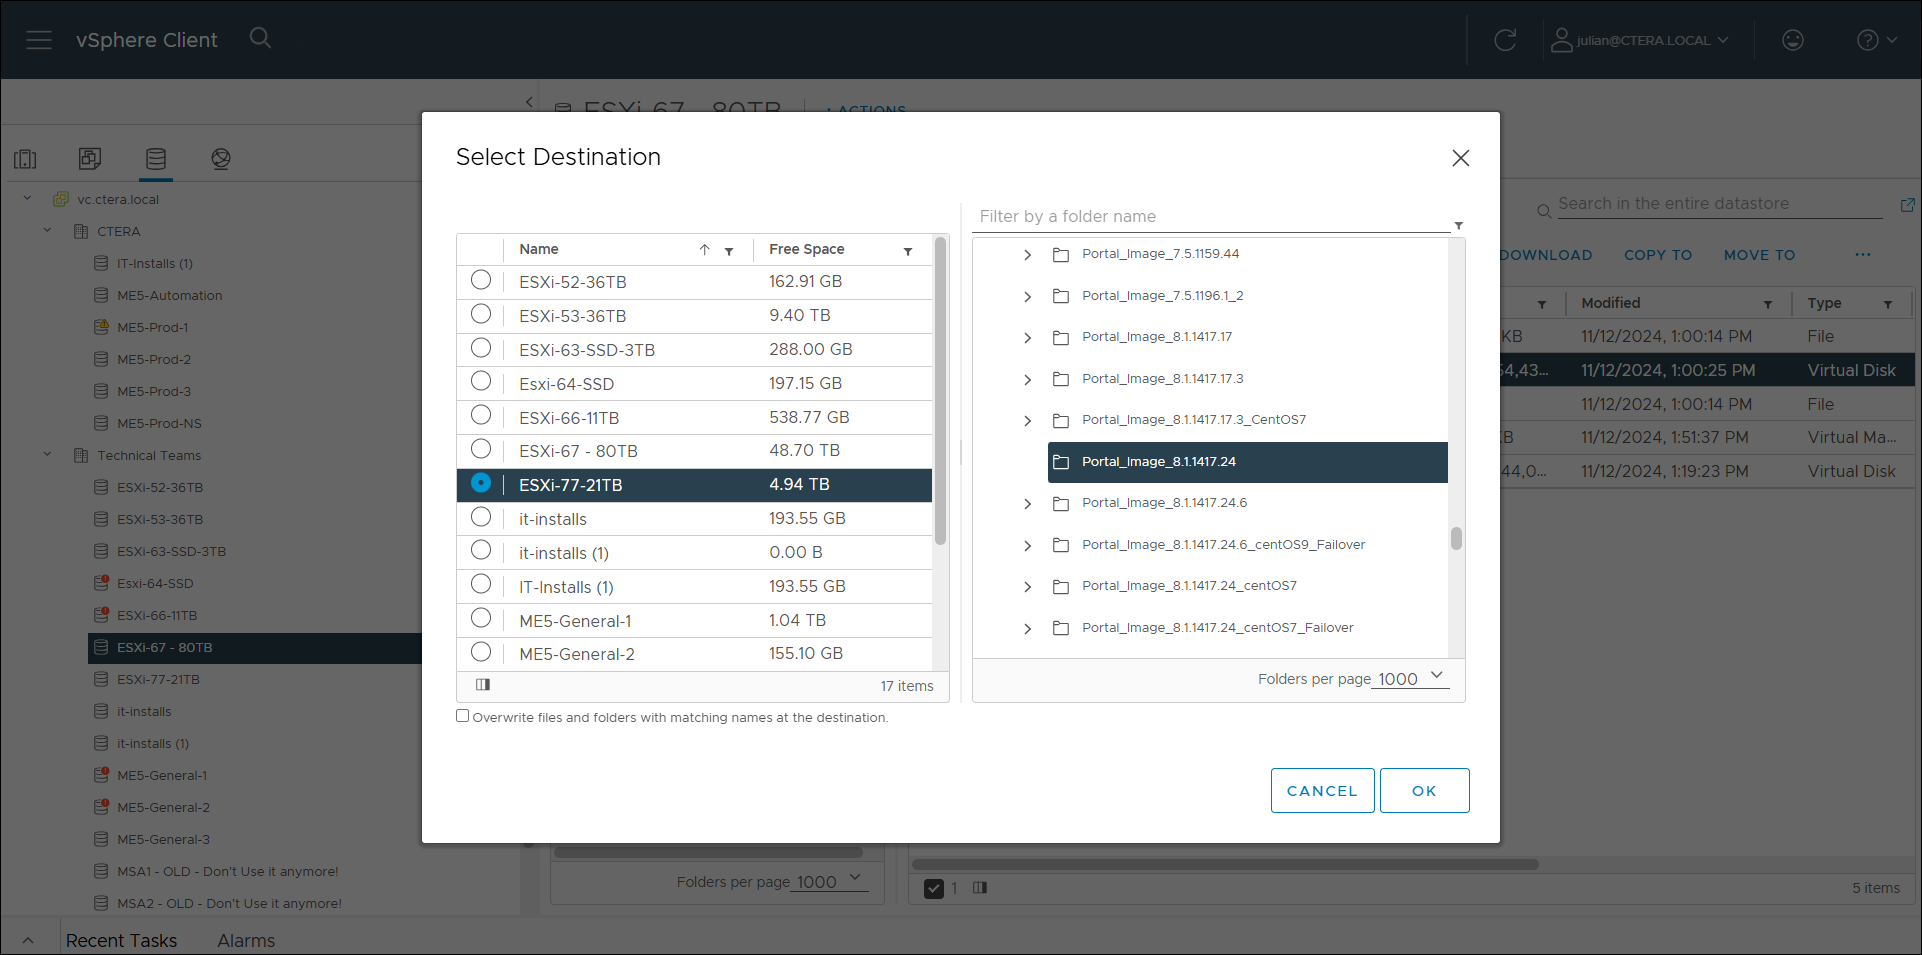
- Select the destination folder for the disk and click OK.
For example, for an 8.1.x CentOS 7 portal VM that you want to upgrade to CentOS 9:
- Expand Hard disk 1 and note the Disk File location.
- Under VMs and Templates,
 , for each of the CentOS 7 VMs in the cluster, click the Snapshots tab and if there are any snapshots, click DELETE ALL.
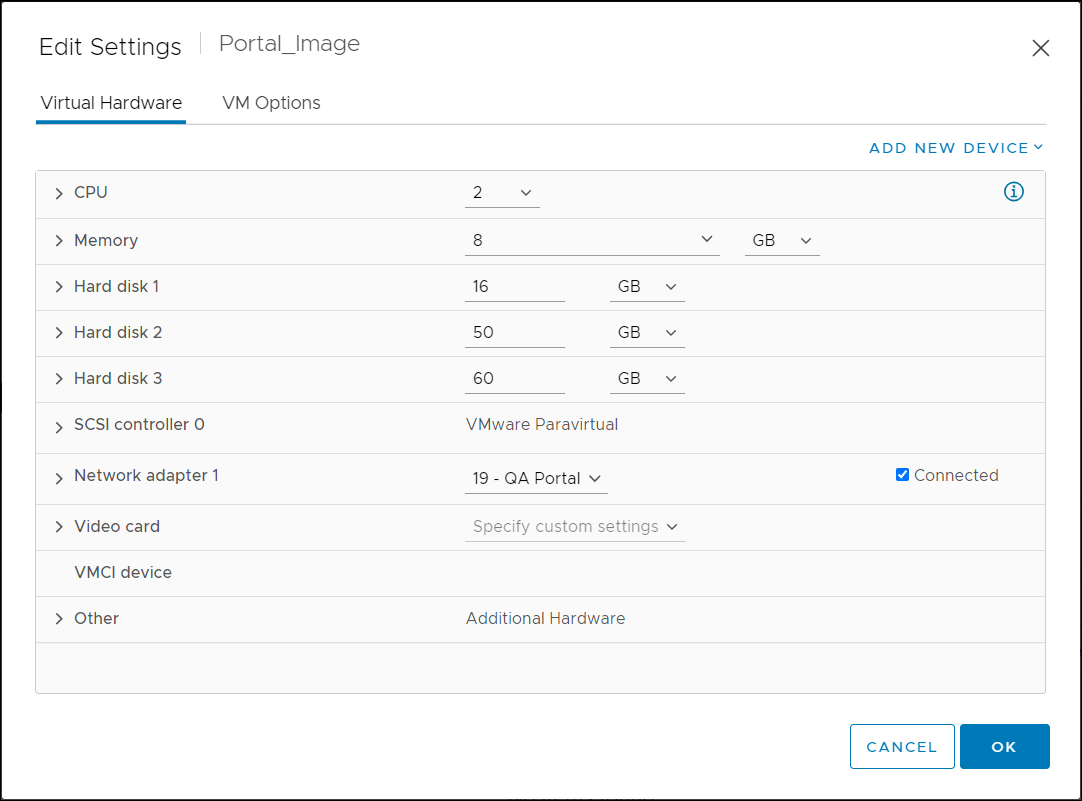
 - For each of the CentOS 7 VMs in the cluster, right-click the VM and select Edit Settings.
The Edit Settings window is displayed.
- Expand Hard disk 1 and note the Virtual Device Node settings:
SCSI(0:0)
- Remove Hard disk 1, the 16GB root disk.
Note
CTERA recommends not checking Delete files from datastore.
- Click OK.
- Click Edit Settings.
- Click ADD NEW DEVICE and select Existing Hard Disk.

- Select a CentOS 9 root disk that you copied and click OK.

- Expand New Hard disk and make sure that the Virtual Device Node settings are the same as they were for Hard Disk 1:
SCSI(0:0)
- Click OK.
- Power on the VM and, using the remote console, log in as
rootto the VM. - Change the default password.
- Navigate to datadir:
cd $datadir - On the primary database server, run the following query to find the size of the largest index:
SELECT relname AS index_name, pg_size_pretty(pg_relation_size(oid)) AS size, pg_relation_size(oid) AS size_bytes FROM pg_class WHERE relkind = 'i' AND relnamespace = (SELECT oid FROM pg_namespace WHERE nspname = 'public') ORDER BY size_bytes DESC LIMIT 1;NoteMake sure that datadir has at least as much free space as the largest index. Use the following command to see how much space is available:
df -h $datadir - Start a screen session:
screen -S C9-migration - Run the following command in the screen console:
dmesg -D && bash migration.sh restore |& tee C9-migration.logThe
migration.sh restorescript restores the backed up files that were saved on the data disk to the new root disk.
dmesg -Ddisables console messages from kernel during the restore and reindex and|& tee C9-migration.logpipes stdout/stderr to a log file.- Disables cloud-init
- Restores the current network connection
- Restores any root cron entries
- Restores any custom NTP settings
- Restores any custom sudoers entries
- Restores any customer hosts entries
- Restores and imports previously imported certificates (Active Directory rejoin)
- Restores and applies any keytab files (for SSO)
- Checks and if required, reloads docker images
- Checks the server role and takes the following action:
- If the server is the primary database server, restarts the portal service and performs reindexing tasks.
- If the server is an application server, restarts the portal service and then the script finishes.
- To validate that the VM runs on CentOS 9, run
cat /etc/centos-releaseto show that the portal is running on CentOS 9. - Repeat this procedure for all the VMs in the portal cluster.
- Continue with Ensuring the Base Backup is Successful.
AWS Platform
Before performing the following procedure, make sure you have completed the preparation described in Preparing the CTERA Portal to Move to CentOS 9.
- In the AWS Management Console select Services.
- Under the Compute service, select EC2.
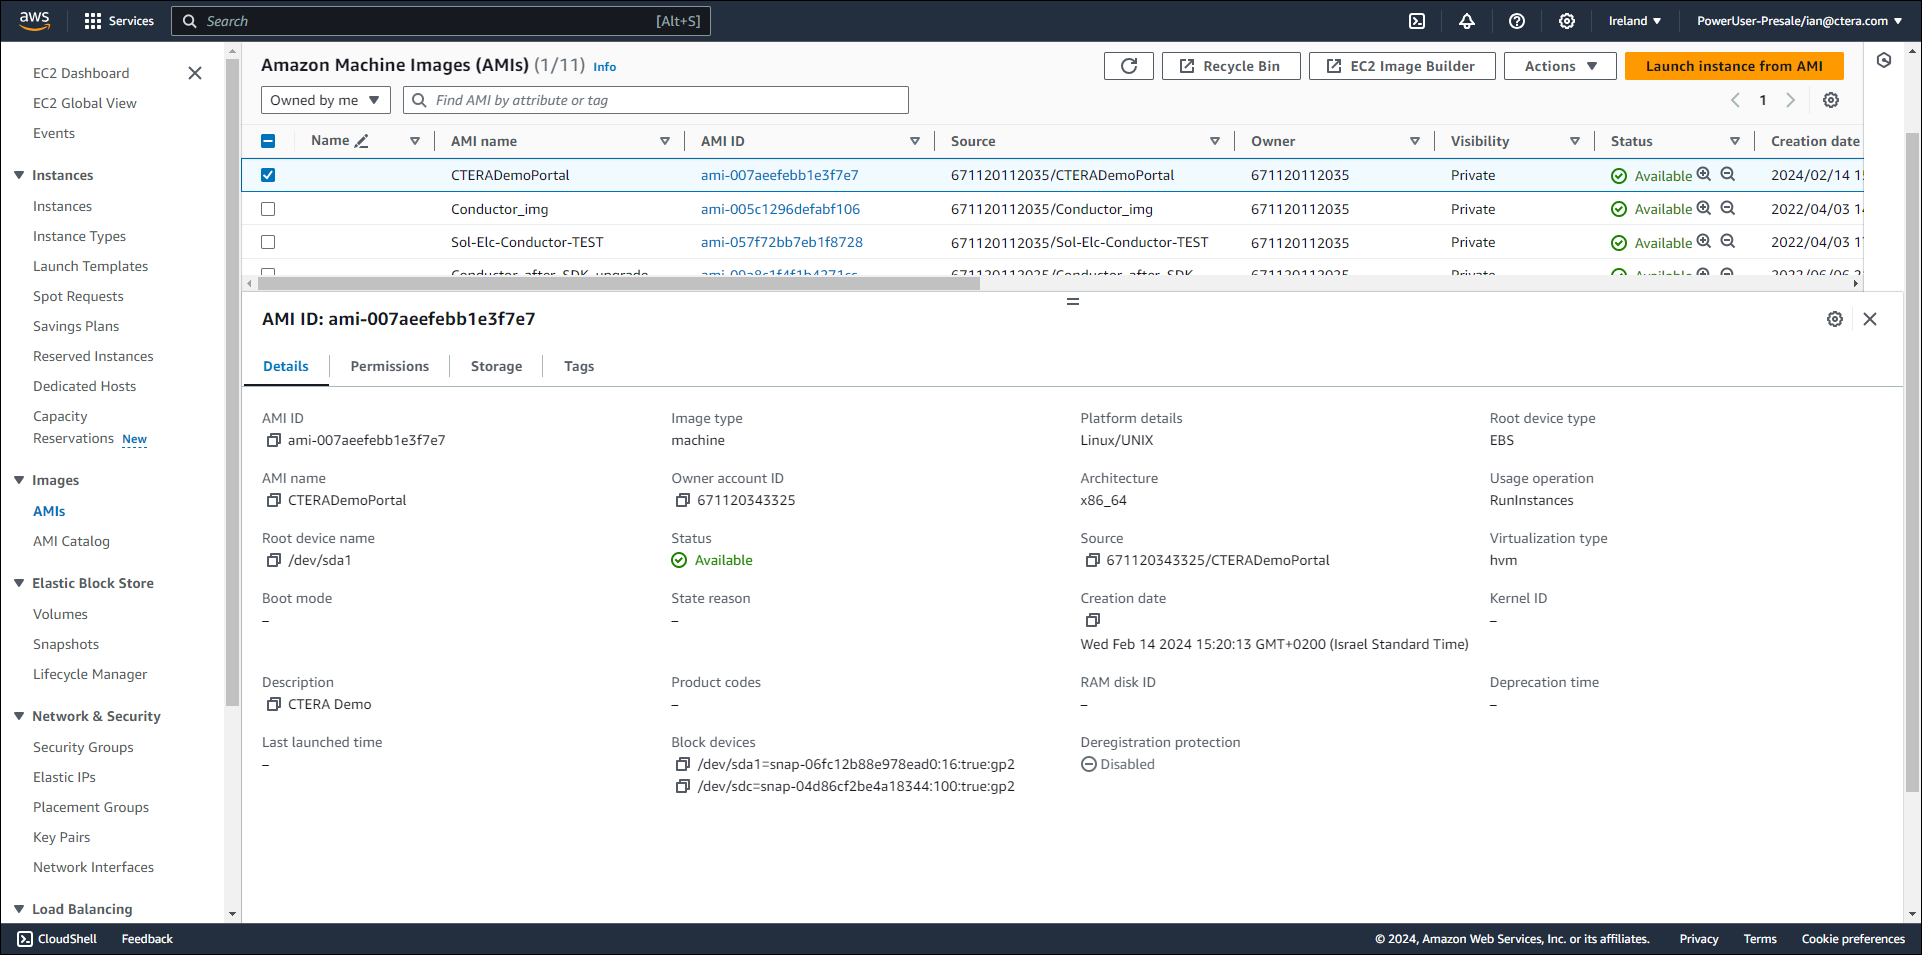
- In the navigation pane, click Images > AMIs.
The Amazon Machine Images (AMIs) page is displayed. - Note the AMI ID of the CentOS 9 CTERA Portal image that CTERA shared with you.
- Click Instances > Instances and select the CentOS 7 instance.
Note
The instance must be running. If it is Stopped, click Instance state > Start instance.
The CentOS 7 root disk volume type must be GP2. If the volume type is GP3, stop the CentOS 7 instance, change the volume type to GP2 and then restart the CentOS 7 instance. Refer to AWS documentation to convert a GP3 volume type to GP2.
On the primary database server, run the following query to find the size of the largest index:SELECT relname AS index_name, pg_size_pretty(pg_relation_size(oid)) AS size, pg_relation_size(oid) AS size_bytes FROM pg_class WHERE relkind = 'i' AND relnamespace = (SELECT oid FROM pg_namespace WHERE nspname = 'public') ORDER BY size_bytes DESC LIMIT 1; - Click Actions > Monitor and troubleshoot > Replace root volume.
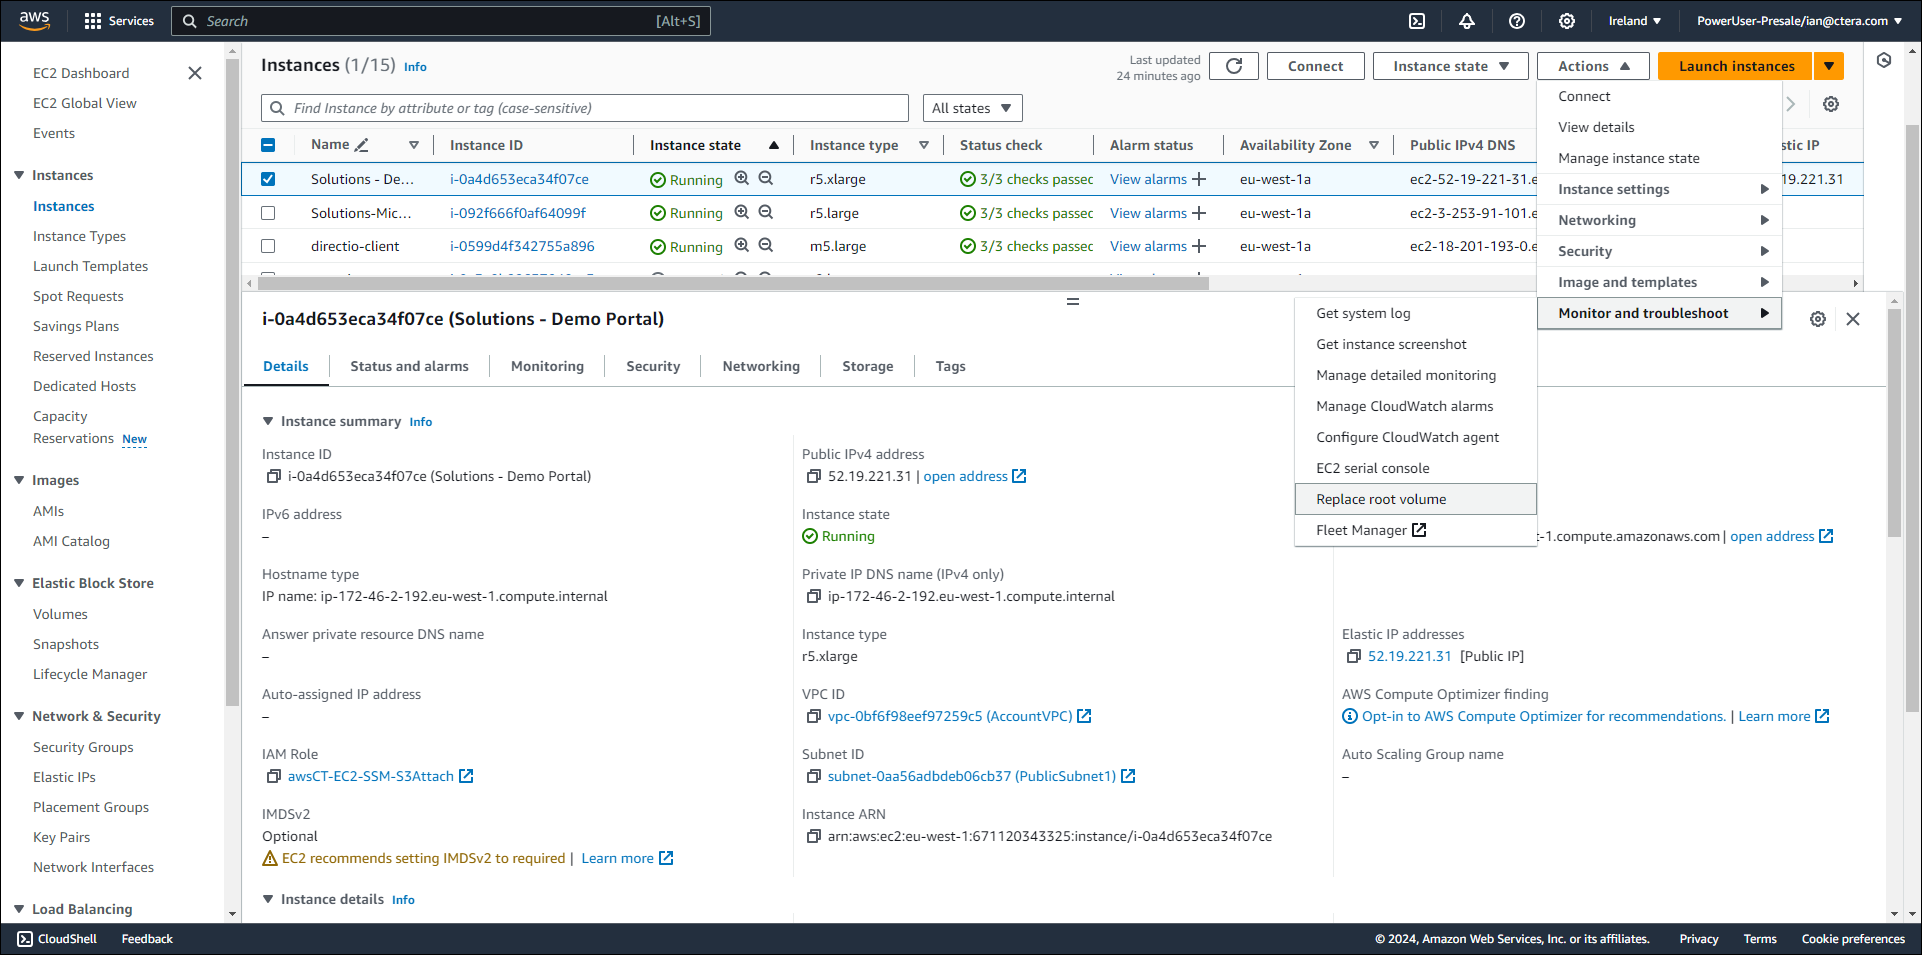
The Replace root volume page is displayed.
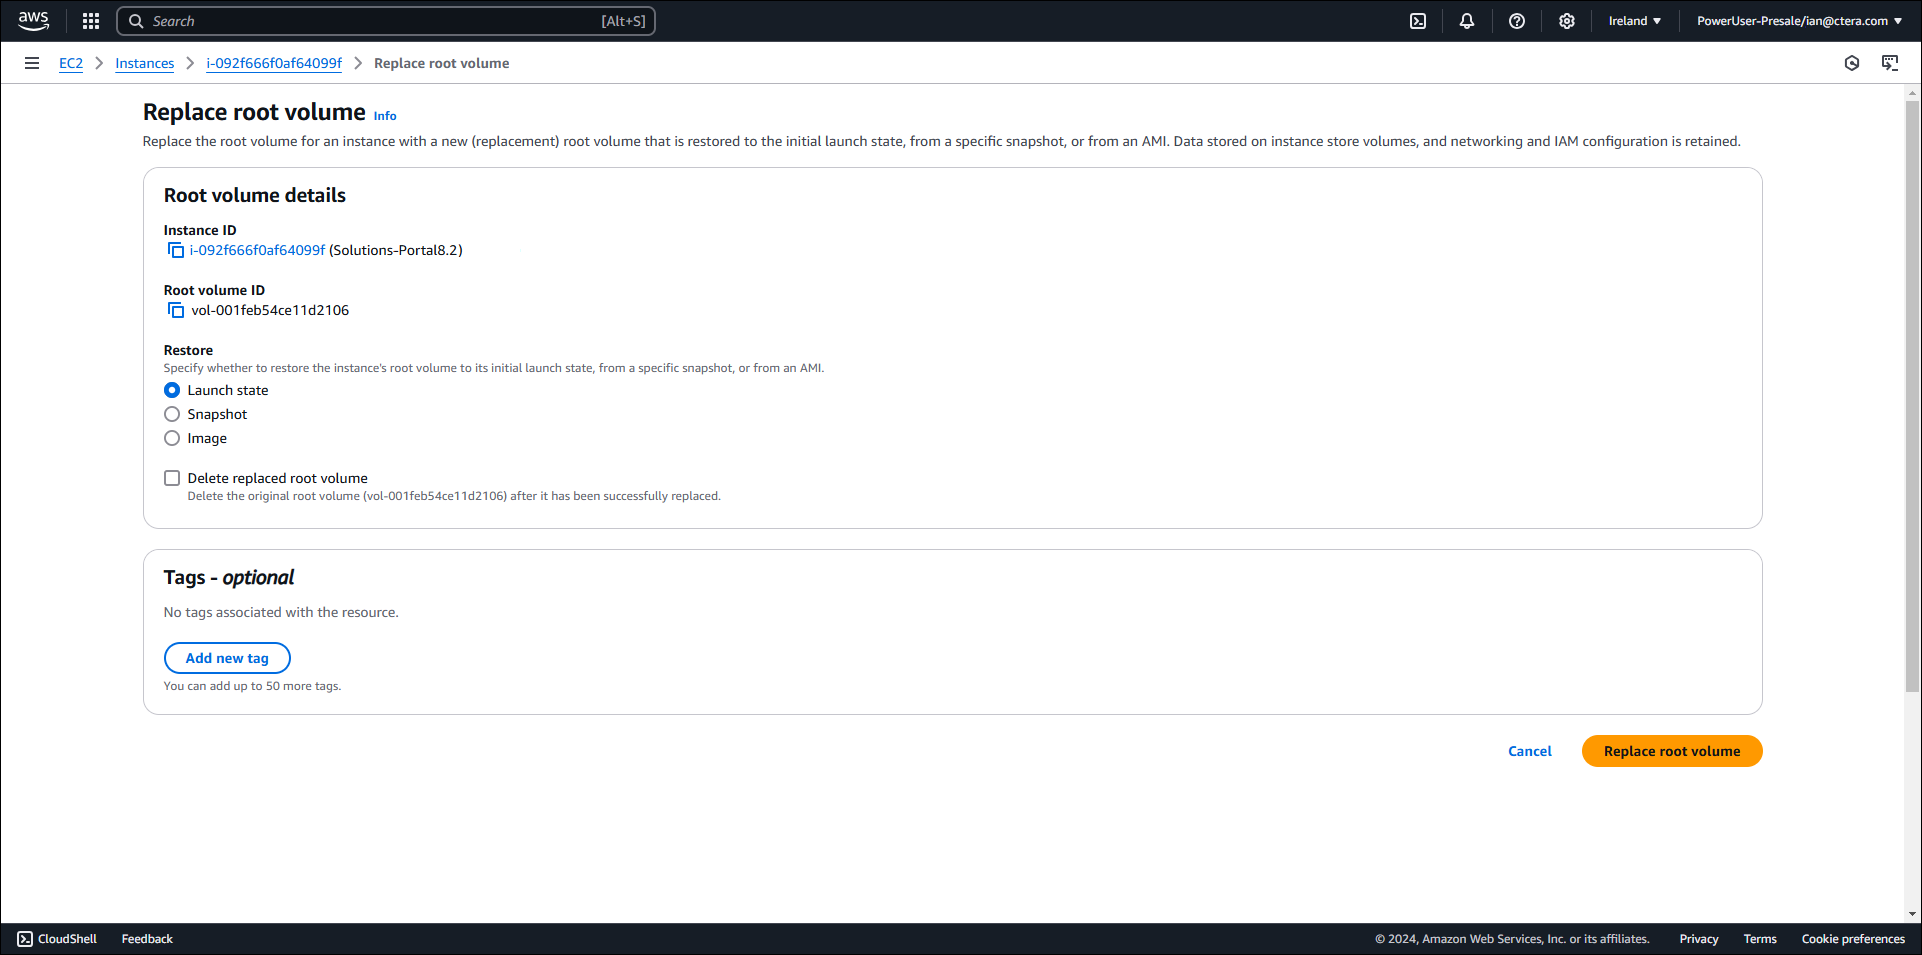
- Select the Image option under Restore and click in the Image box to display the list of AMIs.
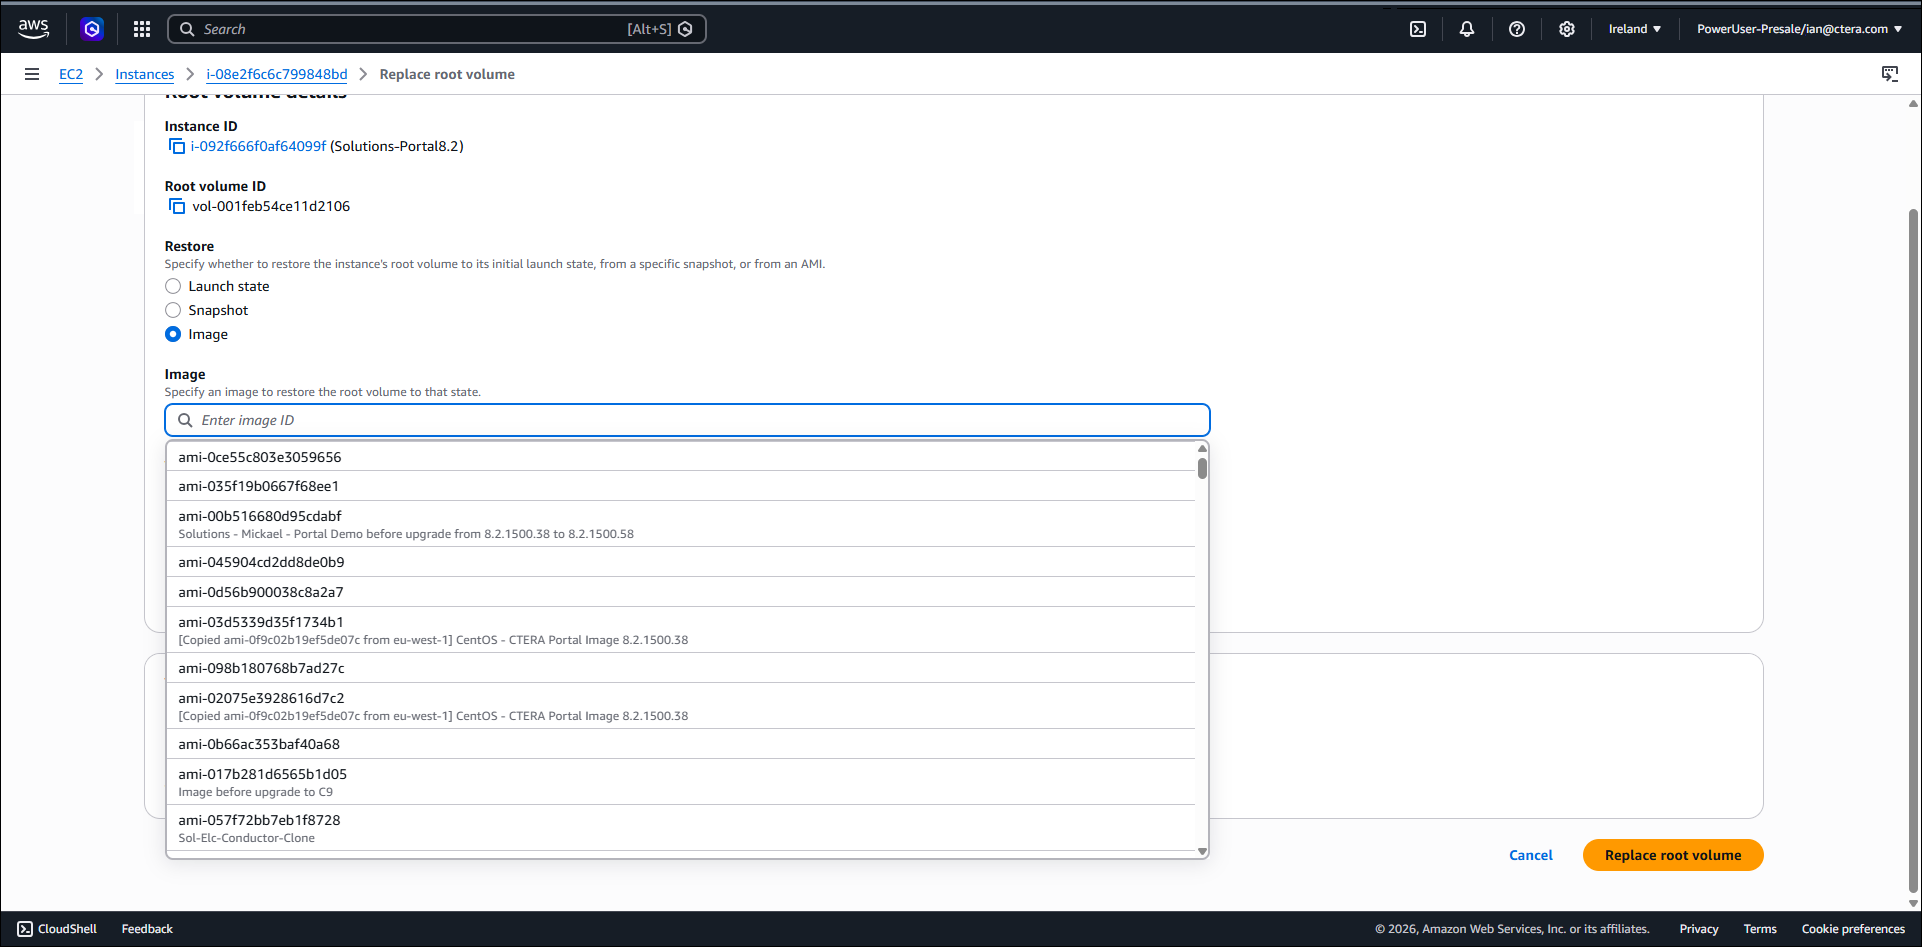
- Select the CentOS 9 AMI image using the AMI ID you previously noted and click Replace root volume.
- Connect to the VM and log in as
rootto the VM. - Change the default password.
- Navigate to datadir:
cd $datadir - Make sure that datadir has at least as much free space as the largest index. Use the following command to see how much space is available:
df -h $datadir - Start a screen session:
screen -S C9-migration - Run the following command in the screen console:
dmesg -D && bash migration.sh restore |& tee C9-migration.logThe
migration.sh restorescript restores the backed up files that were saved on the data disk to the new root disk.
dmesg -Ddisables console messages from kernel during the restore and reindex and|& tee C9-migration.logpipes stdout/stderr to a log file.- Disables cloud-init
- Restores the current network connection
- Restores any root cron entries
- Restores any custom NTP settings
- Restores any custom sudoers entries
- Restores any customer hosts entries
- Restores and imports previously imported certificates (Portal AD rejoin)
- Restores and applies any keytab files (for an agent SSO)
- Checks and if required, reloads docker images
- Checks the server role and takes the following action:
- If the server is the primary database server, restarts the portal service and performs reindexing tasks.
- If the server is an application server, restarts the portal service and then the script finishes.
- Navigate to /etc/ssh/sshd_config.d/00-aws.conf and comment out the line
PermitRootLoginand then runsystemctl restart sshd - To validate that the VM runs on CentOS 9, run
cat /etc/centos-releaseto show that the portal is running on CentOS 9. - Repeat this procedure for all the VMs in the portal cluster.
- Continue with Ensuring the Base Backup is Successful.
Ensuring the Base Backup is Successful
After upgrading to CentOS 9, the base backup might fail. If this happens perform the following:
- Using SSH, log in as
rootto each server and restart the portal using the commandportal-manage.sh restart
Failing Over to Upgrade to CentOS 9
- Install the same number of portal version 8.1.1417.36.1 servers running on CentOS 9 as you have version 8.1.1417.36 servers running on CentOS 7.
- If CTERA Messaging Service is enabled:
- Log in as
rootover SSH to the primary database server. - Run the following command to deprovision the messaging servers:
messaging-servers deprovision --force
- Log in as
- Modify the CentOS 7 replication server so that it is no longer a replication server.
- Connect a CentOS 9 server to the CentOS 7 primary database server and define it as the replication server.
- Log in as
rootover SSH to the CentOS 9 replication server. - Failover to the CentOS 9 server by running the following command:
portal-failover.sh become_master - Shut down all the servers in the portal cluster running on CentOS 7.
- On the new primary database server run the following:
platform-services removeserversfromuninstalled <server_name>where server_name is the sever name for each CentOS 7 server running on CentOS 7. - On the new primary database server run
platform-services rerunlazyinstall --force - Connect all the servers running on CentOS 9 to the server running on CentOS 9 that is now the master server.
Set up the CTERA Portal services, such as the CTERA messaging service on the new cluster.