To add or edit a device configuration template:
-
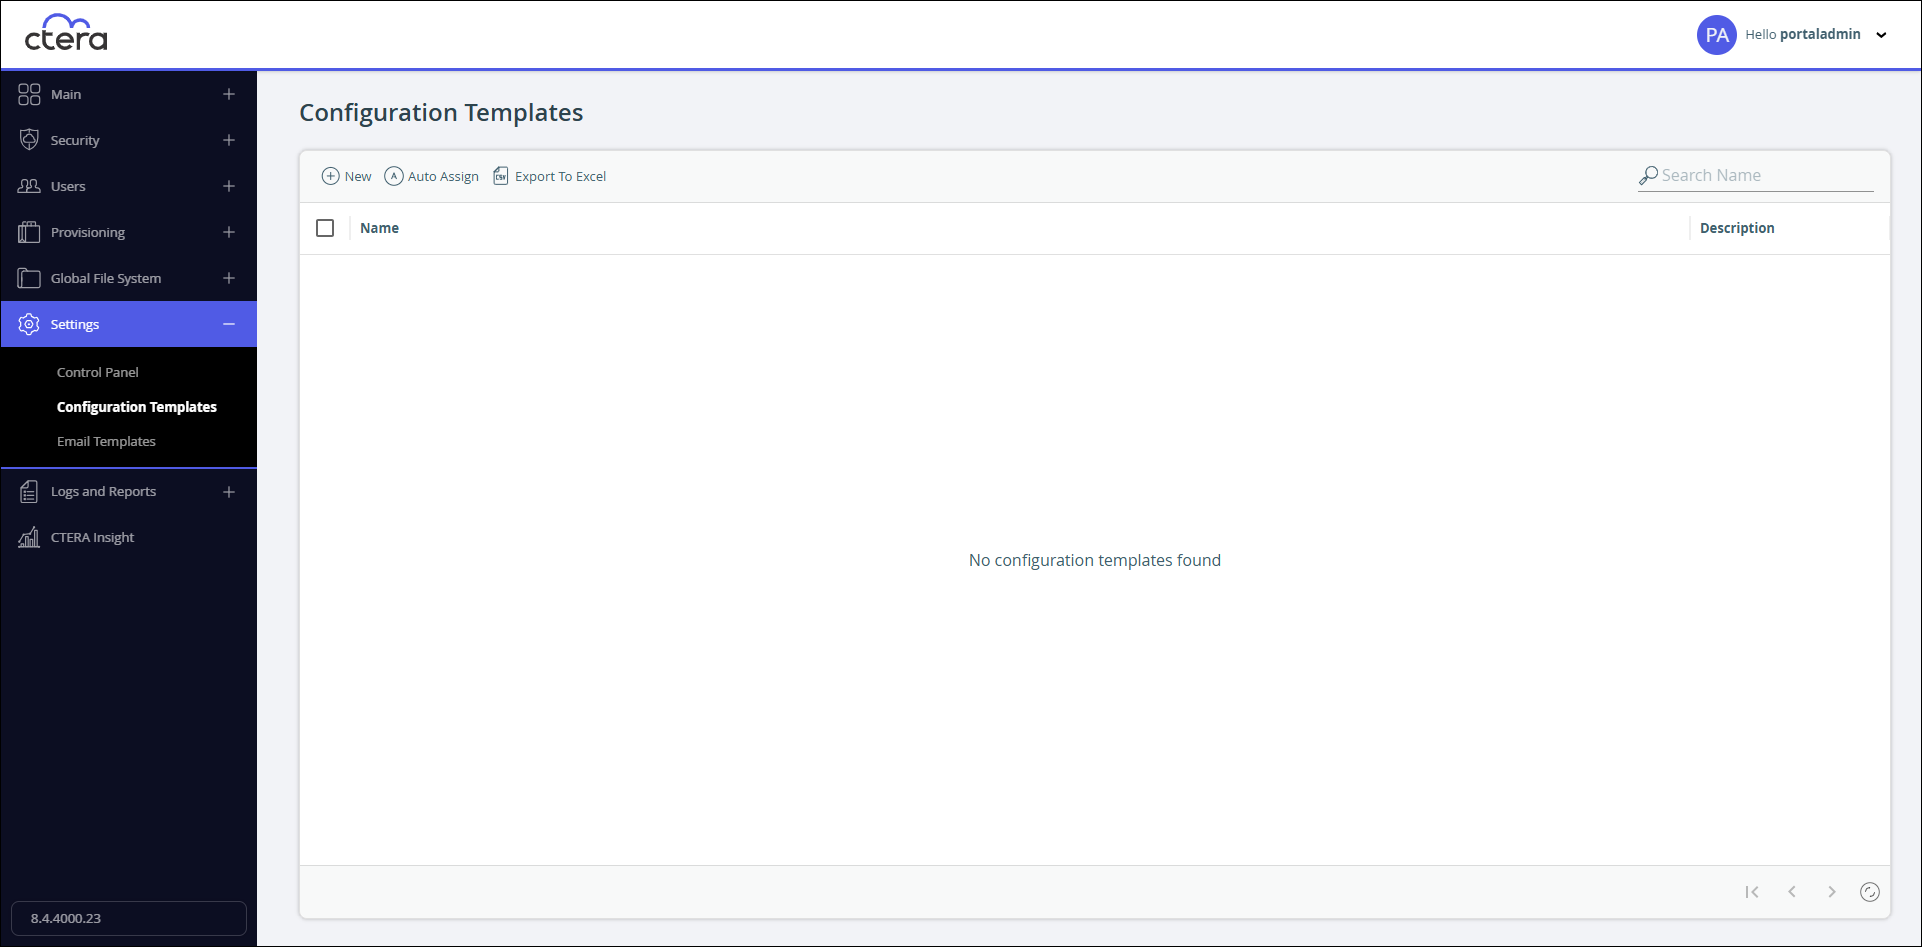
Select Settings > Configuration Template in the navigation pane.
The Configuration Templates page is displayed.
-
Either,
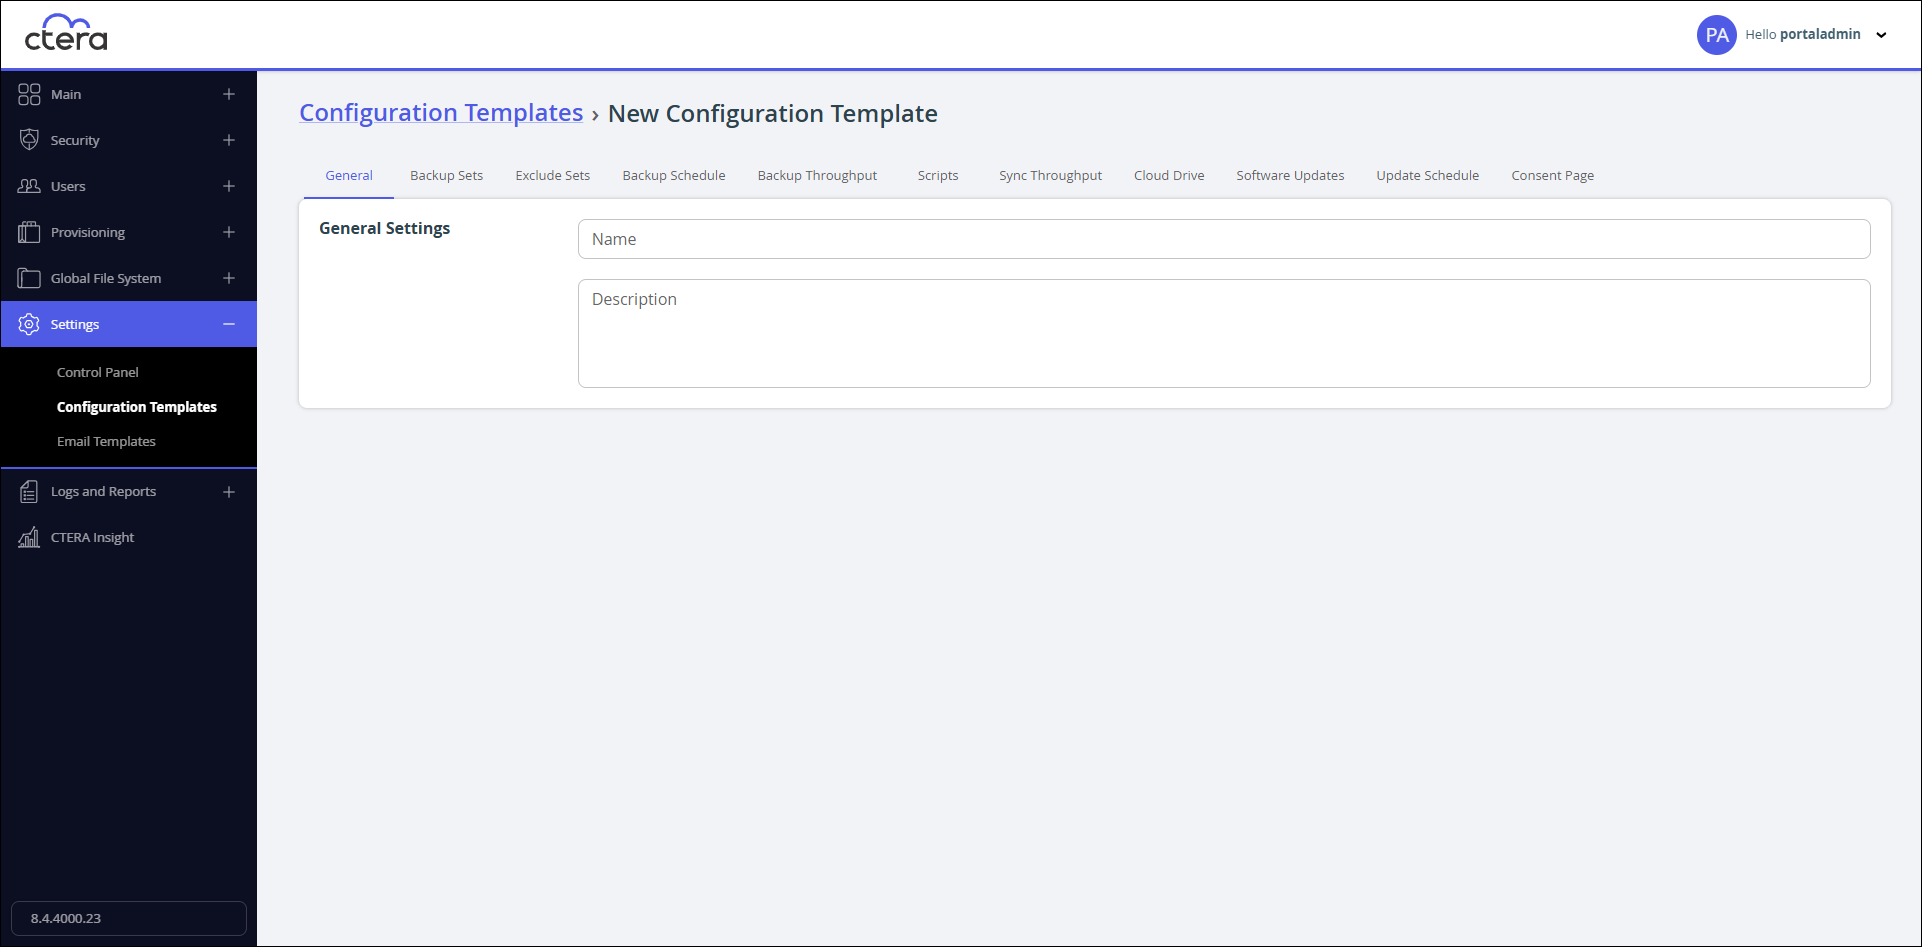
- Add a new template, click New.
The New Configuration Template window is displayed.
Or,
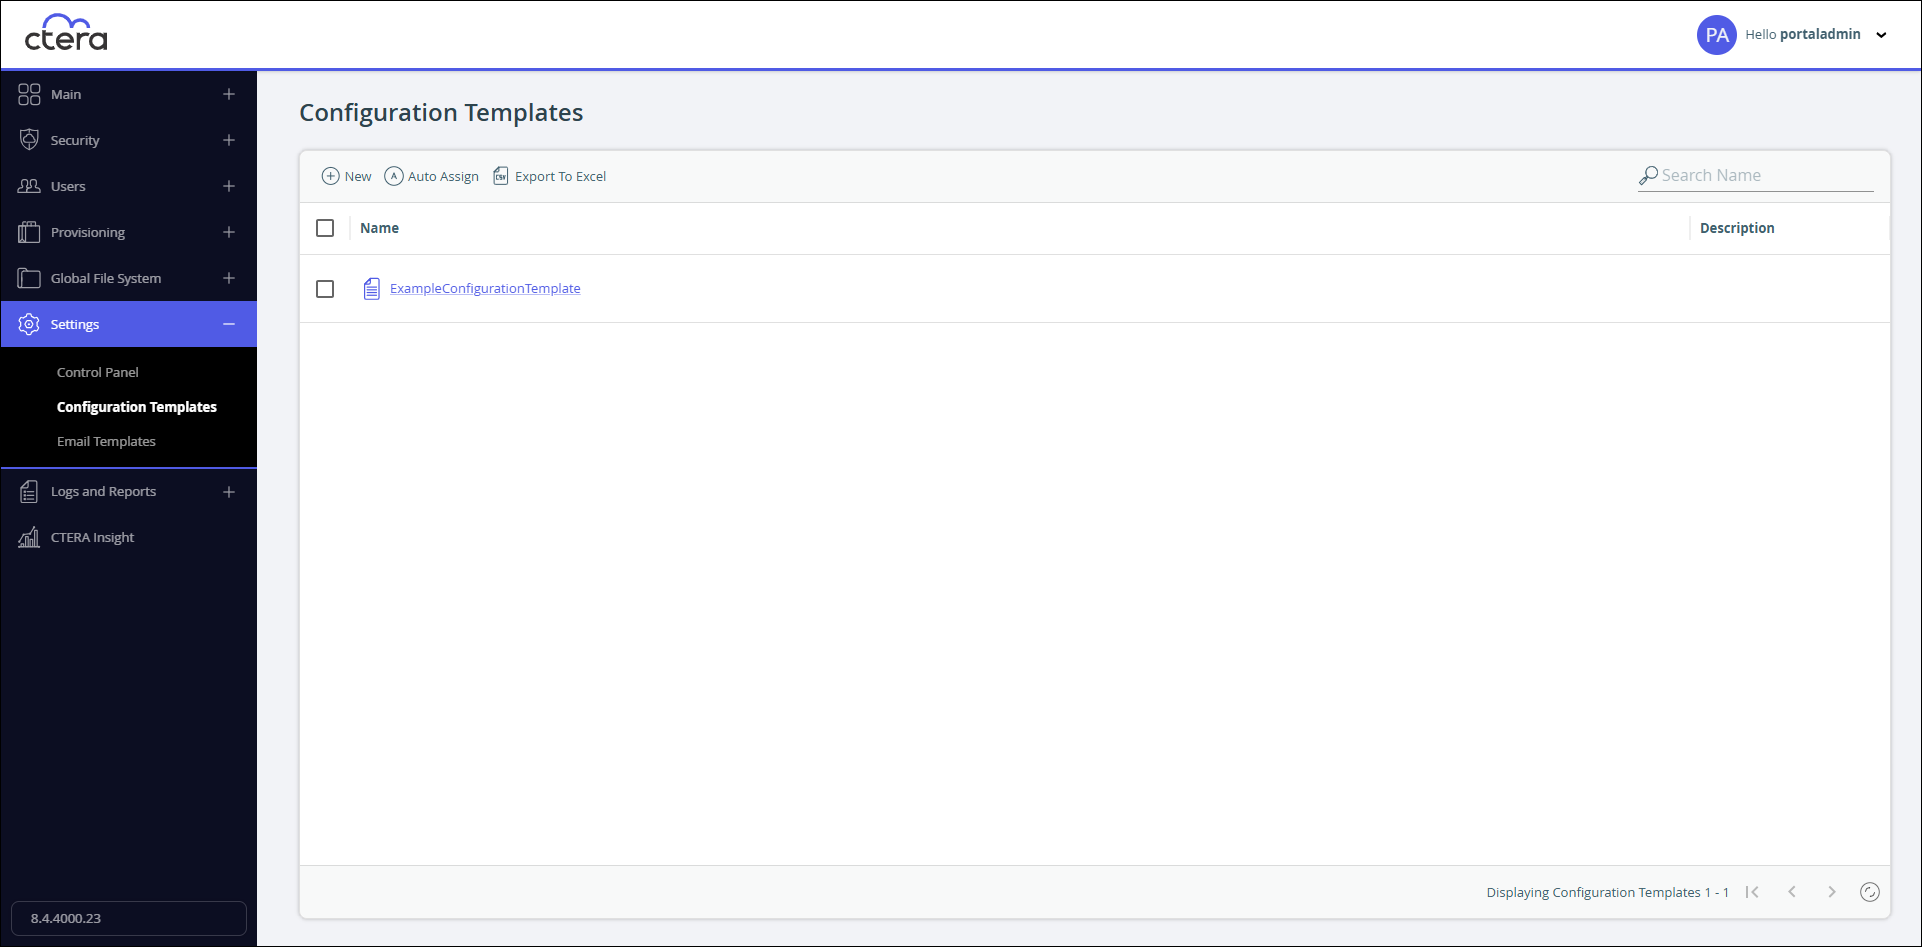
- Edit an existing configuration template, click the template’s name.
The configuration template window is displayed with the configuration template name as the window title.
- Add a new template, click New.
-
Enter the general details for the template:
Name – A unique name for the template. Spaces and special characters cannot be used in the name.
Description – A description of the template. -
Access the following tabs to complete configuring the template:
Backup Sets – Filters to select files to include in the backup, based on criteria of your choice, such as file type, location, and modification date.
Exclude Sets – Filters to select files to exclude from the backup based on criteria of your choice.
Backup Schedule – Specify the backup schedule.
Backup Throughput – You can restrict the amount of bandwidth used for backing up files online.
Scripts – Specify CTERA Agent scripts within device templates.
Sync Throughput – Restrict bandwidth for specific hours in a day or on specific days.
Cloud Drive – Which portal cloud folders are synchronized with the device, and with which folder each cloud drive folder is synced.
Software Updates – A firmware image for all relevant devices.
Update schedule – Configure how and when to install updates.
Consent Page – Configure a consent page that has to be accepted before a user can log in to an edge filer that is connected to the portal. -
Click Save.
The configuration is saved and, after a few minutes, applied to devices to which the template is assigned, as described in Configuring the Automatic Template Assignment Policy or per device, in the Advanced settings for the device, as described in Managing Devices From the End User Portal.
Backup Sets
Backup sets are filters that you can define which select files to include in the backup based on criteria of your choice, such as file type, location, modification date, and so on.
When you create backup sets, you can specify files by extension type, name, location, size and/or modification date. For example, you could create a set called My Music and include all files with the extensions *.wav and *.mp3 that are located in the folder My Documents > Music.
If a file is included in a backup set:
- It is included in the backup even if it is not selected as a Backup File.
- If the file is also included in an exclude set, the file is excluded from the backup.
When you create a backup set, by default it is enabled.
To add a backup set:
- In the configuration template page, select the Backup Sets tab.

- Click New to add a new backup set or select a backup set and click Edit to change it.
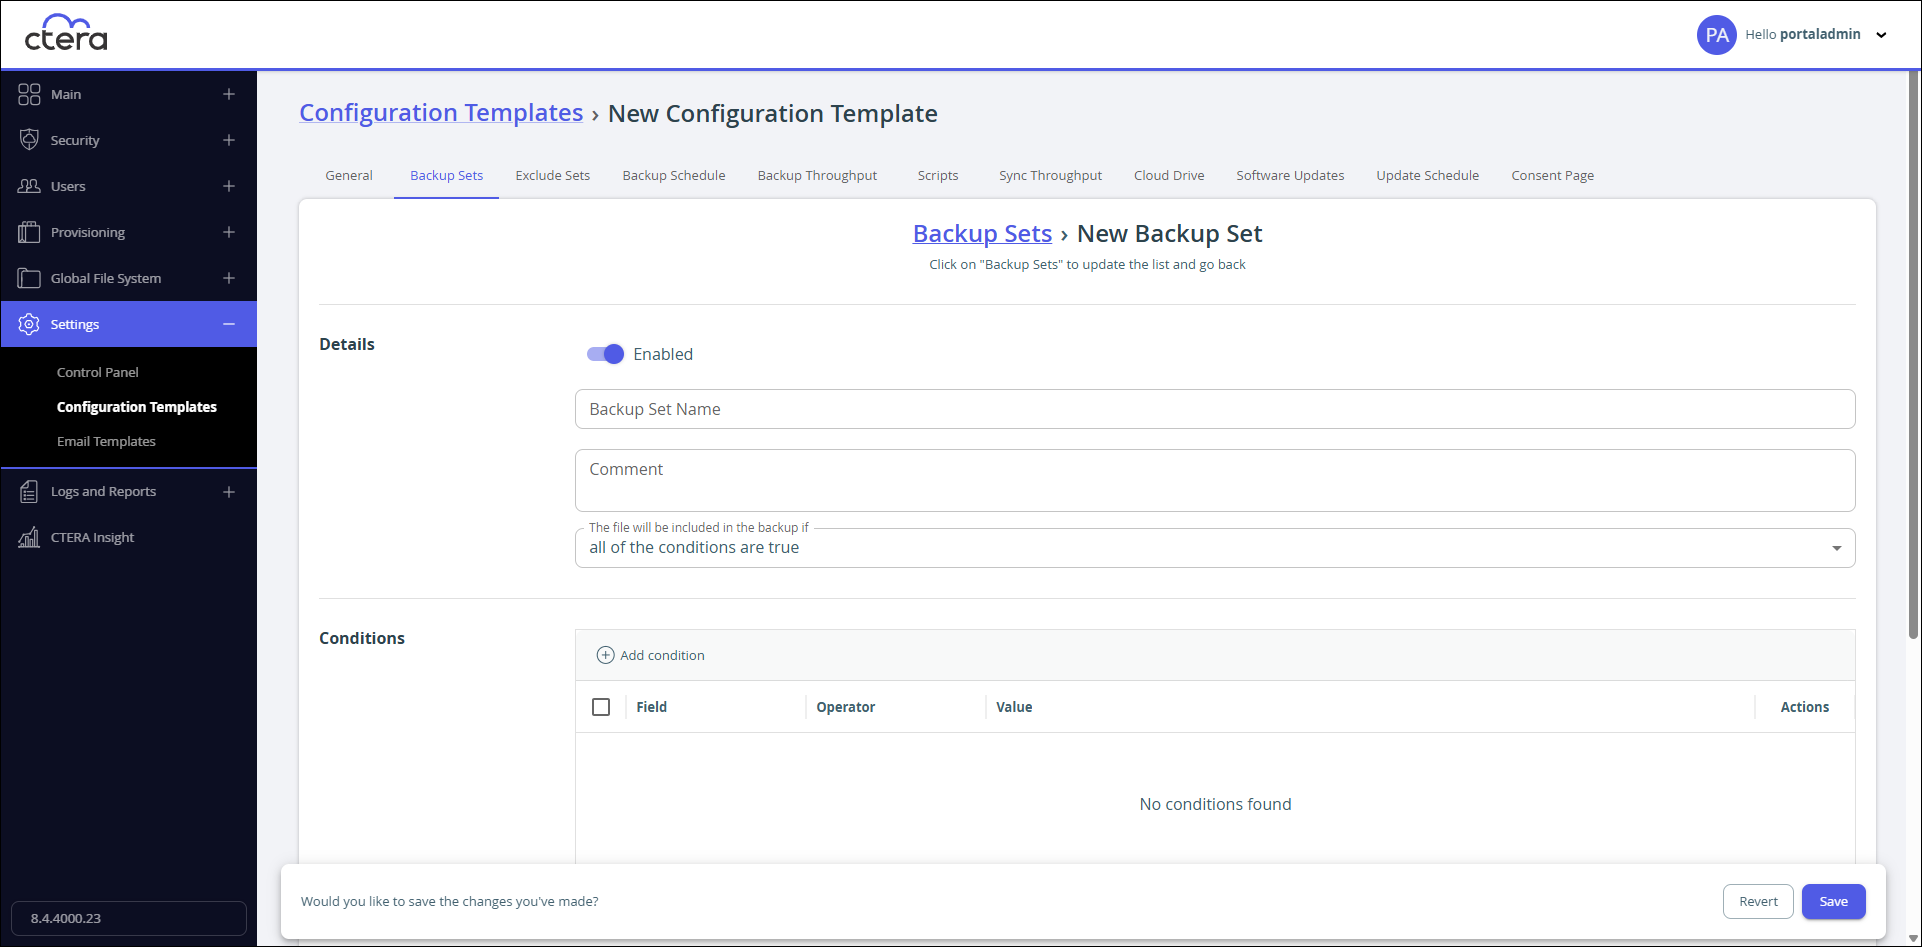
- Set the details and conditions for the backup set:
Backup Set Name – A name for the backup set.
Comment field – A description of the backup set.
The file will be included in the backup If – Specify the conditions for including files in the backup set: either all the conditions must be met or at least one condition must be met for a file to be included in the backup set. - Define conditions for a file to be included in the backup set.
- Click Add condition.
A row is added to the table to add the condition: - In the Field column, select the condition parameter from the drop-down list.
- In the Operator column, select the condition operator from the drop-down list. The list of operators displayed depends on the condition parameter selected in the first column.
equals – Include all files for which the parameter in the first column matches the string in the third column.
begins with – Include all files for which the parameter in the first column begins with the string in the third column.
ends with – Include all files for which the parameter in the first column ends with the string in the third column.
contains – Include all files for which the parameter in the first column contains the string in the third column.
is one of – Include all files for which the parameter in the first column is included in the set specified in the third column. - In the Value column, complete the condition:
Examples:
If you select File Name as the condition parameter in the Field column, begins with as the condition operator in the Operator column, and typeWork-123-in the Value column, then the backup set will include all files whose names begin with Work-123-.
If you select File Type as the condition parameter in the Field column, is one of as the condition operator in the Operator column, and typeavi, mov, mpgin the Value column, then the backup set will include all files with the extension *.avi, *.mov, and *.mpg. - Click
 in the Actions column.
NoteTo edit a condition, click
 in the row to edit.
To remove a condition, click in the row to remove.
 - Click Add condition.
- Define the template directories to be included in the backup set.
-
Click Add a file or folder to select file and folders to which you want to apply the conditions for the backup set.
A row is added to the table. -
Click in the row, either select a variable from the drop-down list or type a variable.
You can use any operating system environment variable defined on the Windows or macOS machine, for the user account on which the CTERA service is running. If the specified environment variable is not defined on the machine, this row in the policy is ignored. In addition, a set of CTERA-specific environment variables can be used.
$ALLUSERSPROFILE – The Windows All Users profile directory.
$WINDIR – The Windows directory.
$TEMP – The Windows temporary files directory.
$SYSTEMDRIVE – The Windows system drive.
$PROGRAMFILES – The Windows Program Files directory.
$APPDATA – The path to the application data directory. For example, if the local user who connected the agent to the portal is JohnSmith, then $APPDATA refers to `C:\Users\JohnSmith\Application Data.$USERPROFILE – The path to the user profile folder. For example, if the local user who connected the agent to the portal is JohnSmith, then $USERPROFILE refers to
C:\Users\JohnSmith
CTERA Edge Filer Template Variables
$USERS – The home directories folder on the CTERA Edge Filer. For example,/Shares/Home Folder
$AGENTS – Establishes a direct connection to the CTERA Portal to perform backup tasks.
$SYNCS – The Clientless Backup destination folder on the CTERA Edge Filer. For example,/Shares/Clientless Backup
$PROJECTS – The projects folder on the CTERA Edge Filer. For example,/Shares/Projects
$PRIMARYUSER – The profile folder of the local user who connected the CTERA Agent to the CTERA Portal. For example, if the local user who connected the agent to the portal is JohnSmith, then $PRIMARYUSER refers toC:\Users\JohnSmithNote$PRIMARYUSER is relevant for the CTERA Windows Agent only.
You can use wildcards. For example,
$USERS/*/MyFolderto back up theMyFolderfolder under all users' home directories.
For UNIX/Windows interoperability, backup sets support the use of both slashes and backslashes. Any slashes or backslashes are automatically converted to the type supported by the machine's operating system.
When you specify a folder name, all of the files and subfolders in it are automatically included. You do not need to add “*” at the end of the folder name. -
Click
in the Actions column.
NoteTo change a variable, click
in the row to edit.
To remove a variable, click in the row to remove. -
The backup set is created.
Exclude Sets
Exclude sets are filters that you can define which select files to exclude from the backup based on criteria of your choice. The final set of files to include in a backup operation is determined by performing the following checks for each file:
- Whether the file is contained in an exclude set. If so, the file is skipped.
- Whether the file is contained in a backup set. If so, the file is backed up.
- Whether the file is contained in a folder that was selected specifically for backup in the device interface. If so, the file is backed up.
If a file is included in an enabled backup set but also included in an Exclude set, the file will be excluded from the backup.
When you create an exclude set, by default it is enabled.
To add an exclude set:
- In the configuration template page, select the Exclude Sets tab.
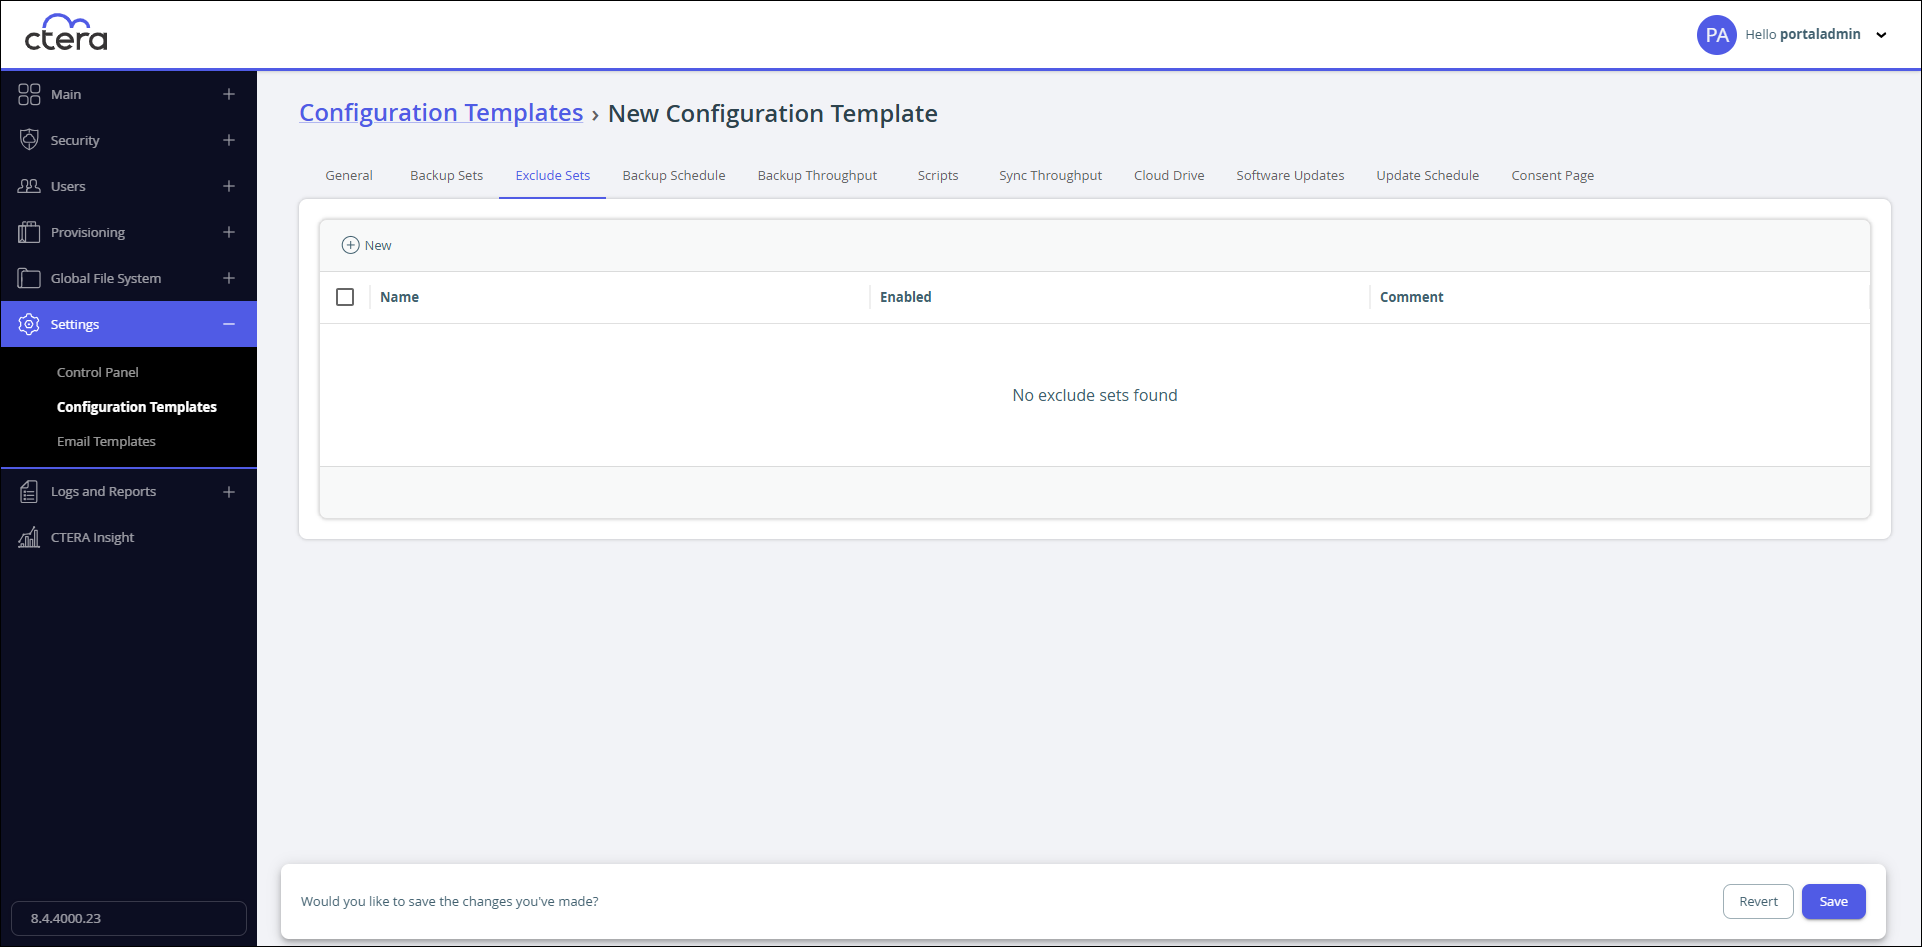
- Click New to add a new exclude set or select an exclude set and click Edit to change it.
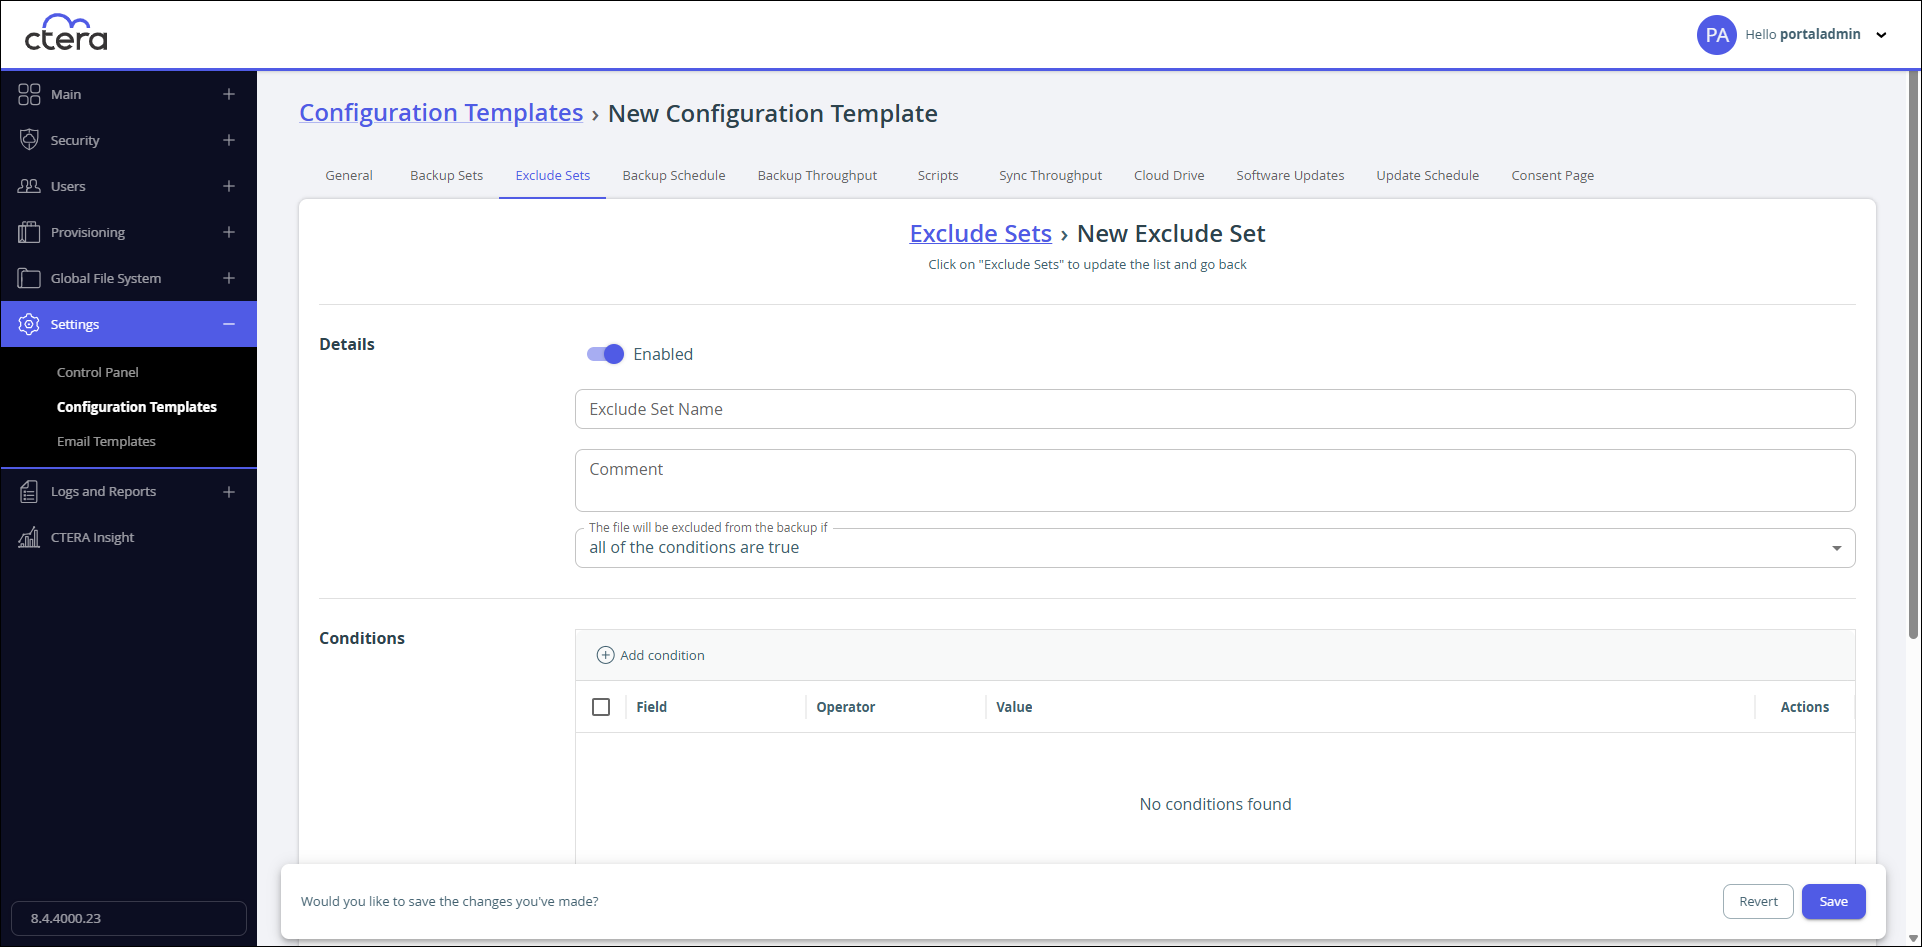
- Set the details and conditions for the exclude set:
Exclude Set Name – A name for the exclude set.
Comment field – A description of the exclude set.
The file will be excluded from the backup If – Specify the conditions for excluding files in the exclude set: either all the conditions must be met or at least one condition must be met for a file to be excluded in the exclude set. - Define Conditions for a file to be excluded in the exclude set.
- Click Add condition.
A row is added to the table to add the condition: - In the Field column, select the condition parameter from the drop-down list.
- In the Operator column, click Select and select the condition operator from the drop-down list. The list of operators displayed depends on the condition parameter selected in the first column.
equals – Exclude all files for which the parameter in the first column matches the string in the third column.
begins with – Exclude all files for which the parameter in the first column begins with the string in the third column.
ends with – Exclude all files for which the parameter in the first column ends with the string in the third column.
contains – Exclude all files for which the parameter in the first column contains the string in the third column.
is one of – Exclude all files for which the parameter in the first column is included in the set specified in the third column. - In the Value column, complete the condition.
Examples:
If you select File Name as the condition parameter in the Field column, begins with as the condition operator in the Operator column, and typeWork-123-in the Value column, then the exclude set will include all files whose names begin with Work-123-.
If you select File Type as the condition parameter in the Field column, is one of as the condition operator in the Operator column, and typeavi, mov, mpgin the Value column, then the exclude set will include all files with the extension *.avi, *.mov, and *.mpg. - Click in the Actions column.
NoteTo edit a condition, click
in the row to edit.
To remove a condition, click in the row to remove. - Click Add condition.
- Define Template Directories, click Add a file or folder to select file and folders to which you want to apply the conditions for the exclude set.
A row is added to the table.- Click in the row, either select a variable from the drop-down list or type a variable.
You can use any operating system environment variable defined on the Windows or macOS machine, for the user account on which the CTERA service is running. If the specified environment variable is not defined on the machine, this row in the policy is ignored. In addition, a set of CTERA-specific environment variables can be used.
$ALLUSERSPROFILE – The Windows All Users profile directory.
$WINDIR – The Windows directory.
$TEMP – The Windows temporary files directory.
$SYSTEMDRIVE – The Windows system drive.
$PROGRAMFILES – The Windows Program Files directory.
User-specific Windows Environment Variables
$APPDATA – The path to the application data directory. For example, if the local user who connected the agent to the portal is JohnSmith, then $APPDATA refers toC:\Documents and Settings\JohnSmith\Application Data
$USERPROFILE – The path to the user profile directory. For example, if the local user who connected the agent to the portal is JohnSmith, then $USERPROFILE refers toC:\Documents and Settings\JohnSmith
$USERS – The home directories folder on the CTERA Edge Filer. For example,/Shares/Home Folder.
\AGENTS – Establishes a direct connection to the CTERA Portal to perform backup tasks.
$SYNCS – The Clientless Backup destination folder on the CTERA Edge Filer. For example,/Shares/Clientless Backup.
$PROJECTS – The projects folder on the CTERA Edge Filer. For example,/Shares/Projects.
$PRIMARYUSER – The profile folder of the local user who connected the CTERA Agent to the CTERA Portal. For example, if the local user who connected the agent to the portal is JohnSmith, then $PRIMARYUSER refers toC:\Users\JohnSmith$PRIMARYUSER is relevant for the CTERA Windows Agent only.
$USERS/*/MyFolderto back up theMyFolderfolder under all users' home directories.
For UNIX/Windows interoperability, exclude sets support the use of both slashes and backslashes. Any slashes or backslashes are automatically converted to the type supported by the machine's operating system.
When you specify a folder name, all of the files and subfolders in it are automatically excluded. You do not need to add “*” at the end of the folder name. - Click in the Actions column.
NoteTo change a variable, click
in the row to edit.
To remove a variable, click in the row to remove. - Click in the row, either select a variable from the drop-down list or type a variable.
The exclude set is created.
Backup Schedule
Specify the backup schedule.
To manage the cloud backup schedule:
- In the configuration template page, select the Backup Schedule tab.
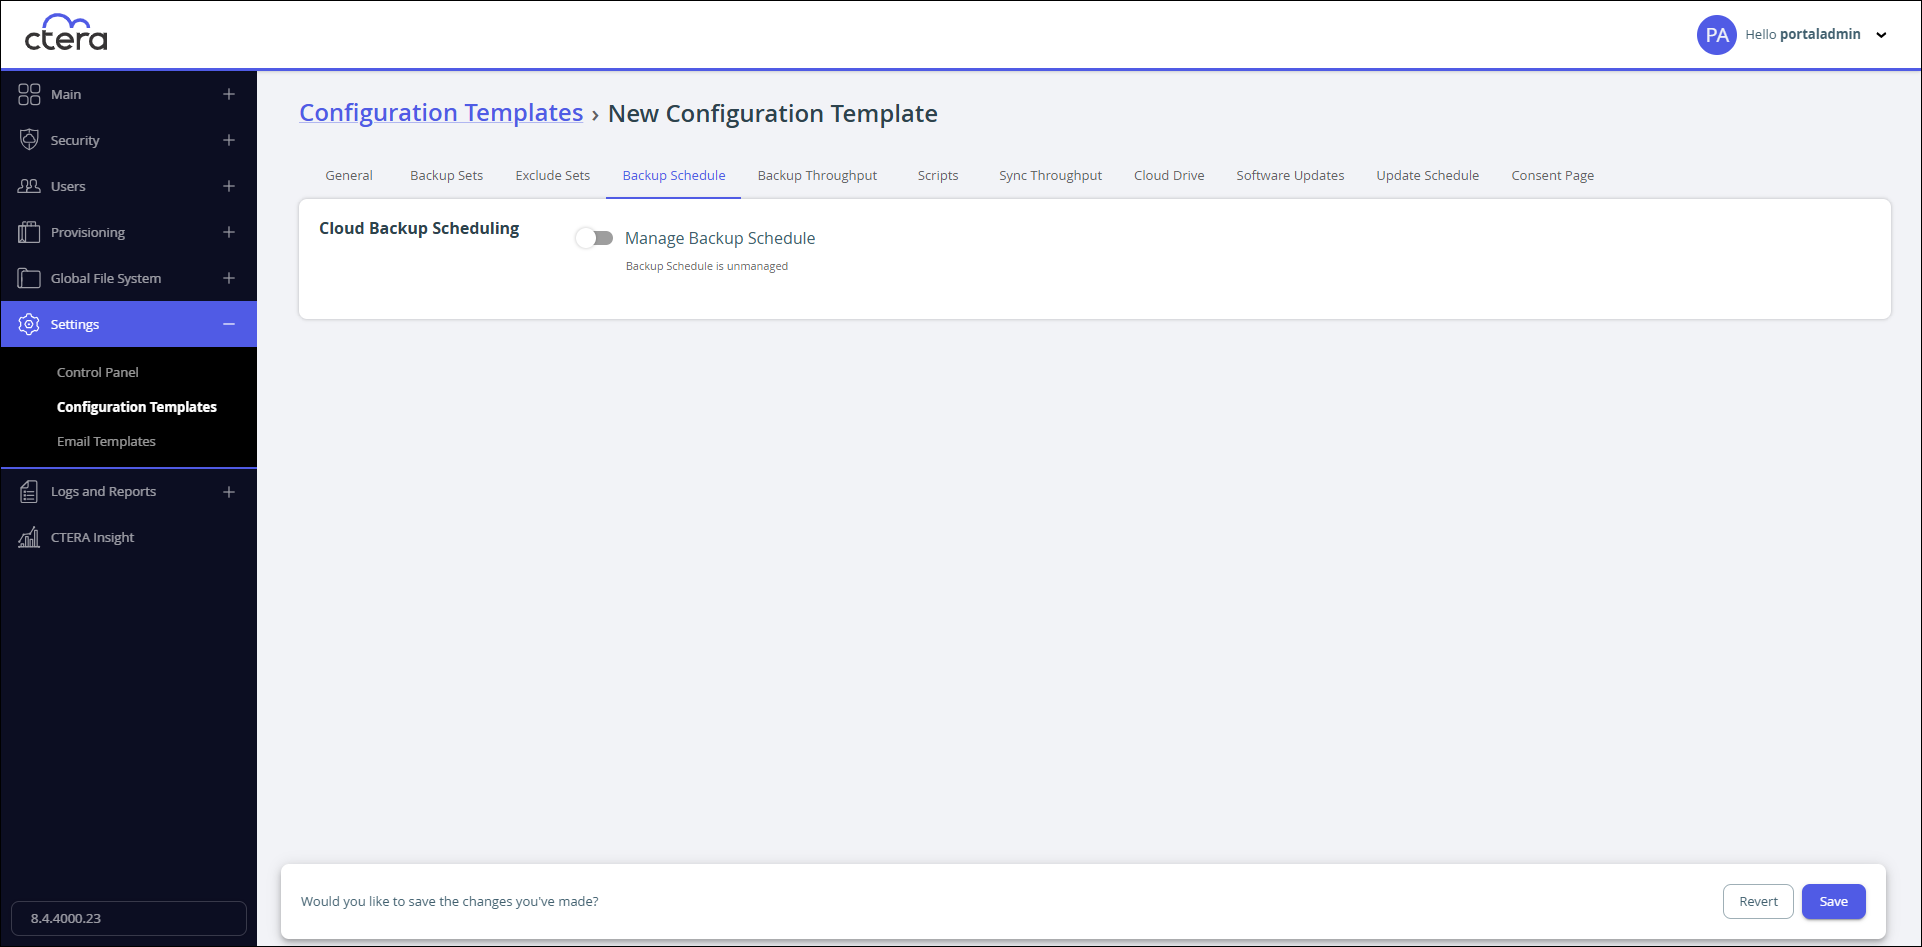
- Slide Manage Backup Schedule on.
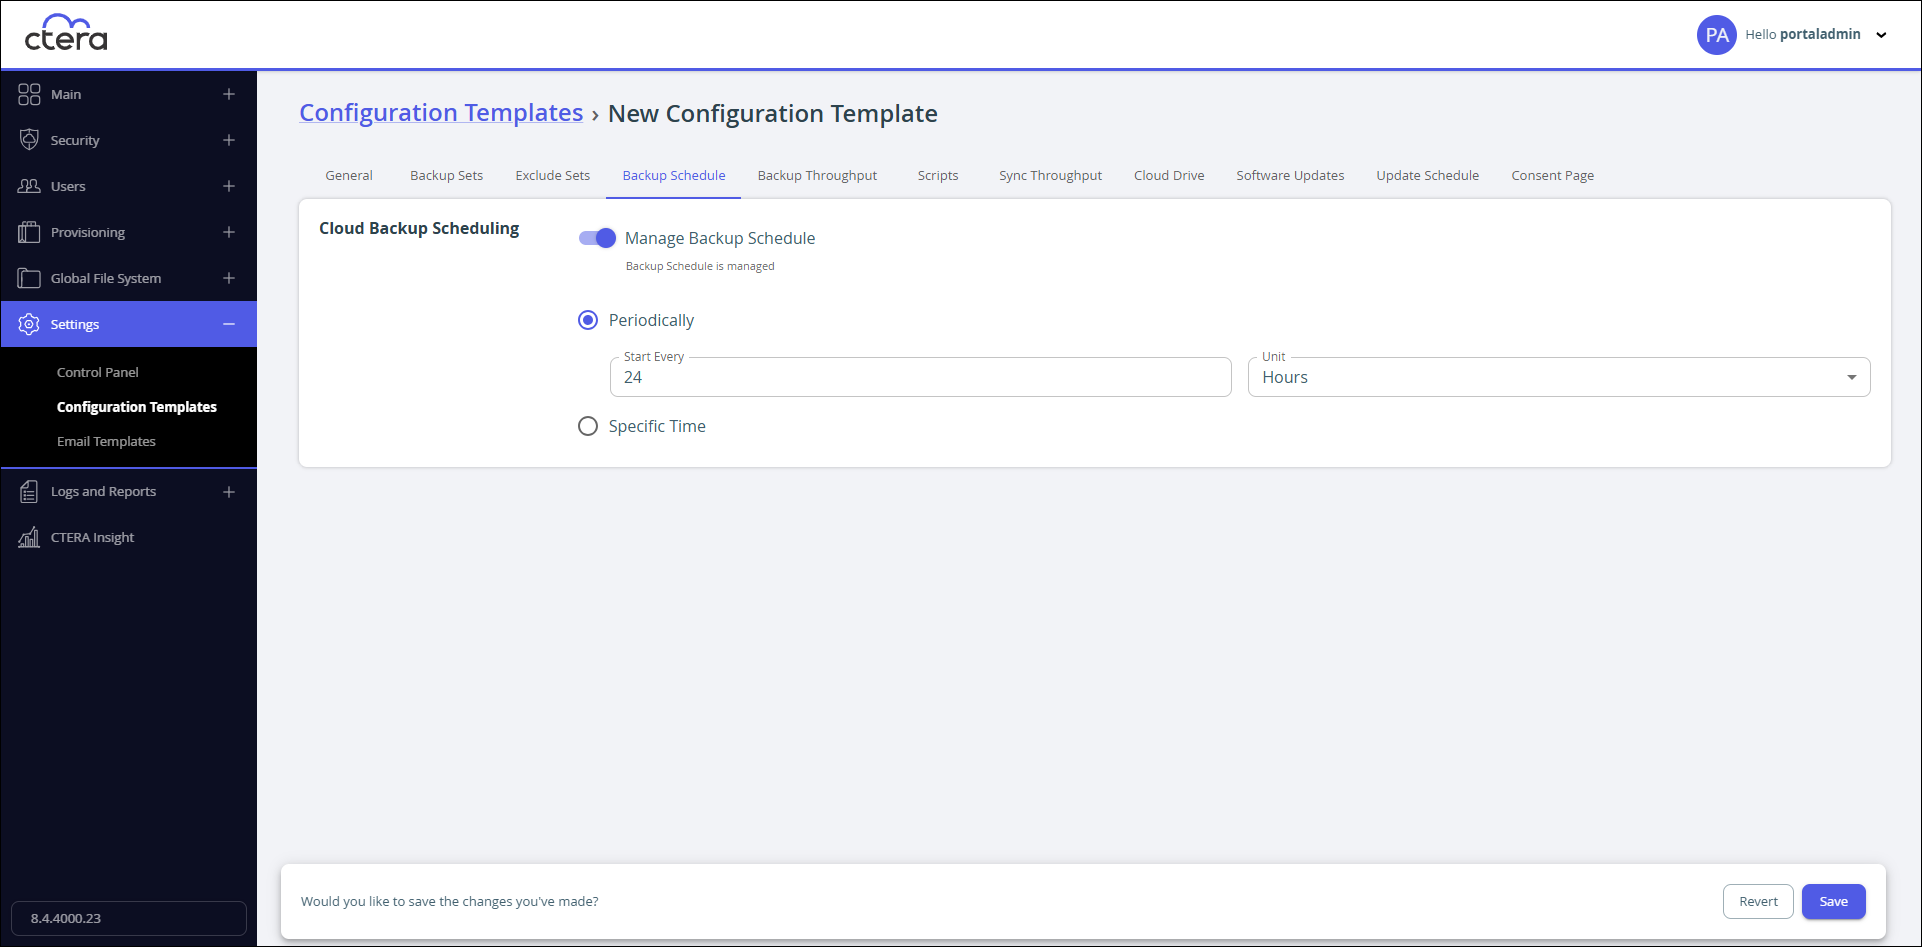
- The device template will manage which backup schedule for devices using this template. Management of backup schedules is disabled in the devices' local administration interfaces.
If you want the backup schedule to be managed from each device's administration interface, click Don't Manage. - Configure the backup schedule:
Periodically – Back up files every specified number of hours.
Start Every – The amount of time between automatic cloud backups, in hours.
Unit – How the numeric time is measured, Hours or Minutes.
Specific Time – Back up files according to a specified daily schedule.
Start Time – The time at which cloud backup can start.If a given backup extends past the scheduled time for the next automatic backup, the next automatic backup commences immediately after the prior backup finishes.
- A specific hour
- On Completion (default). The backup operation will only end when cloud backup is complete.
If the amount of changed data to back up is large, the backup process can take a long time. If a stop time is configured, the backup process may not complete within the time frame. For example, if you specify that data should be backed up between 12AM-2AM, and the backup requires 3 hours, the backup will not complete.
- One or more specific days
- Every Day (default). Cloud backup will occur every day.
Backup Throughput
You can restrict the amount of bandwidth used for backing up files online.
To restrict throughput:
- In the configuration template page, select the Backup Throughput tab.
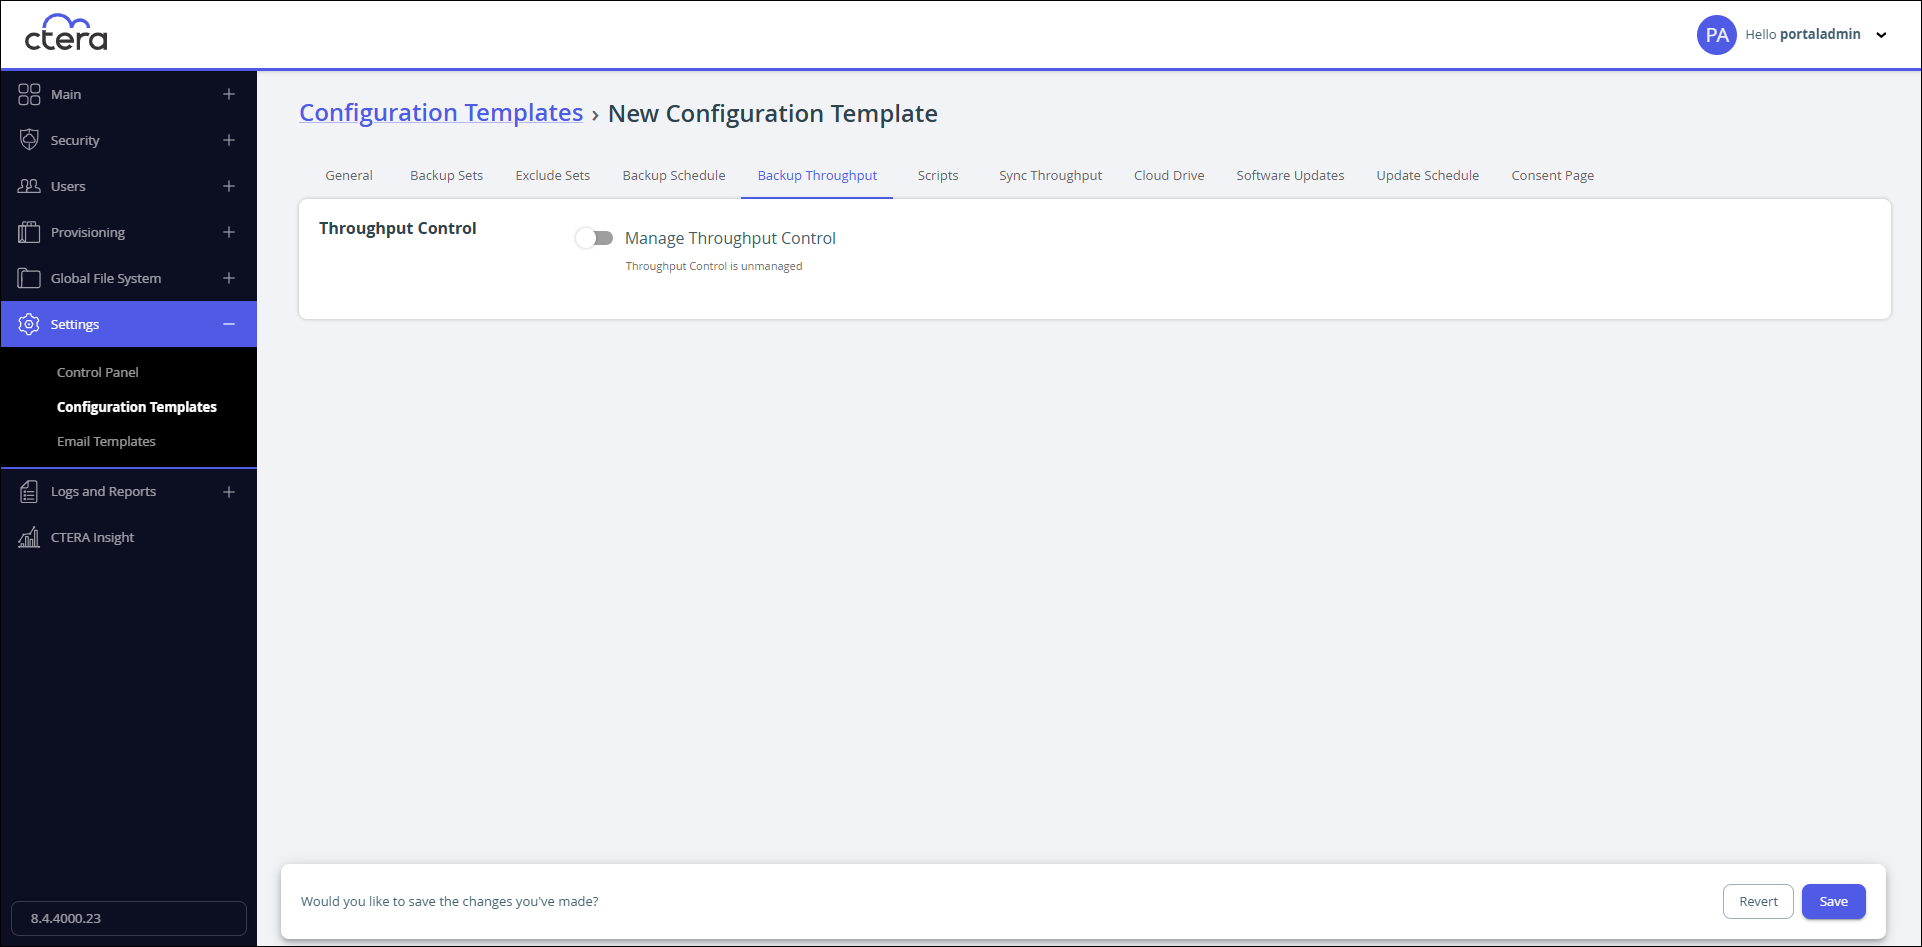
- Slide Manage Throughput Control on.
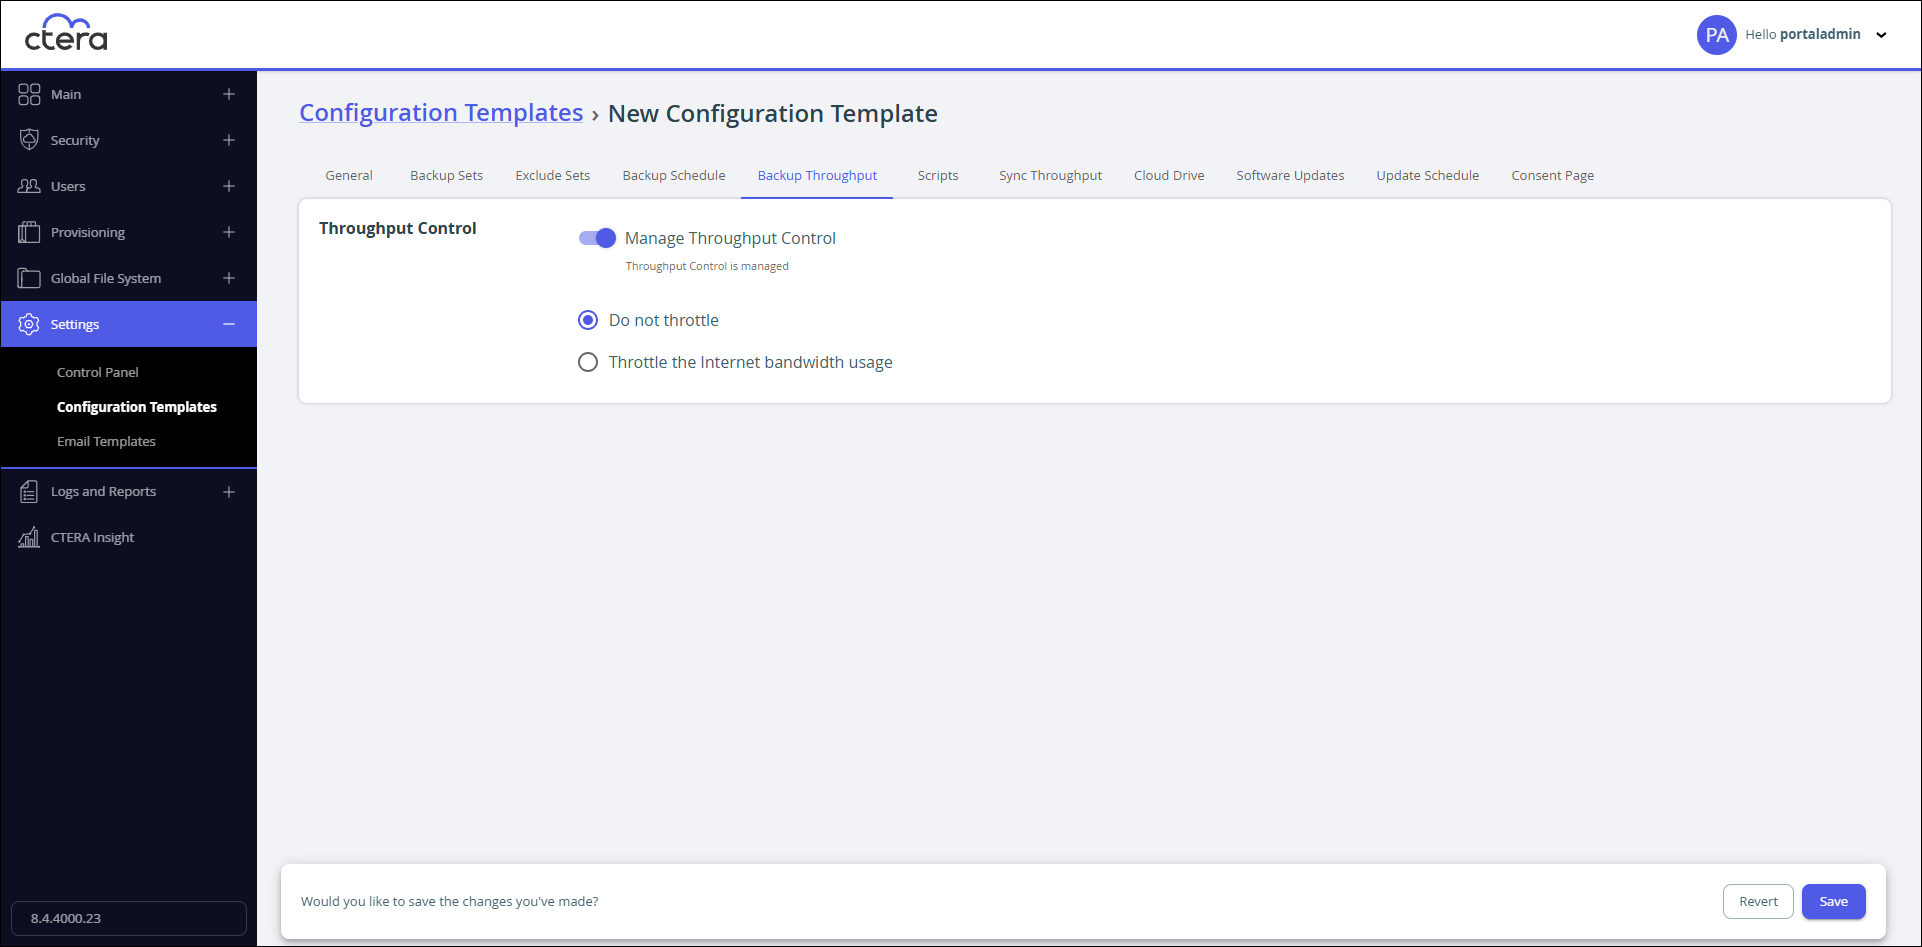
Management of backup throughput is disabled in the device local administration interface.
If you want the backup throughput to be managed from each device's administration interface, slide Manage Throughput Control off. - Configure the backup throughput:
Do not throttle – Throughput should not be restricted.
Throttle the Internet bandwidth usage – Restrict the bandwidth used for cloud backups.
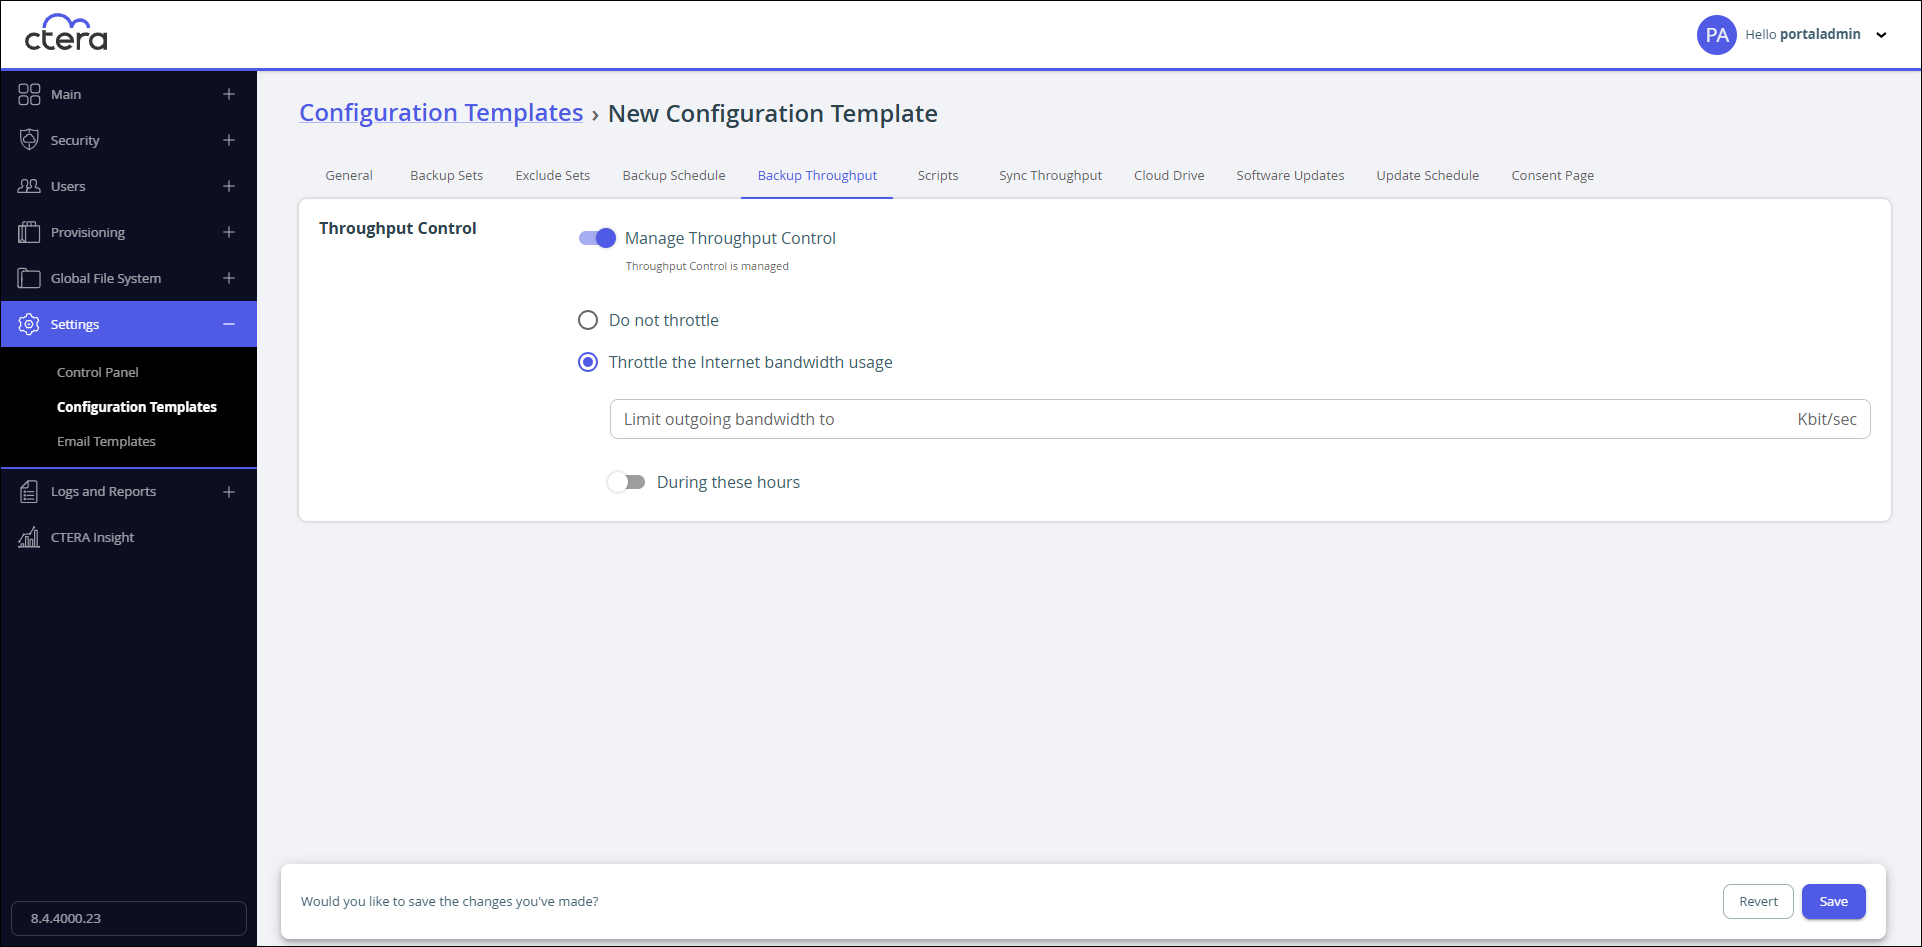
Limit outgoing bandwidth to – The maximum bandwidth to use for cloud backups in Kbits per second.
During these hours – The bandwidth used for cloud backups is restricted only at specific times of the day.
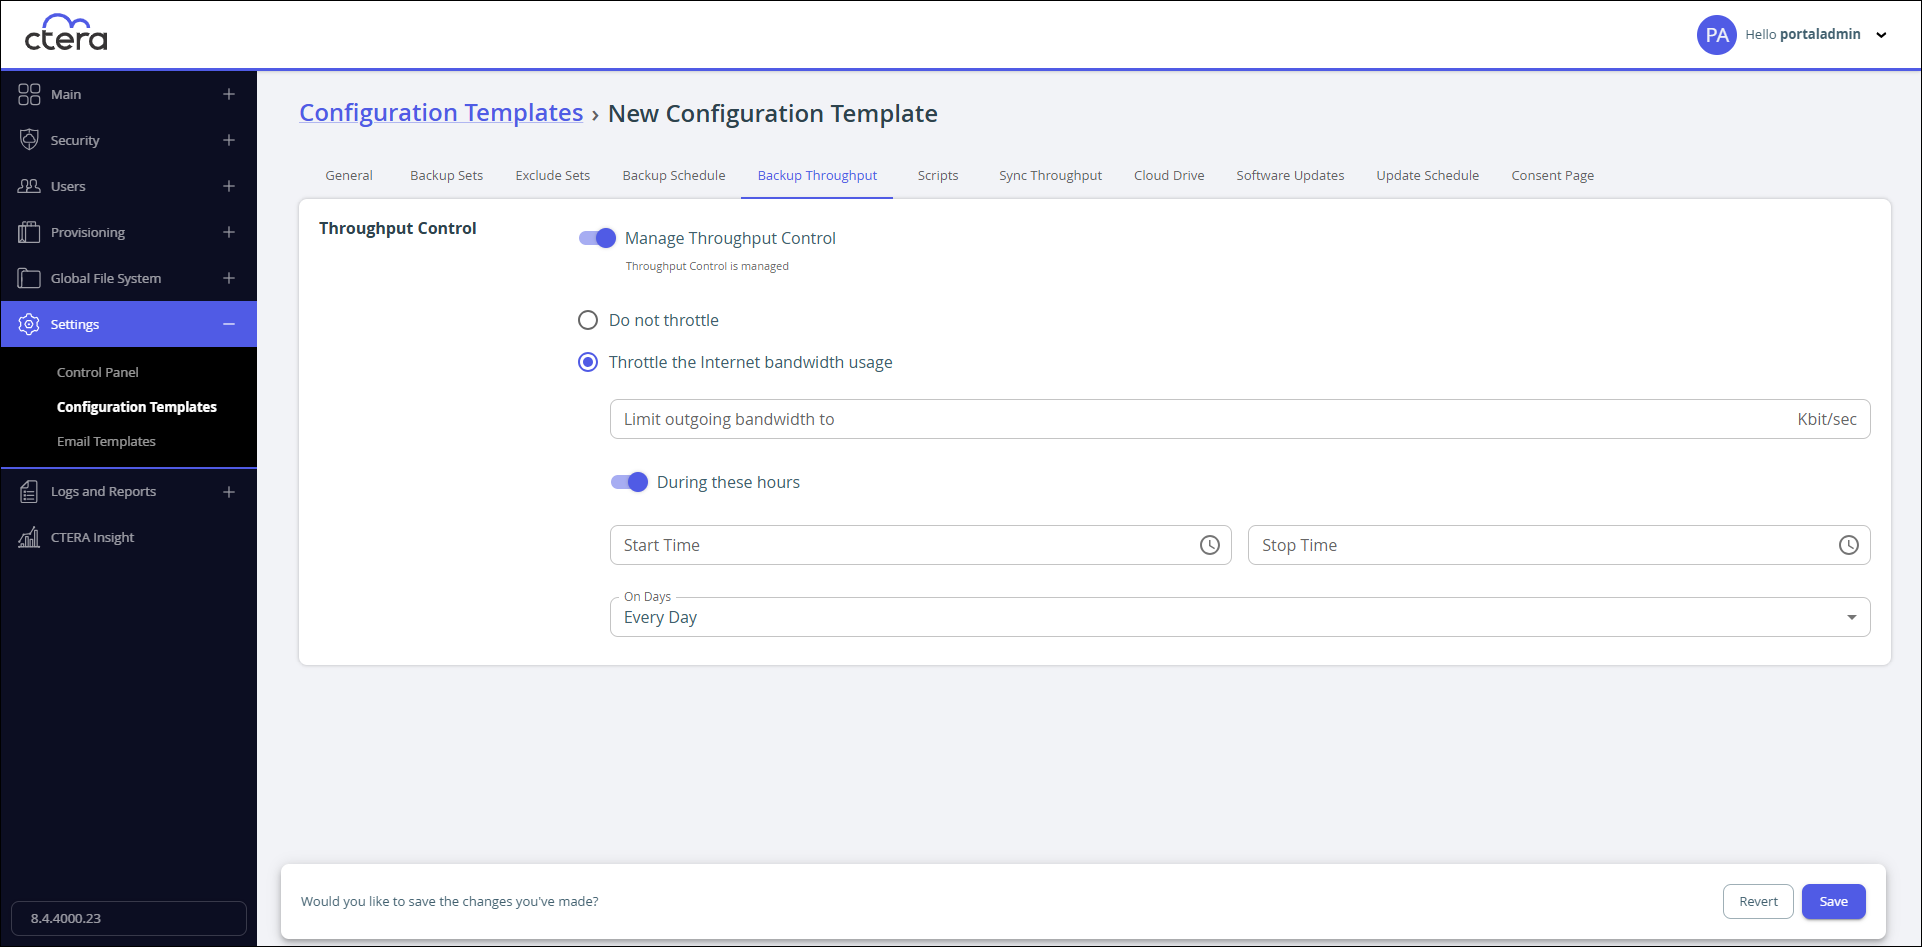
Start Time – The time that the bandwidth restriction starts.
Stop Time – The time that the bandwidth restriction stops.
On Days – The bandwidth used for cloud backups is restricted only on specific days. This can be any of the following:- Bandwidth used for cloud backup will be restricted on one or more specific days.
- Every Day (default). Bandwidth used for cloud backup will be restricted every day.
Scripts
You can create and manage scripts to run on CTERA Drive Protect. The scripts are updated and pushed to CTERA Drive Protect connected to the portal.
You can configure scripts to run at any of the following stages of CTERA Drive Protect processes:
- Before backup
- After backup
- After sign-in
To configure scripts:
- In the configuration template page, select the Scripts tab.

- Slide Manage Scripts on
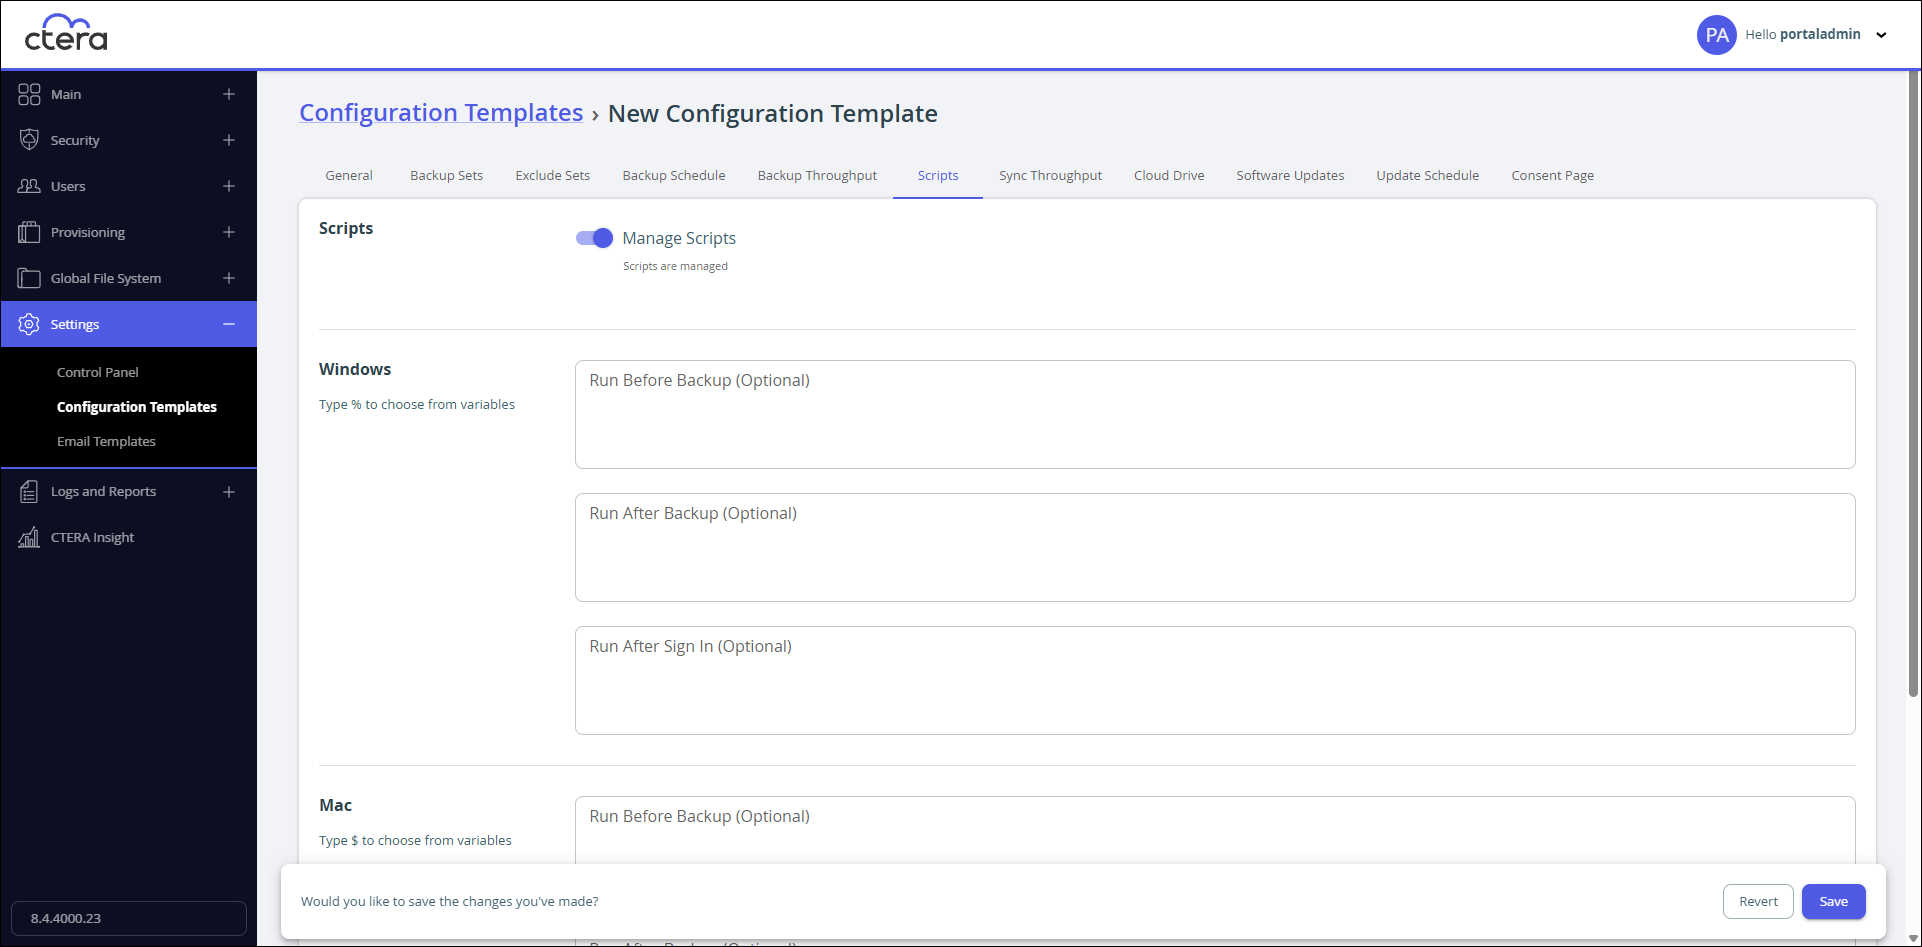
The device template will manage scripts for devices using this template. - Add the scripts you want to include in the template to run on CTERA Drive Protect running on Windows or macOS.
- Click when you want the script to run: Run Before Backup, Run After Backup, or Run After Sign In.
Scripts that you want to run after sign-in require CTERA Drive Protect to be restarted.
Sync Throughput
To control the cloud sync upload and download speeds:
- In the configuration template page, select the Sync Throughput tab.

- Slide Manage Throughput Control on.
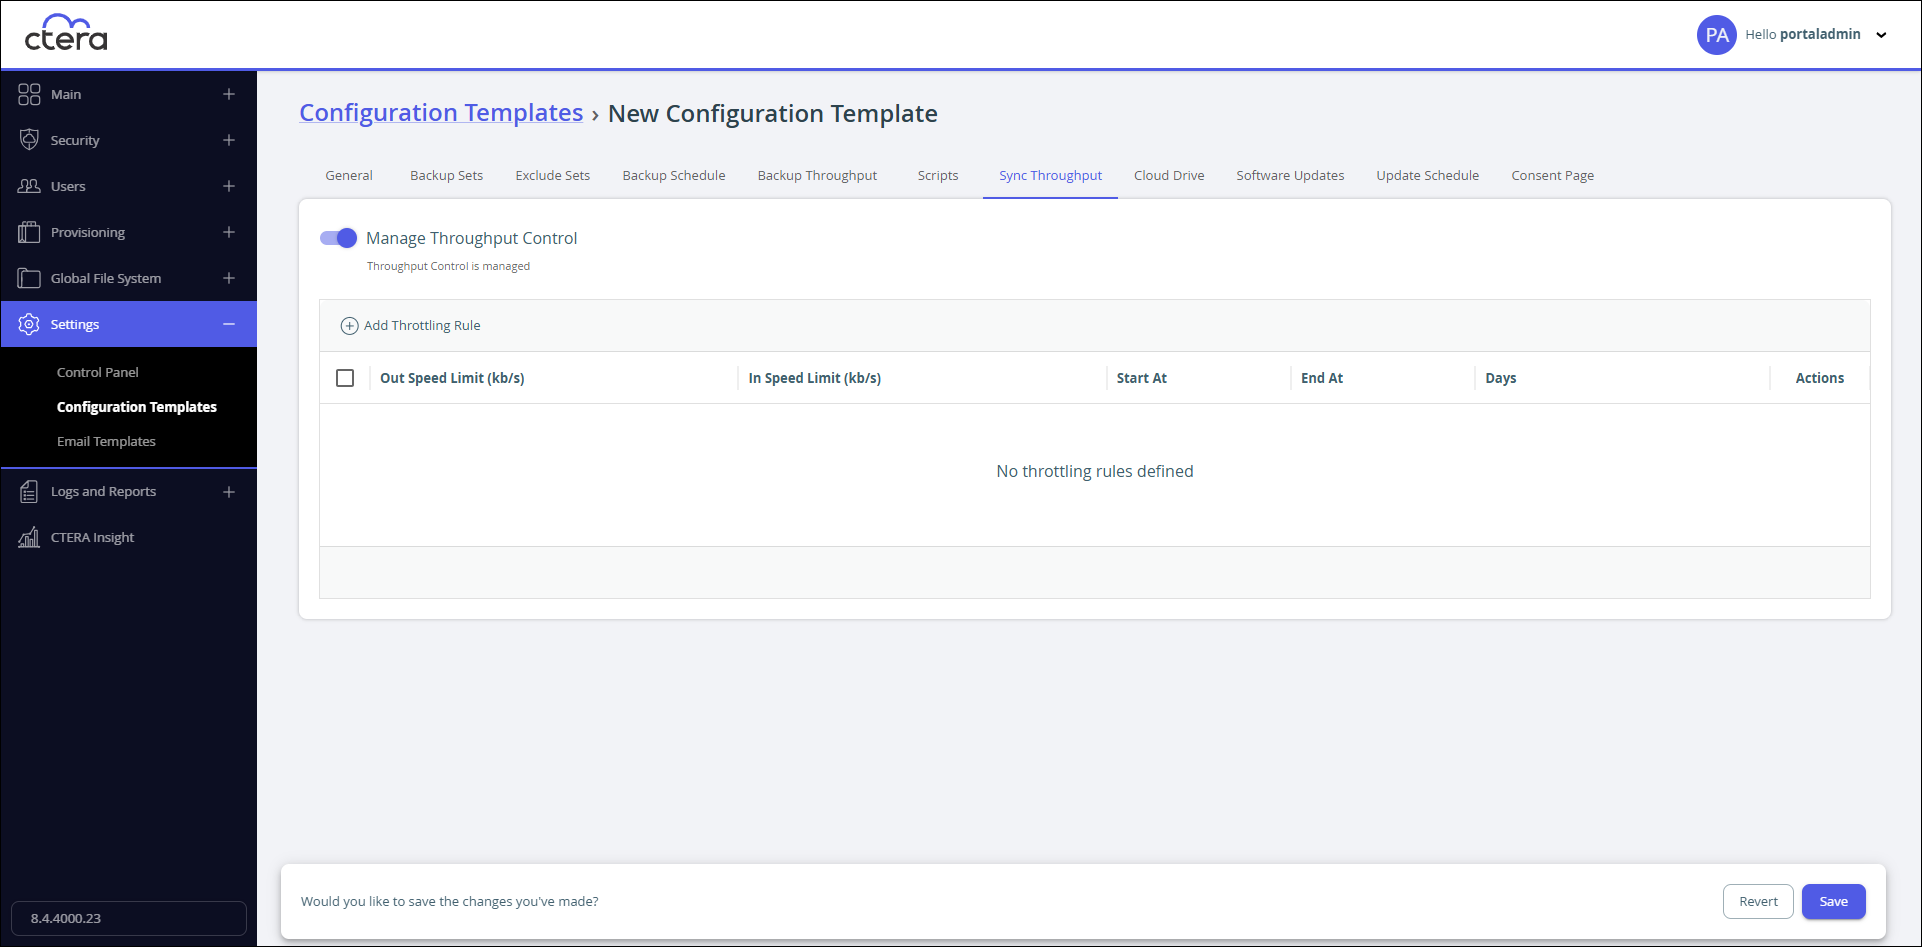
If you want the sync throughput to be managed from each device's administration interface, slide Manage Throughput Control off. - Click Add throttling rule to set the throttling for sync throughput.
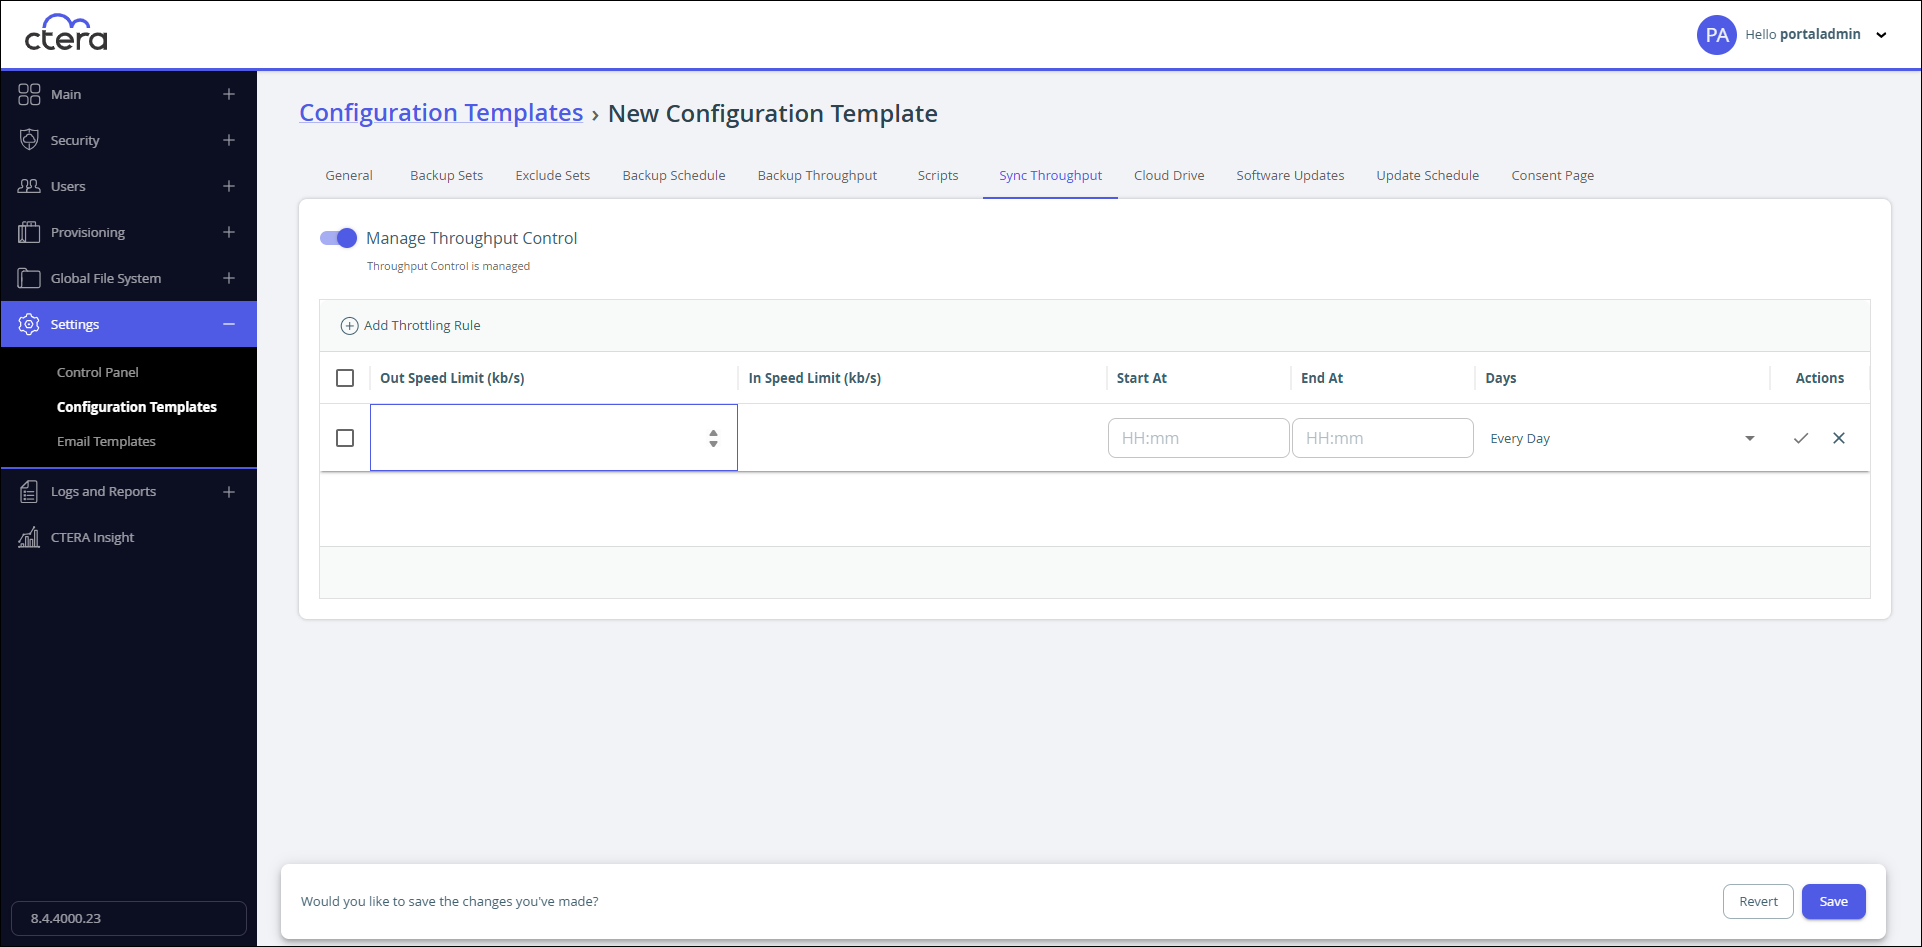 Note
NoteWhen no throttling rules are defined, there is no speed restriction for uploading or downloading files to the Cloud Drive for syncing. A maximum of 50 rules can be defined.
- Define the following for the throttling rule:
Out Speed Limit (kb/s) – The maximum speed to use for cloud drive sync upload in Kbits per second. The minimum value for the speed is 8kb/s. If there is no value, then there are no speed limits.
In Speed Limit (kb/s) – The maximum speed to use for cloud drive sync download in Kbits per second. The minimum value for the speed is 8kb/s. If there is no value, then there are no speed limits.
Start at – Specify the time when the bandwidth limit used for cloud drive sync upload starts.
End at – Specify the time when the bandwidth limit used for cloud drive sync upload ends. When the end time is before the start time, the end time is the next day.
Days – Specify that the bandwidth used for cloud drive sync upload should be restricted every day (the default) or only on specified days.
:::(Info) (Note)
When the start and end times for more than one rule overlap, the order of the rules in the list determines how they are implemented with the rule at the top of the list implemented first. Use Move Down and Move Up to change the order the rules are listed.
::: - Click in the Actions column.
Note
To edit a throttling rule, click
in the row to edit.
To remove a throttling rule, click in the row to remove.
Cloud Drive
Specify which portal cloud folders are to be synchronized with the device, and with which folder each cloud drive folder is synced.
To manage cloud drive sync in the device template:
- In the configuration template page, select the Cloud Drive tab.
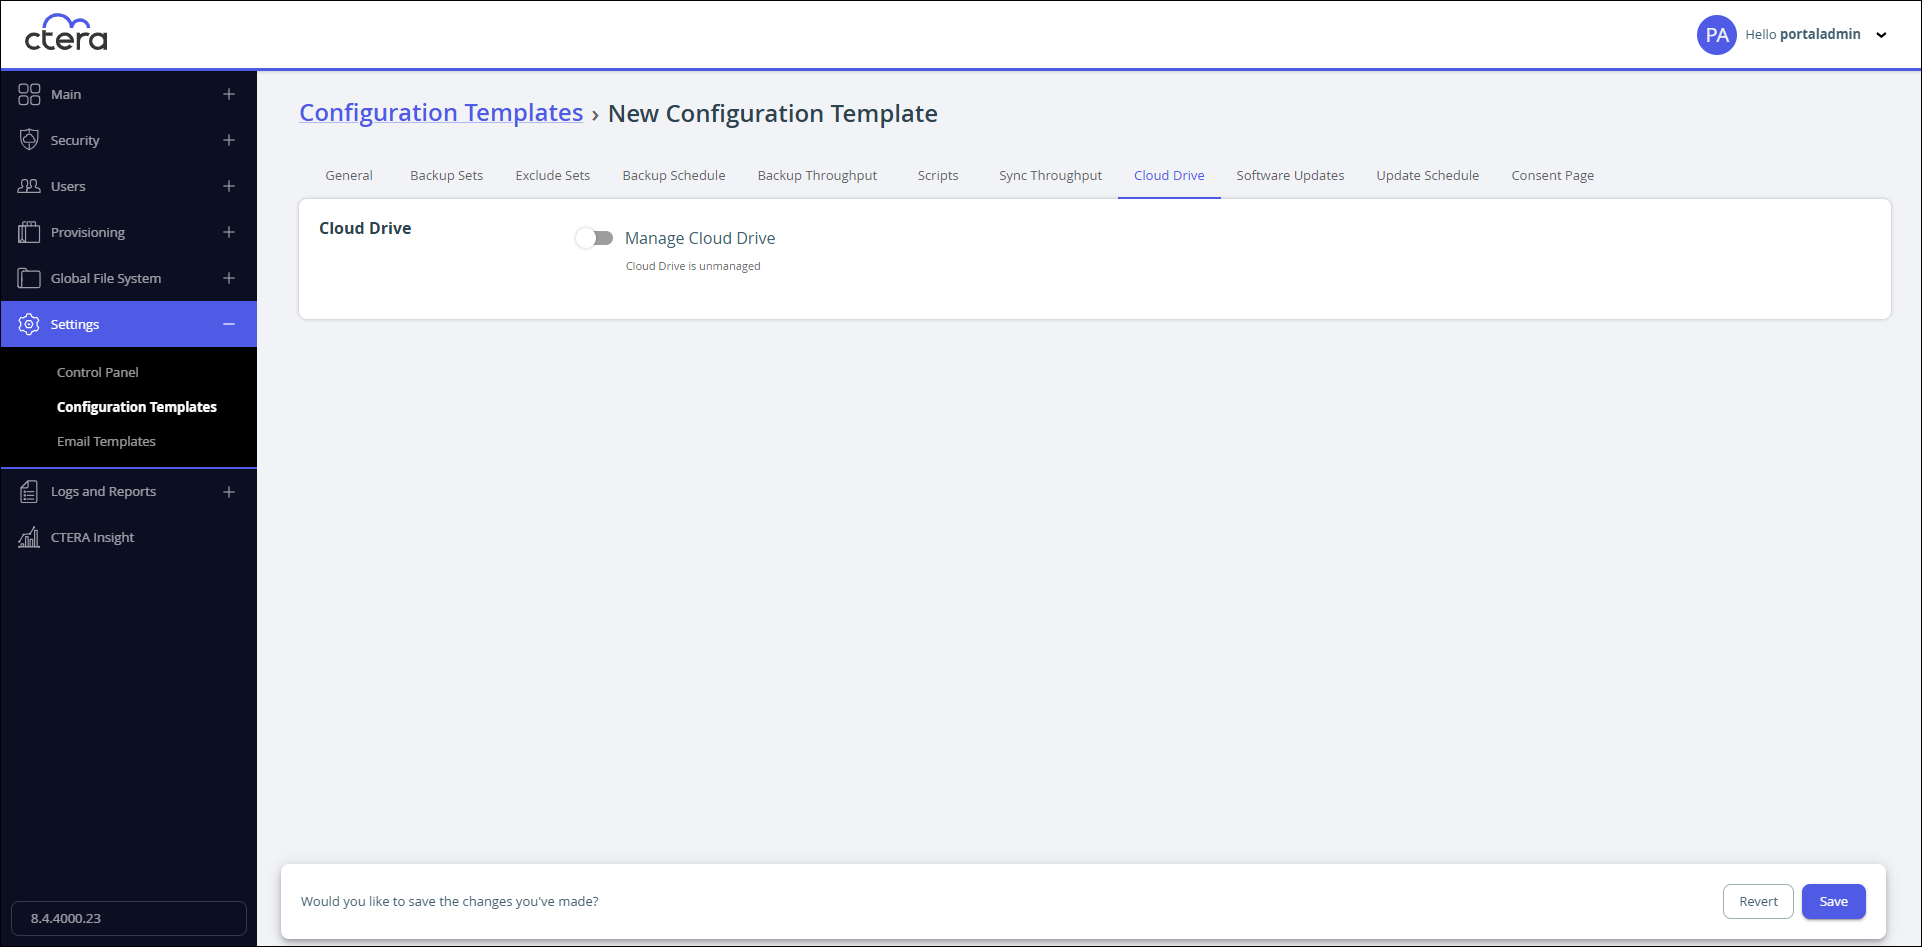
- Slide Manage Cloud Drive on.
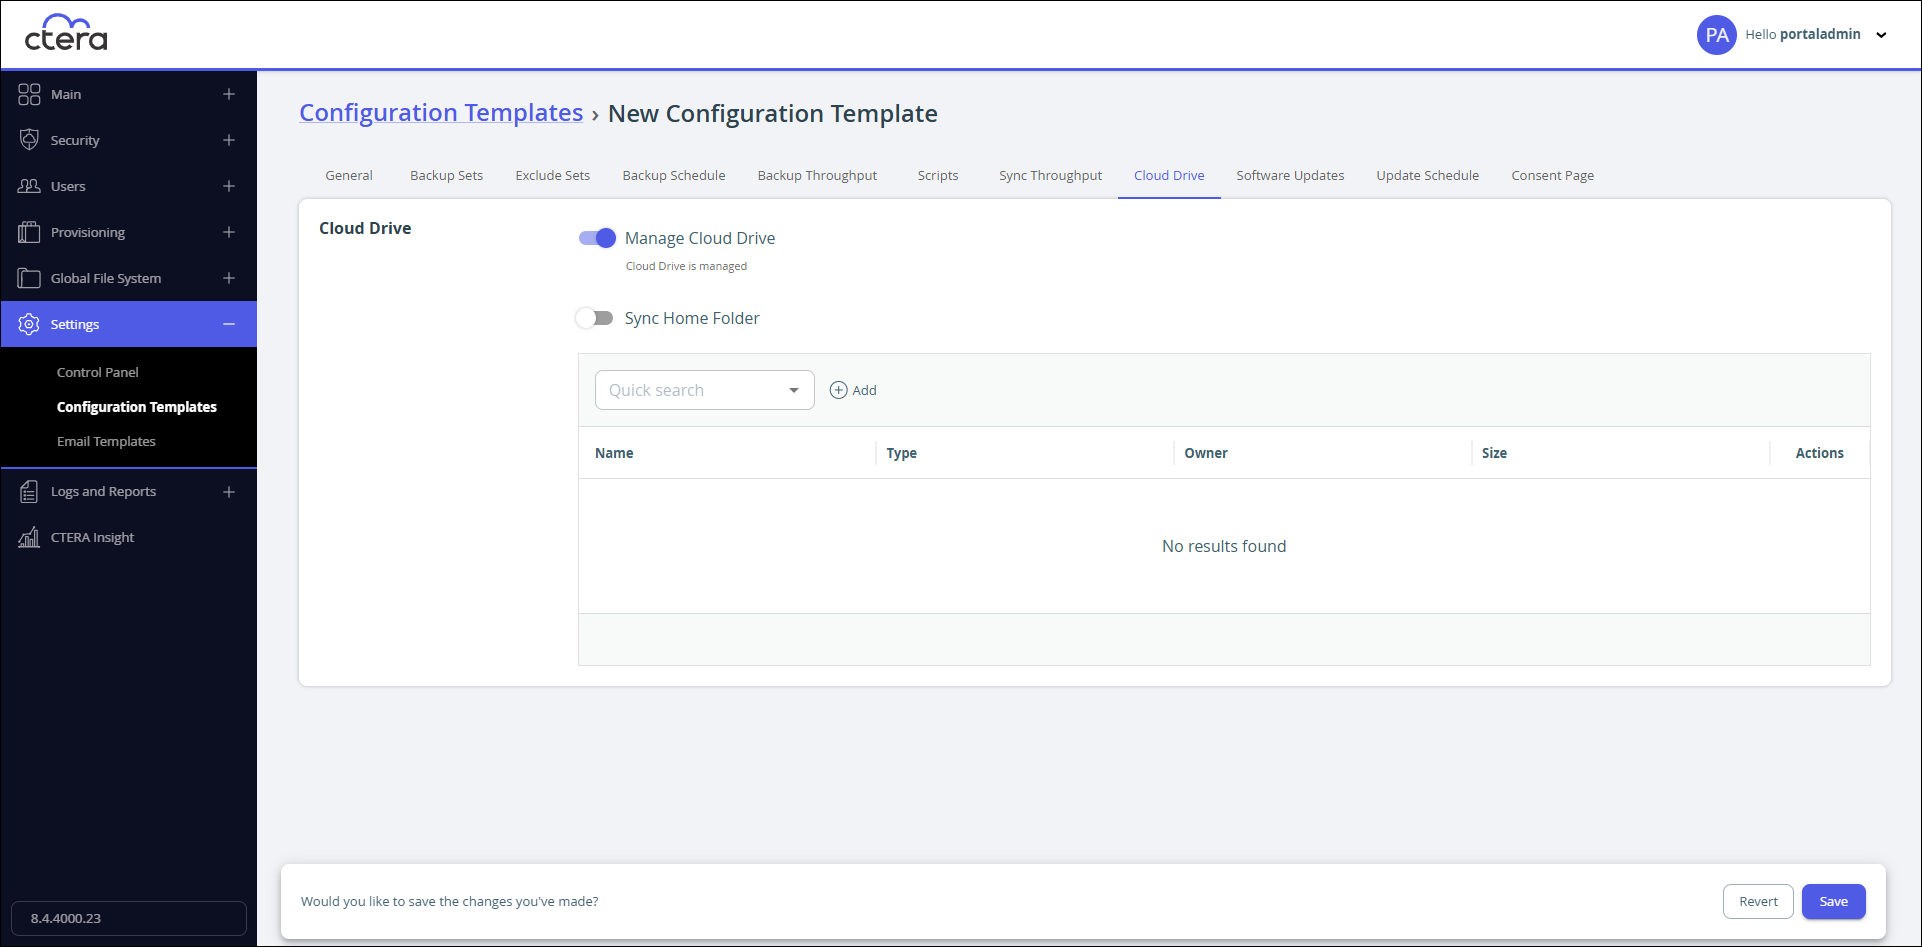
- To sync the home folder, slide Sync Home Folder on and then click Settings.
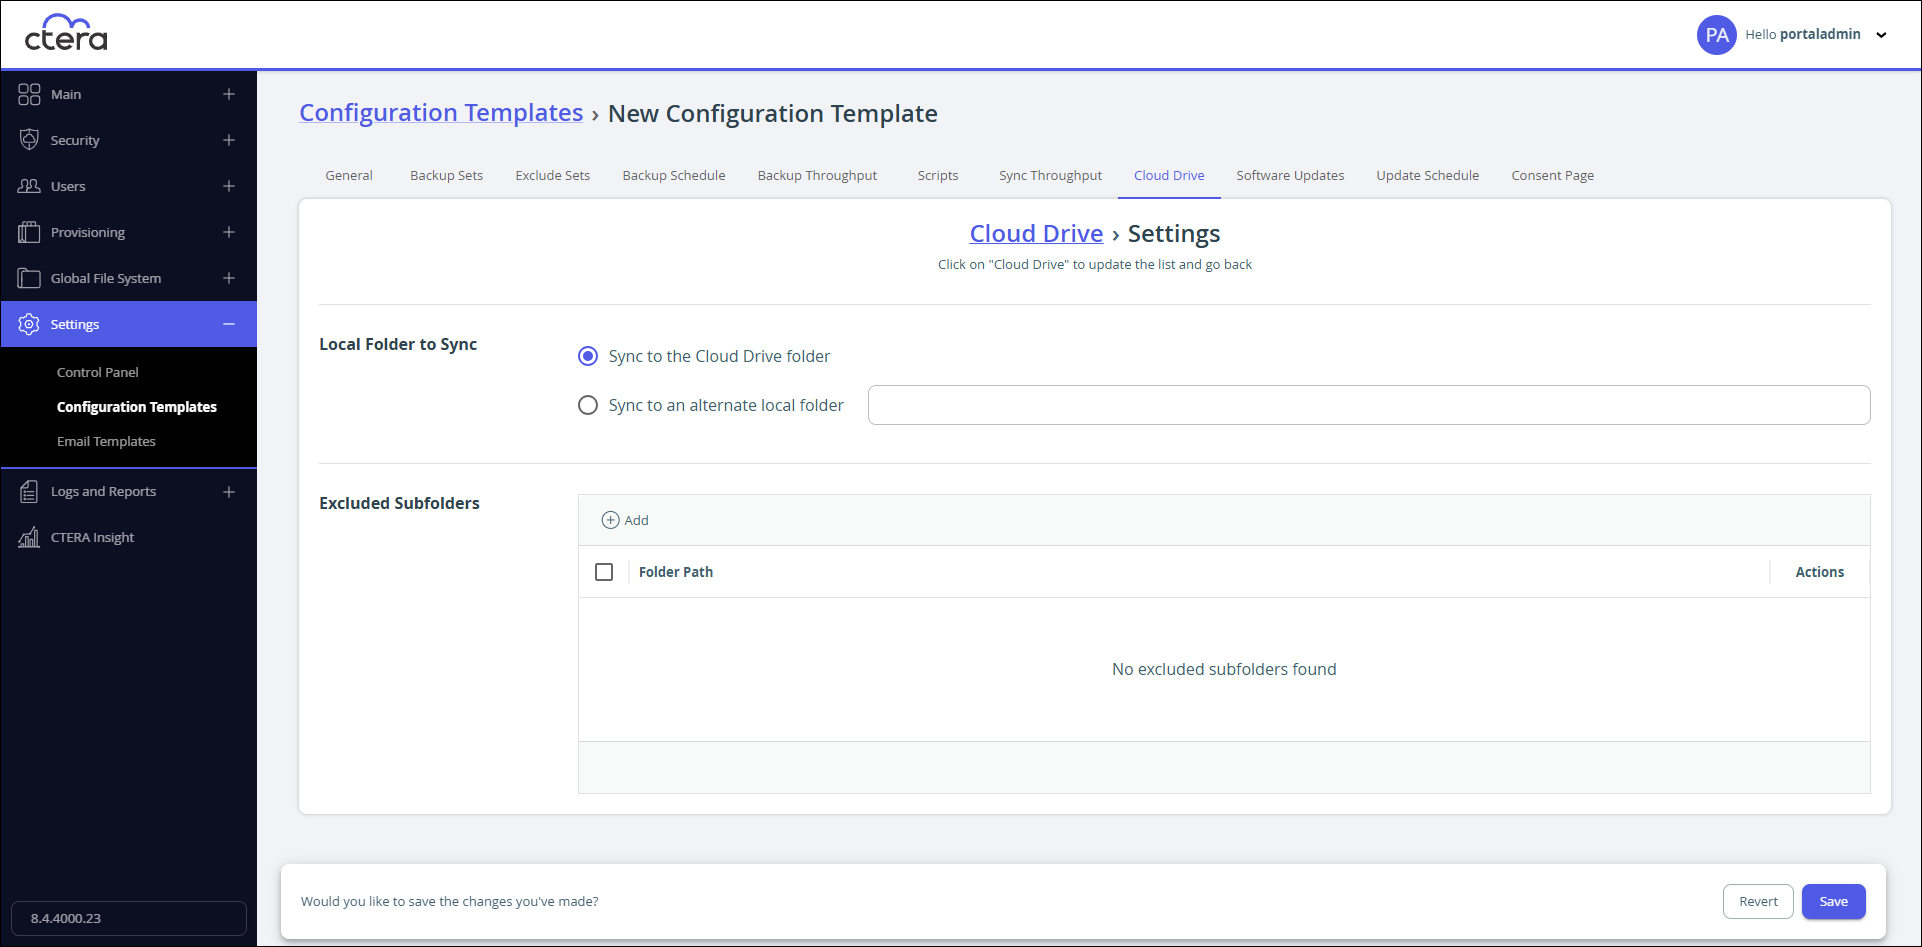
- Set which local folder on the device the cloud drive home folder should be synced:
- Sync to the Cloud Drive folder or,
- Sync to an alternative local folder
Use one of the environment variables described in Backup Sets.
- Exclude subfolders: Click Add in the Excluded Subfolders section.
A row is added to the table. - Click in the row and enter the folder path of a subfolder to exclude from syncing.
- Click in the Actions column.
Note
To edit the folder path, click
in the row to edit.
To remove an excluded folder, click in the row to remove. - Click Cloud Drive in Cloud Drive > Settings to return to the Cloud Drive tab.
- Set which local folder on the device the cloud drive home folder should be synced:
- To add more cloud drive folders to sync with the device:
- Click in the Quick Search field and type a search string to search for the name of a cloud drive folder you want to add.
All the folders that include the search string in their names are displayed. - Select the folder you want to add.
- Click Add.
The folder is added to the list.
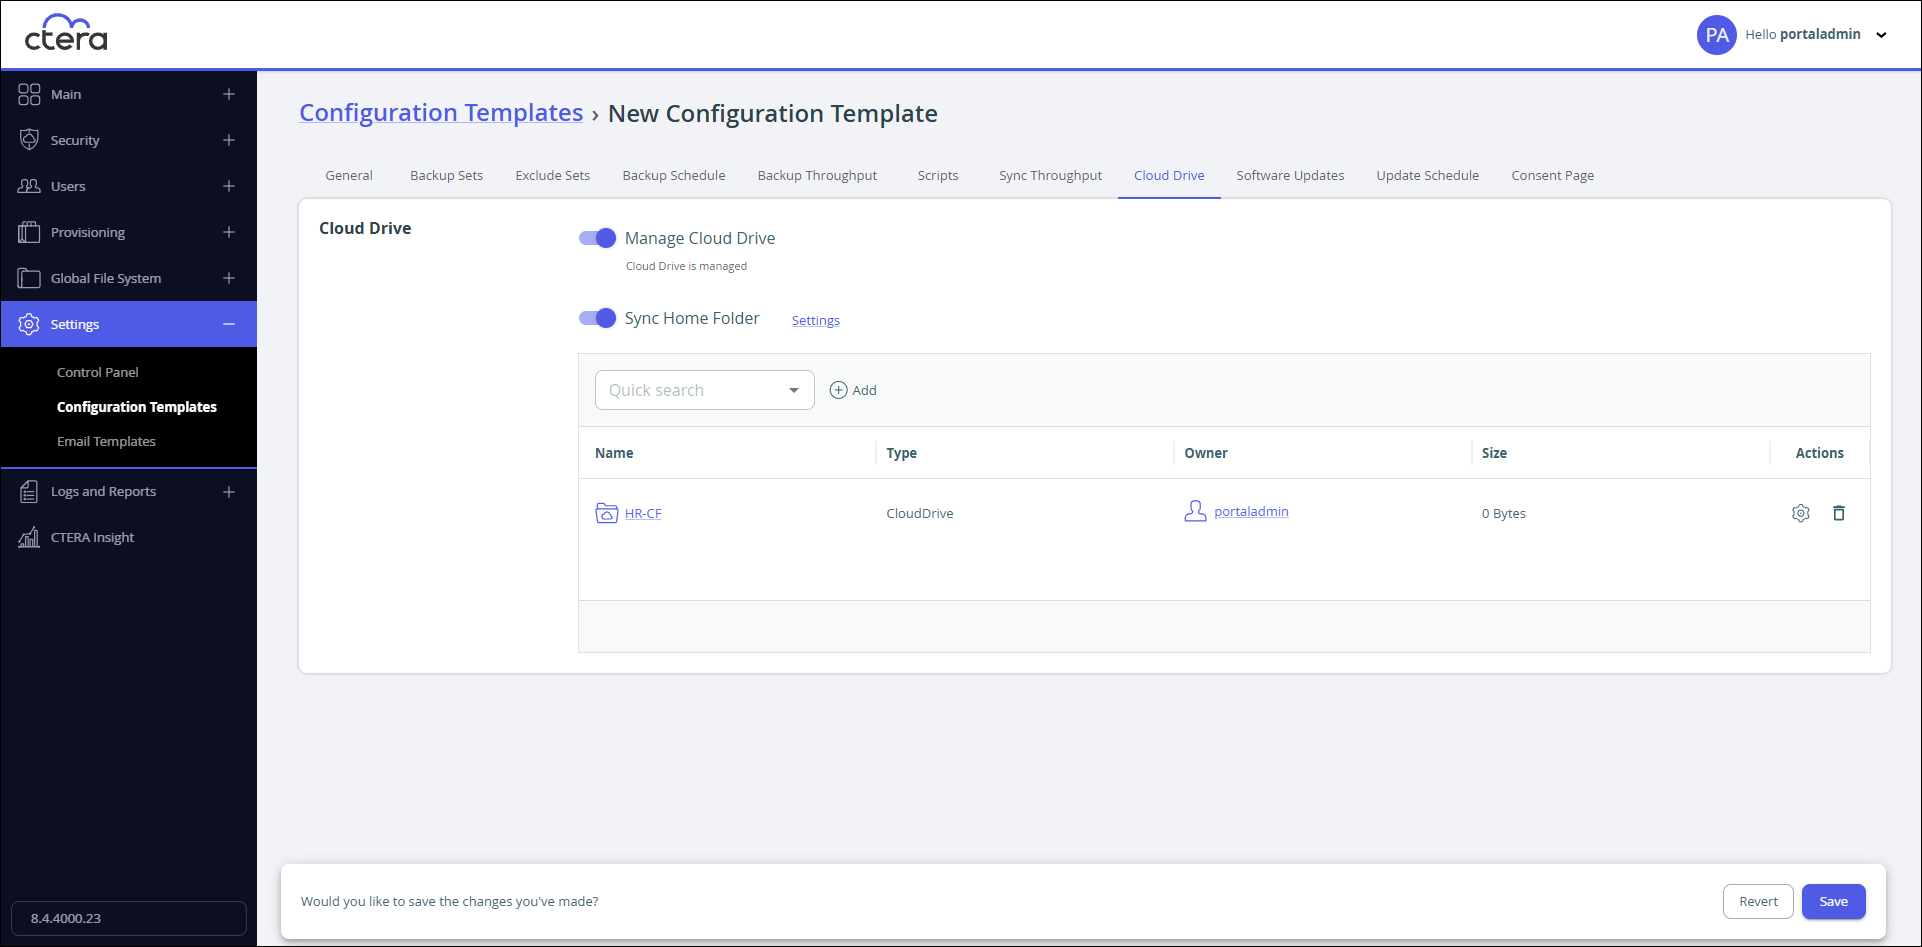
- To set which folder on the device the folder should sync with, click
 in the row.
 - Set which local folder on the device the cloud drive folder should be synced and subfolders that should be excluded, as described in step 3 above.
- Click in the Quick Search field and type a search string to search for the name of a cloud drive folder you want to add.
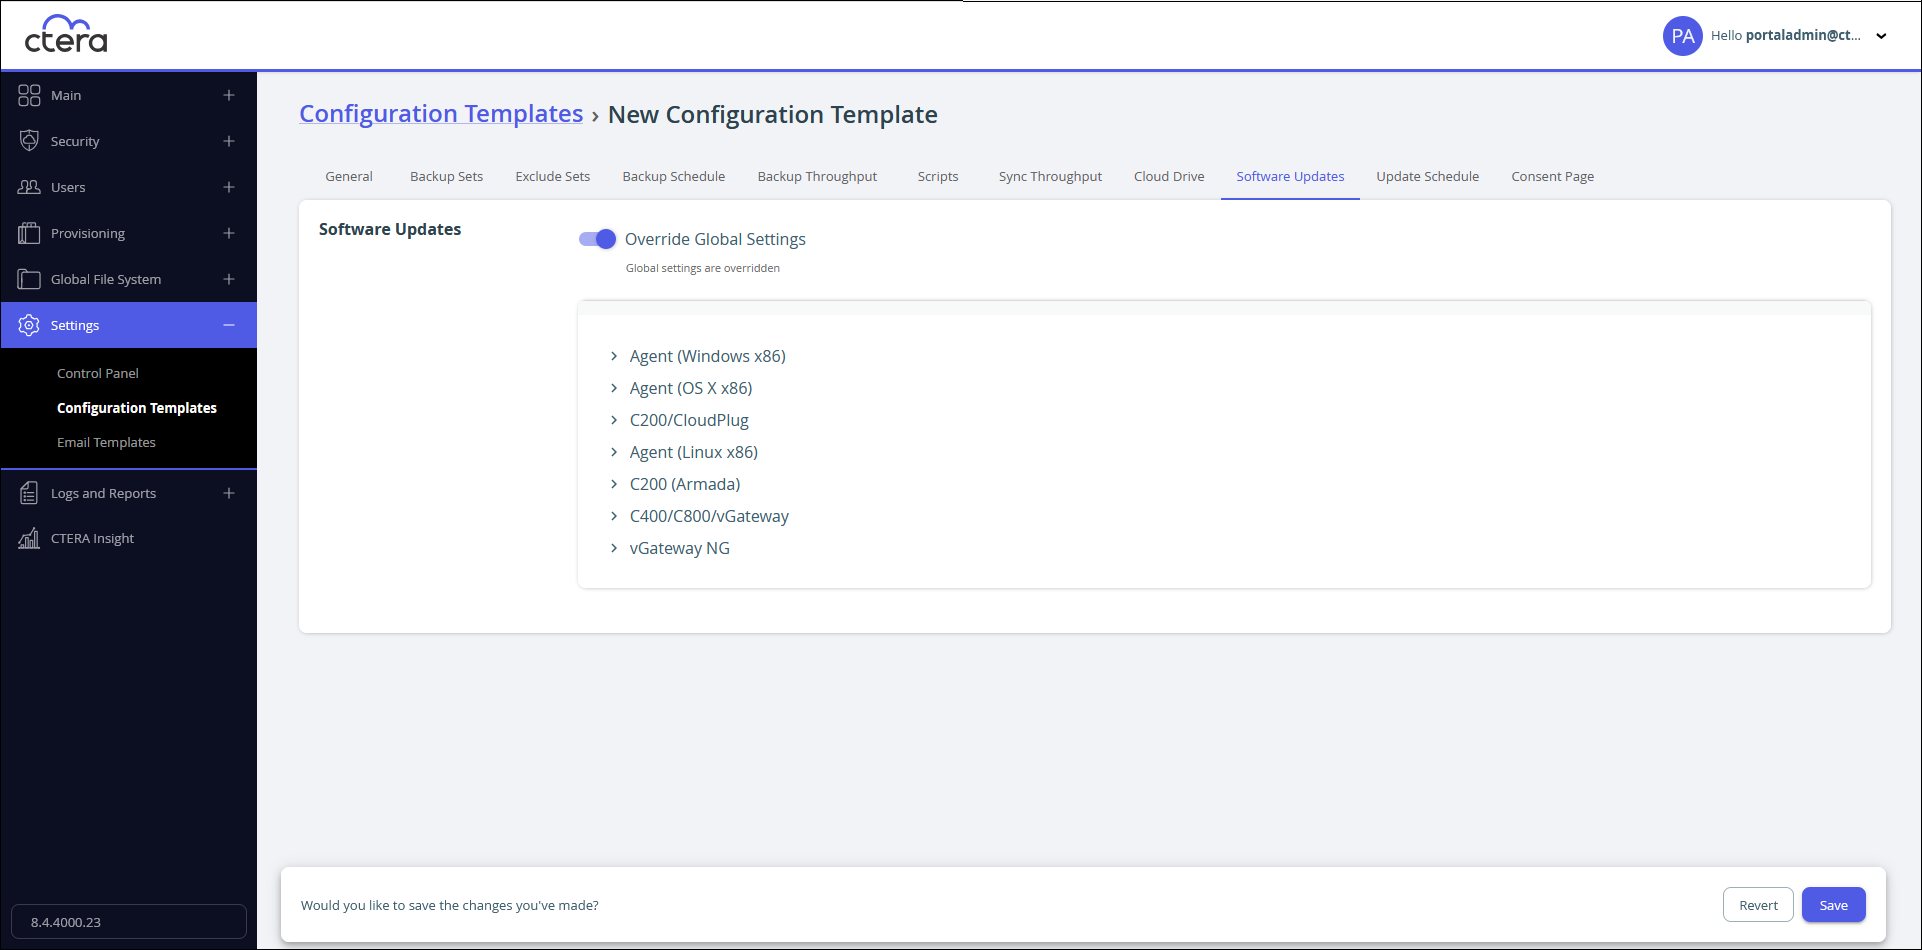
Software Updates
When you mark a firmware image as the current firmware image, all devices that are of the relevant device platform, assigned to this template, and set to automatically download firmware images will download this firmware image.
There can only be one current firmware image per device platform.
To mark a firmware image as the current firmware image:
- In the configuration template page, select the Software Updates tab.

- Click Override Global Settings.
 Note
NoteThe list of available firmware is what the global administrator has uploaded to the portal.
- Select the desired firmware image.
- Click Mark as Current.
The selected firmware image becomes the current firmware image and is marked with .
.
Update schedule
You can configure your devices to automatically download and install firmware updates.
To configure automatic firmware updates:
- In the configuration template page, select the Update Schedule tab.

- Slide Manage Update Schedule on.
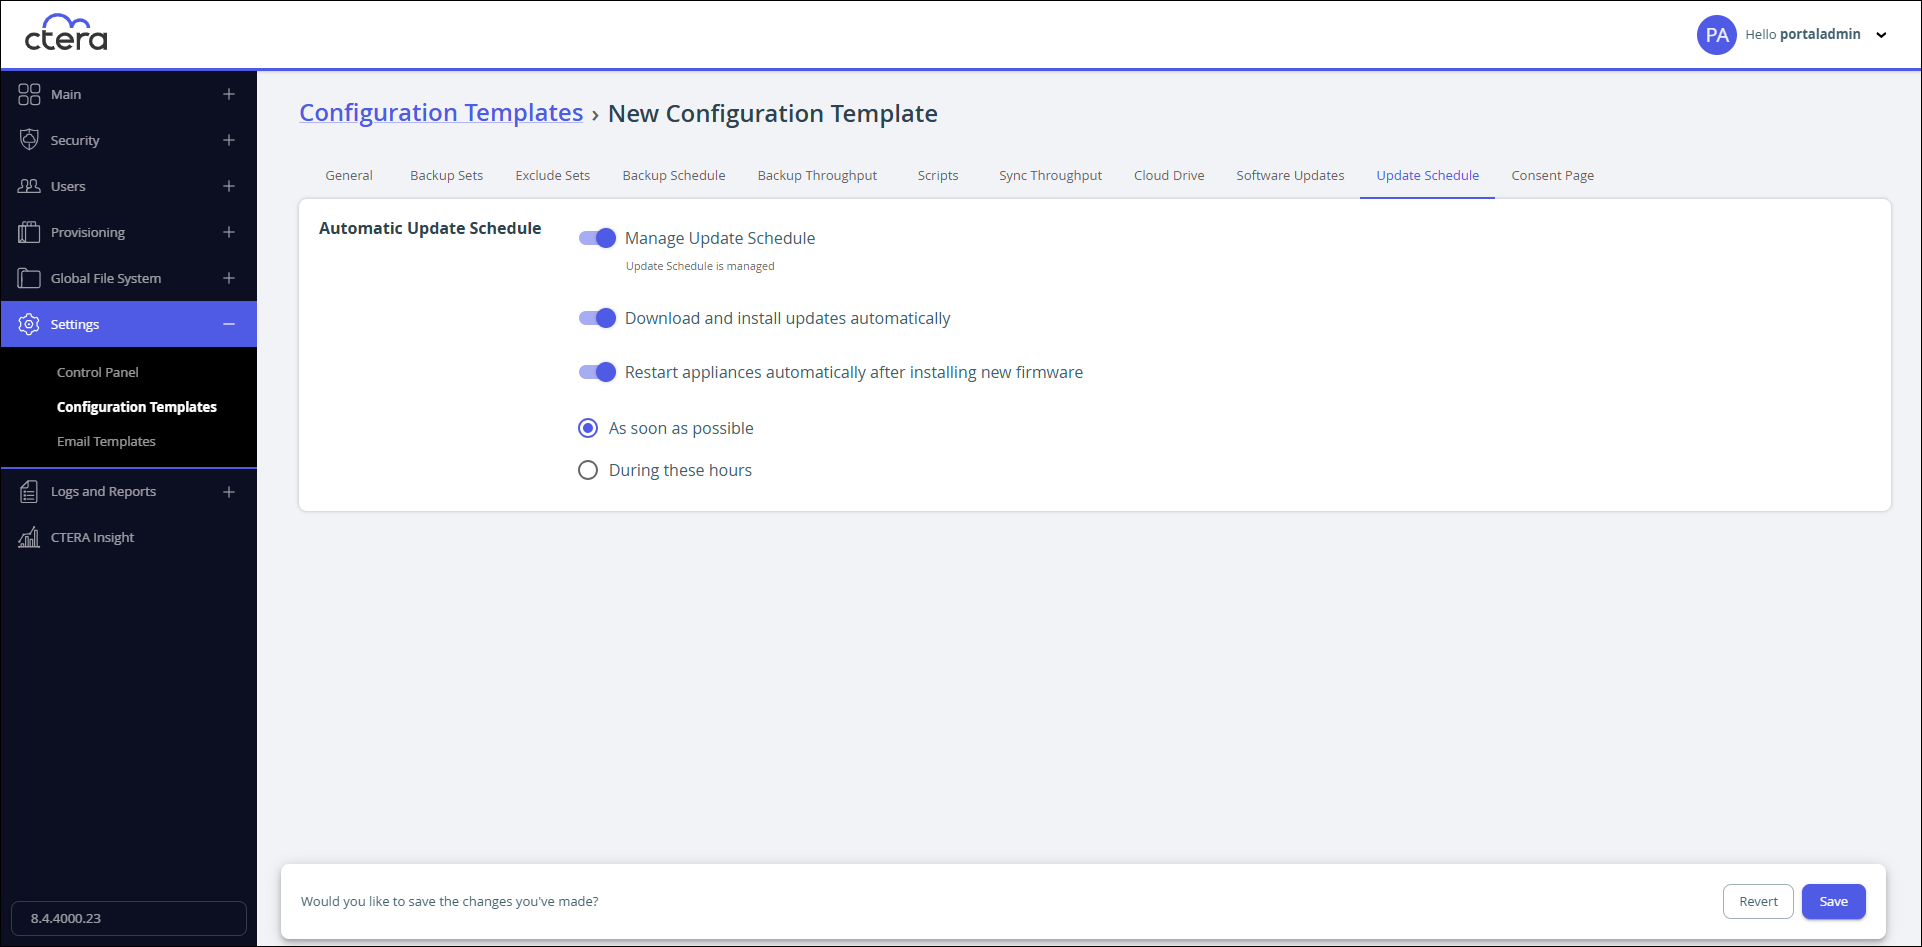
- Configure the firmware update schedule.
Download and install updates automatically – The CTERA Portal downloads and installs firmware updates automatically. If you do not select this option, device owners must perform firmware updates manually.
Restart appliances automatically after installing new firmware – CTERA Edge Filers automatically reboot after installing a firmware update.
As soon as possible – Reboot as soon as possible after a firmware update. In this case, CTERA Edge Filers reboot as soon as it is recommended to do so. For example, the automatic reboot might be deferred, if the CTERA Edge Filer while the antivirus feature is being enabled.
During these hours – To reboot only during specific hours.
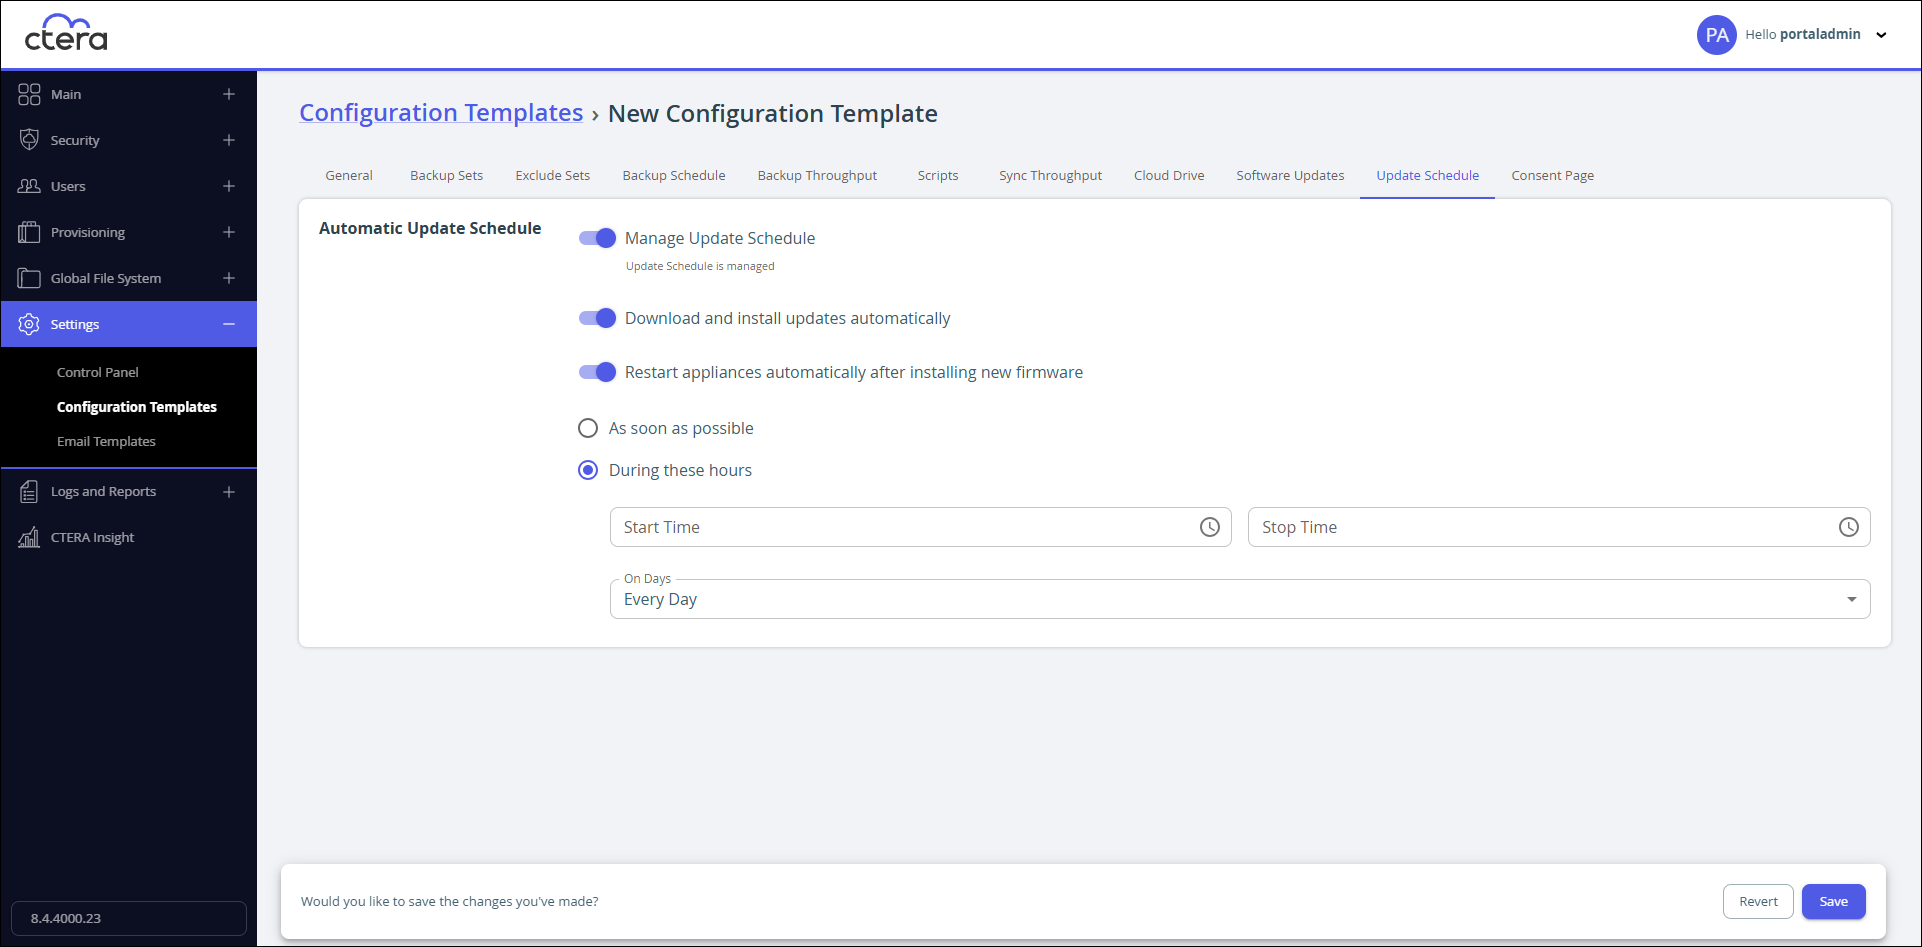
Start Time – The time that the update can start.
Stop Time – The time that the update must stop.
On Days – The days on which an update can be performed. This can be any of the following:- Updates can be performed on one or more specific days
- Every Day (default). Updates can be performed every day.
Consent Page
You can configure devices that are connected to a CTERA Portal to display a consent page before the user can log in to the device. Only after the user accepts the terms in the consent page can the user log in.
To configure a consent page:
- In the configuration template page, select the Consent Page tab.

- Slide Display consent page before login on.
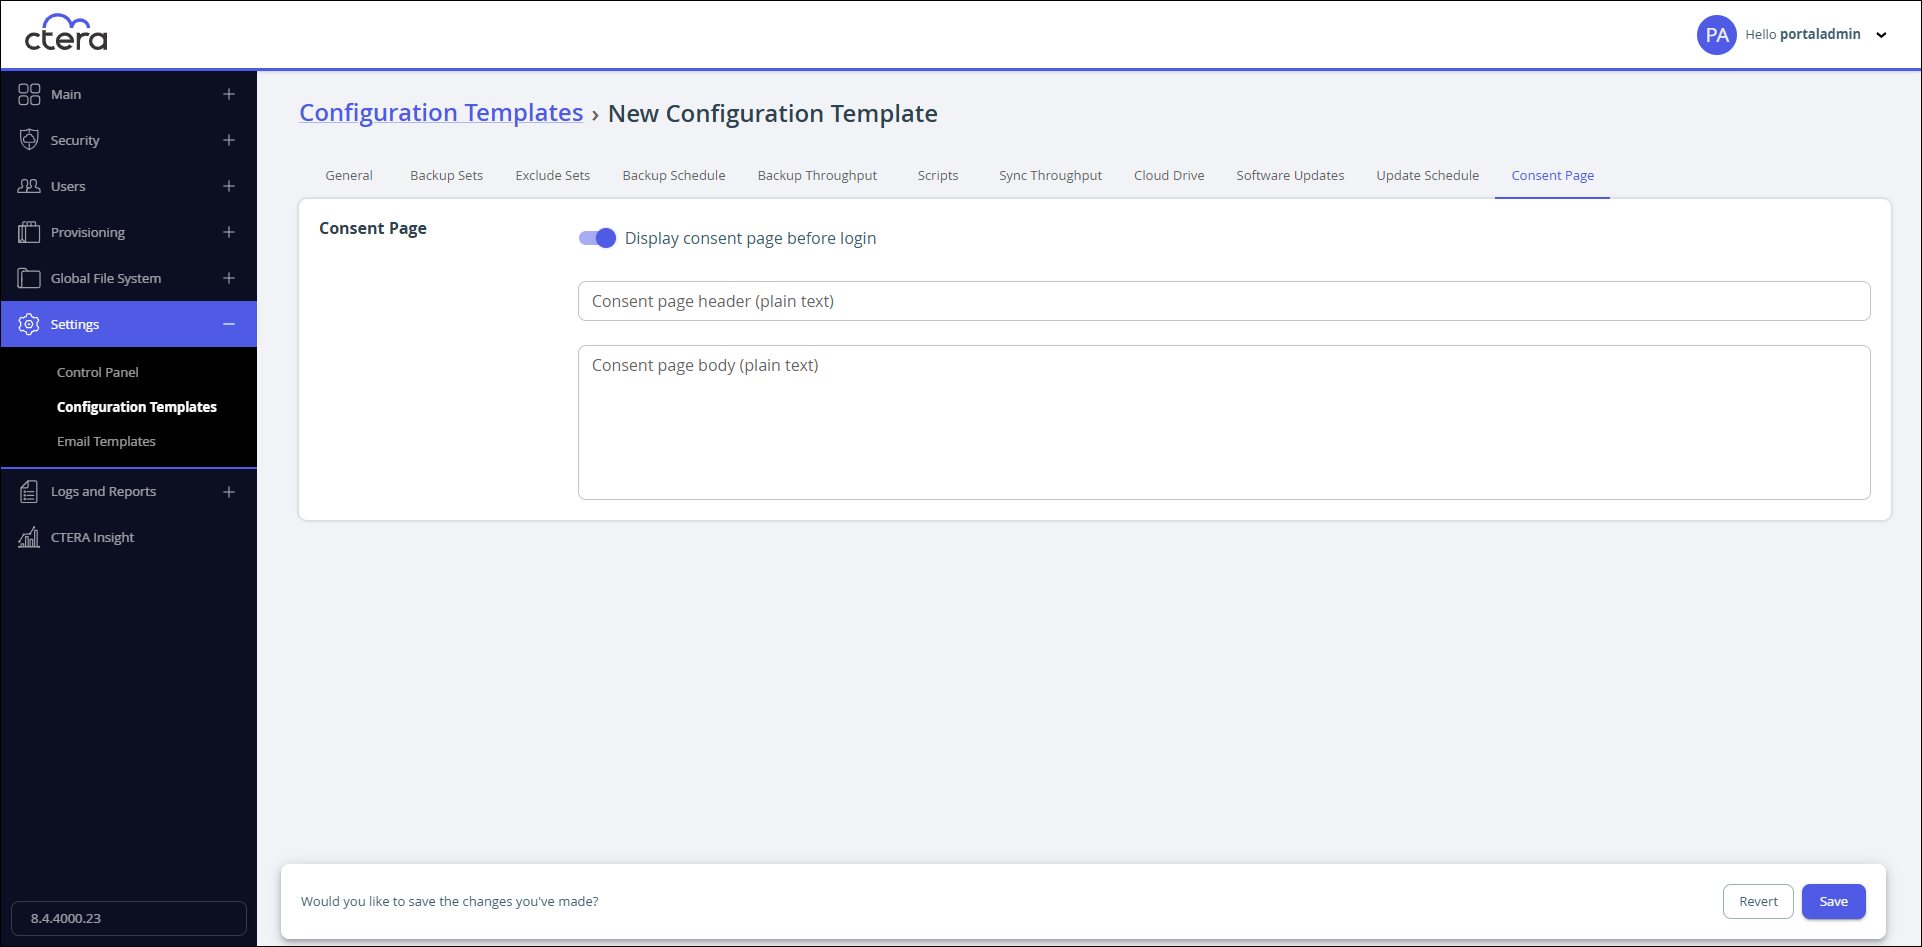
- Enter the text for the consent page header, as plain text.
- Enter the text for the consent page body, as plain text.